A Gloucestershire Wassail, dating to the Middle Ages.
Yesterday was the 6th of January, the final feast day of Christmas, the day of epiphany, Twelfth Night. Down in the counties of South-West and South-East England a very old and special ceremony takes place in the apple orchards; the Wassail was a way to celebrate the end of Christmas and to bless the trees so that they will bear plenty of fruit for the cider. It was a time of celebration and merry-making. All of this happened at dusk, a magical time of day, where the world faeries and spirits overlapped with the world of Man. In different parts of England, the day upon which the Wassail occurs changes: some celebrate it on the 5th of January (the Eve of Epiphany), and others on the 17th of January (this is day Twelfth Night would occur before the Introduction of the Gregorian Calendar, “Old Twelfthy Night”, as it was called).
A blurry, dusky Levenshulme Community Choir leading our Wassail
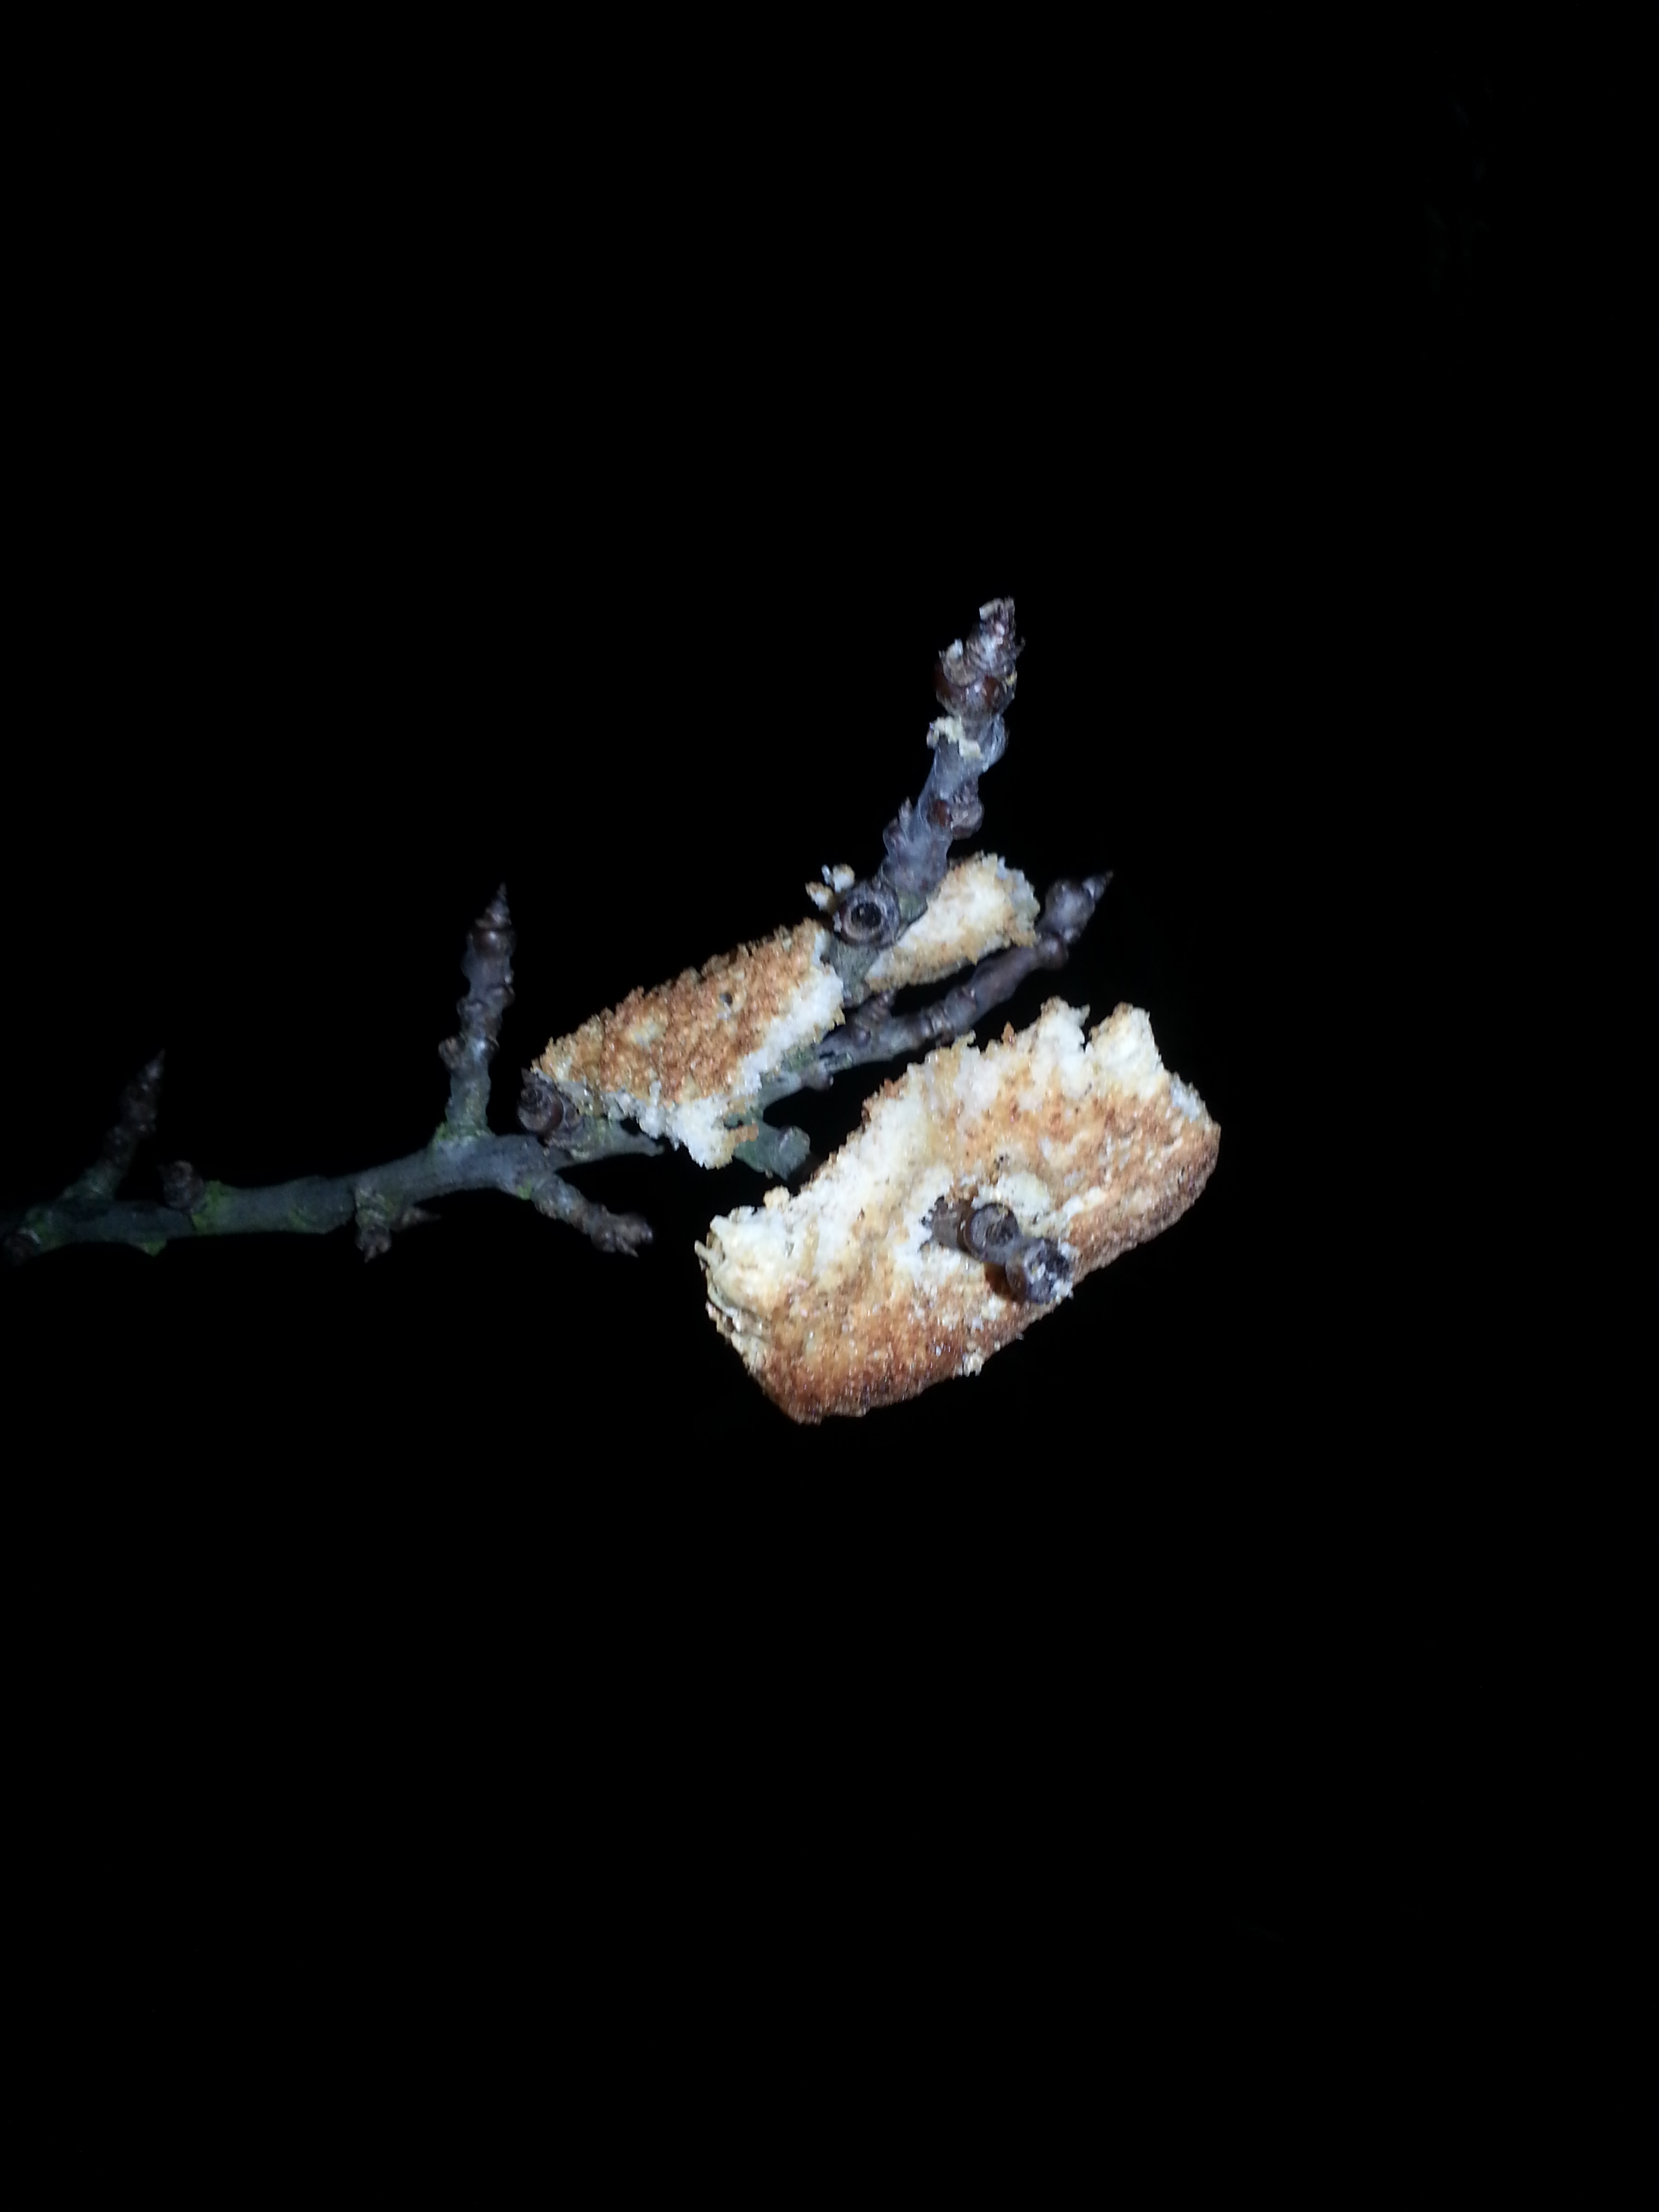
For the Wassail ceremony a Wassail King and Queen are nominated who lead the other revellers a merry dance around the trees. In the largest trees, the Queen is lifted into the boughs so she can spear pieces of toast that have been soaked in Wassail punch (I’ll get to that in a moment or two) as an offering to the tree spirits of the orchard. As folk dance about the trees, other run around banging pots and pans to drive out the evil spirits.
Wassailing predates the Battle of Hastings and is thought to have its origins in Ancient Rome, where people would make sacrifices to the Pomona, the Roman Goddess of Fruits. The word Wassail originates from the Anglo-Saxon waes-hael, meaning “to your health” and the word is used just as we would use Cheers! today. Below is one telling of its origins by Geoffrey of Monmouth in his 1135 book History of the Kings of Britain:
While Vortigern was being entertained at a royal banquet, the girl Renwein came out of an inner room carrying a golden goblet full of wine. She walked up to the King, curtsied low, and said “Lavert King, was hail!” When he saw the girl’s face, Vortigern was greatly struck by her beauty and was filled with desire for her. He asked his interpreter what it was that the girl had said and what he ought to reply to her. “She called you Lord King and did you honour by drinking your health. What you should reply is ‘drinc hail.'” Vortigern immediately said the words “drinc hail” and ordered Renwein to drink. Then he took the goblet from her hand, kissed her and drank in his turn. From that day to this, the tradition has endured in Britain that the one who drinks first at a banquet says “was hail” and he who drinks next says “drinc hail.”
I was lucky enough to go to a Wassail in Levenshulme in Manchester, which is not in the south of England, but the north. In Levenshulme there is a lovely community orchard, and it should be blessed just like any other. It was a great evening and really interesting to see just a glimpse of old England. If you have apple – or any fruit – trees, they why not have a Wassail. Indeed anything that needed blessing could wassailed like other crops like barley and livestock. Of course you’ll need to make some wassail to drink…
Spiking the trees with toast offerings
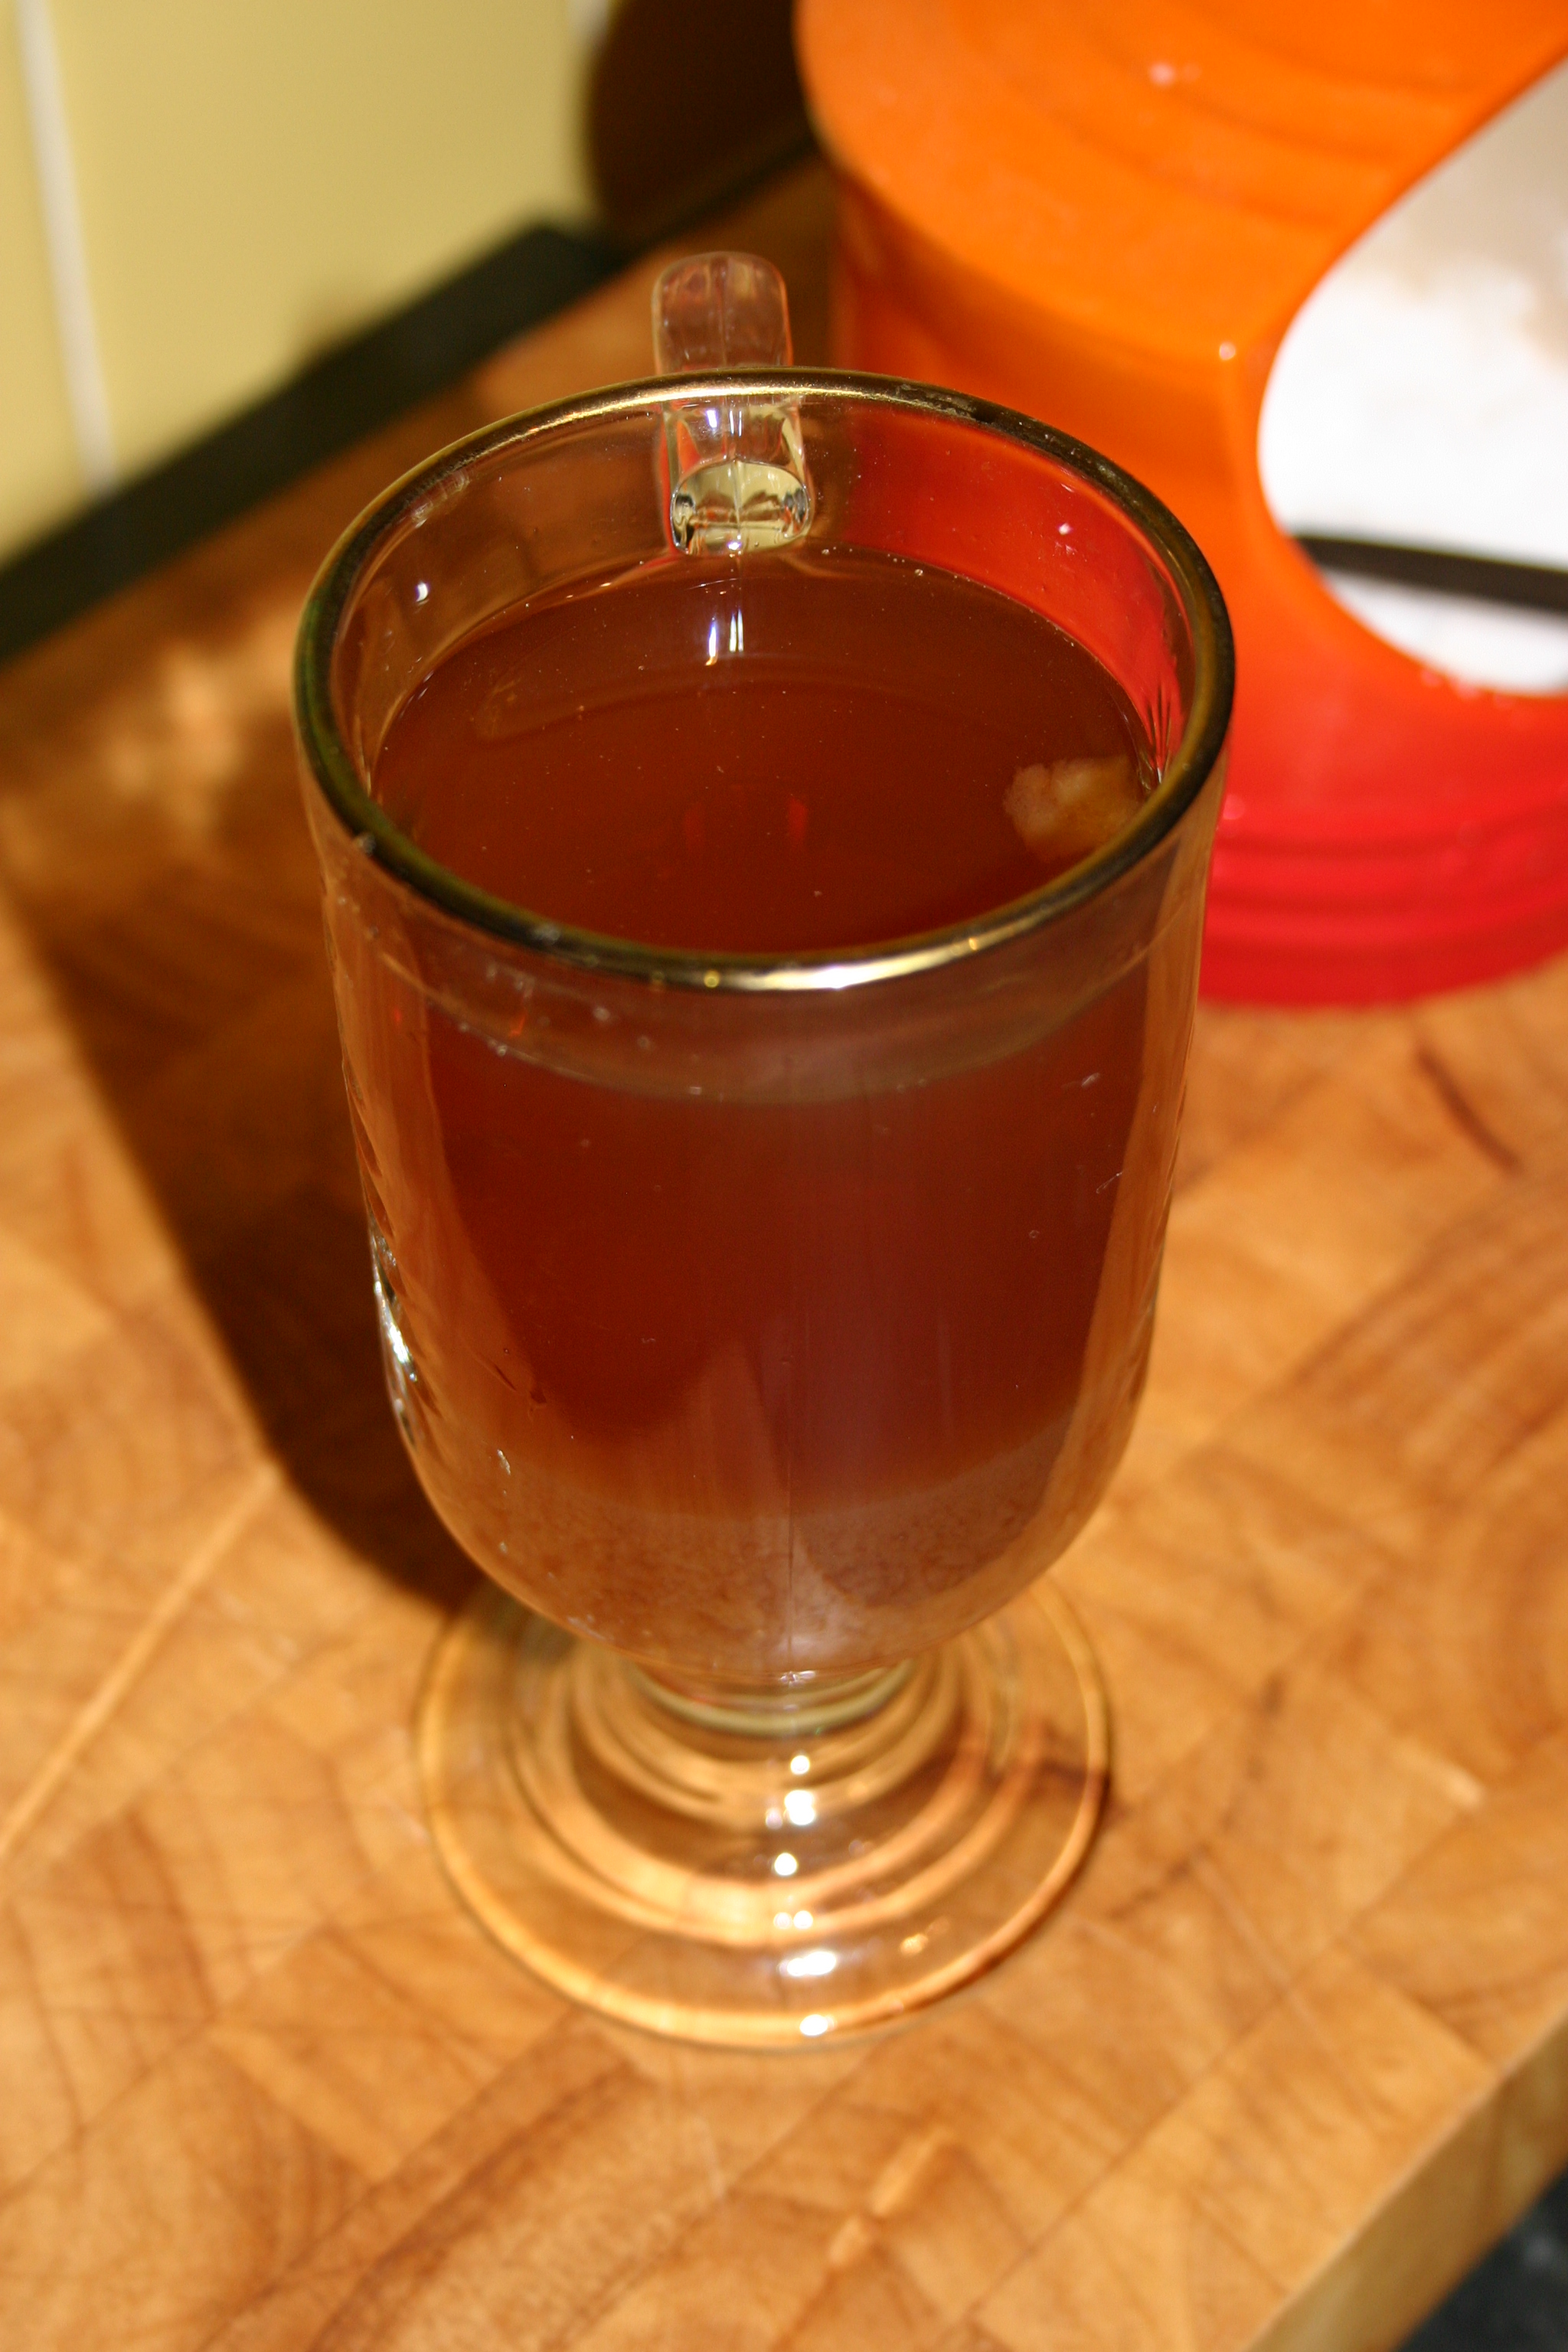
The drink wassail is essentially a hot mulled cider or ale, sweetened with sugar and made aromatic with spices and made much boozier with sherry, brandy or sack (a sweet, fortified ale similar in taste to sherry) and sometimes thickened with eggs. An essential ingredient in the wassail drink is roasted apples, which would quickly burst and fall apart, giving wassail its alternative name ‘lamb’s wool’. Also floating on the surface would be plenty of toast.
The hot wassail is poured into a large carved wooden bowl and it is passed around the crowd so that everyone can take a good mouthful, raise it above their head and shout “Wassail!”. It is because of this celebration, we “raise a toast” when having drinks.
Two Wassail Recipes
Here’s a recipe dating from 1722 that appears in the excellent book Food in England by Dorothy Squires:
Take 1 lb. of brown sugar, 1 pint of hot beer, a grated nutmeg, and a large lump of preserved ginger root cut up. Add 4 glasses of sherry, and stir well. When cold, dilute with 5 pints of cold beer, spread suspicion of yeast on to hot slices of toasted bread, and let it stand covered for several hours. Bottle off and seal down, and in a few days it should be bursting the corks, when it should be poured out into the wassail bowl, and served with hot, roasted apples floating in it.
I liked that it is diluted with beer! What brew it must have been.
Below is my rather pared down recipe for wassail:
Ingredients:
4 to 6 apples
3 litres of good cider
6 cinnamon sticks
dark rum, to taste
soft dark brown sugar, to taste
around 500ml of water
toast (optional)
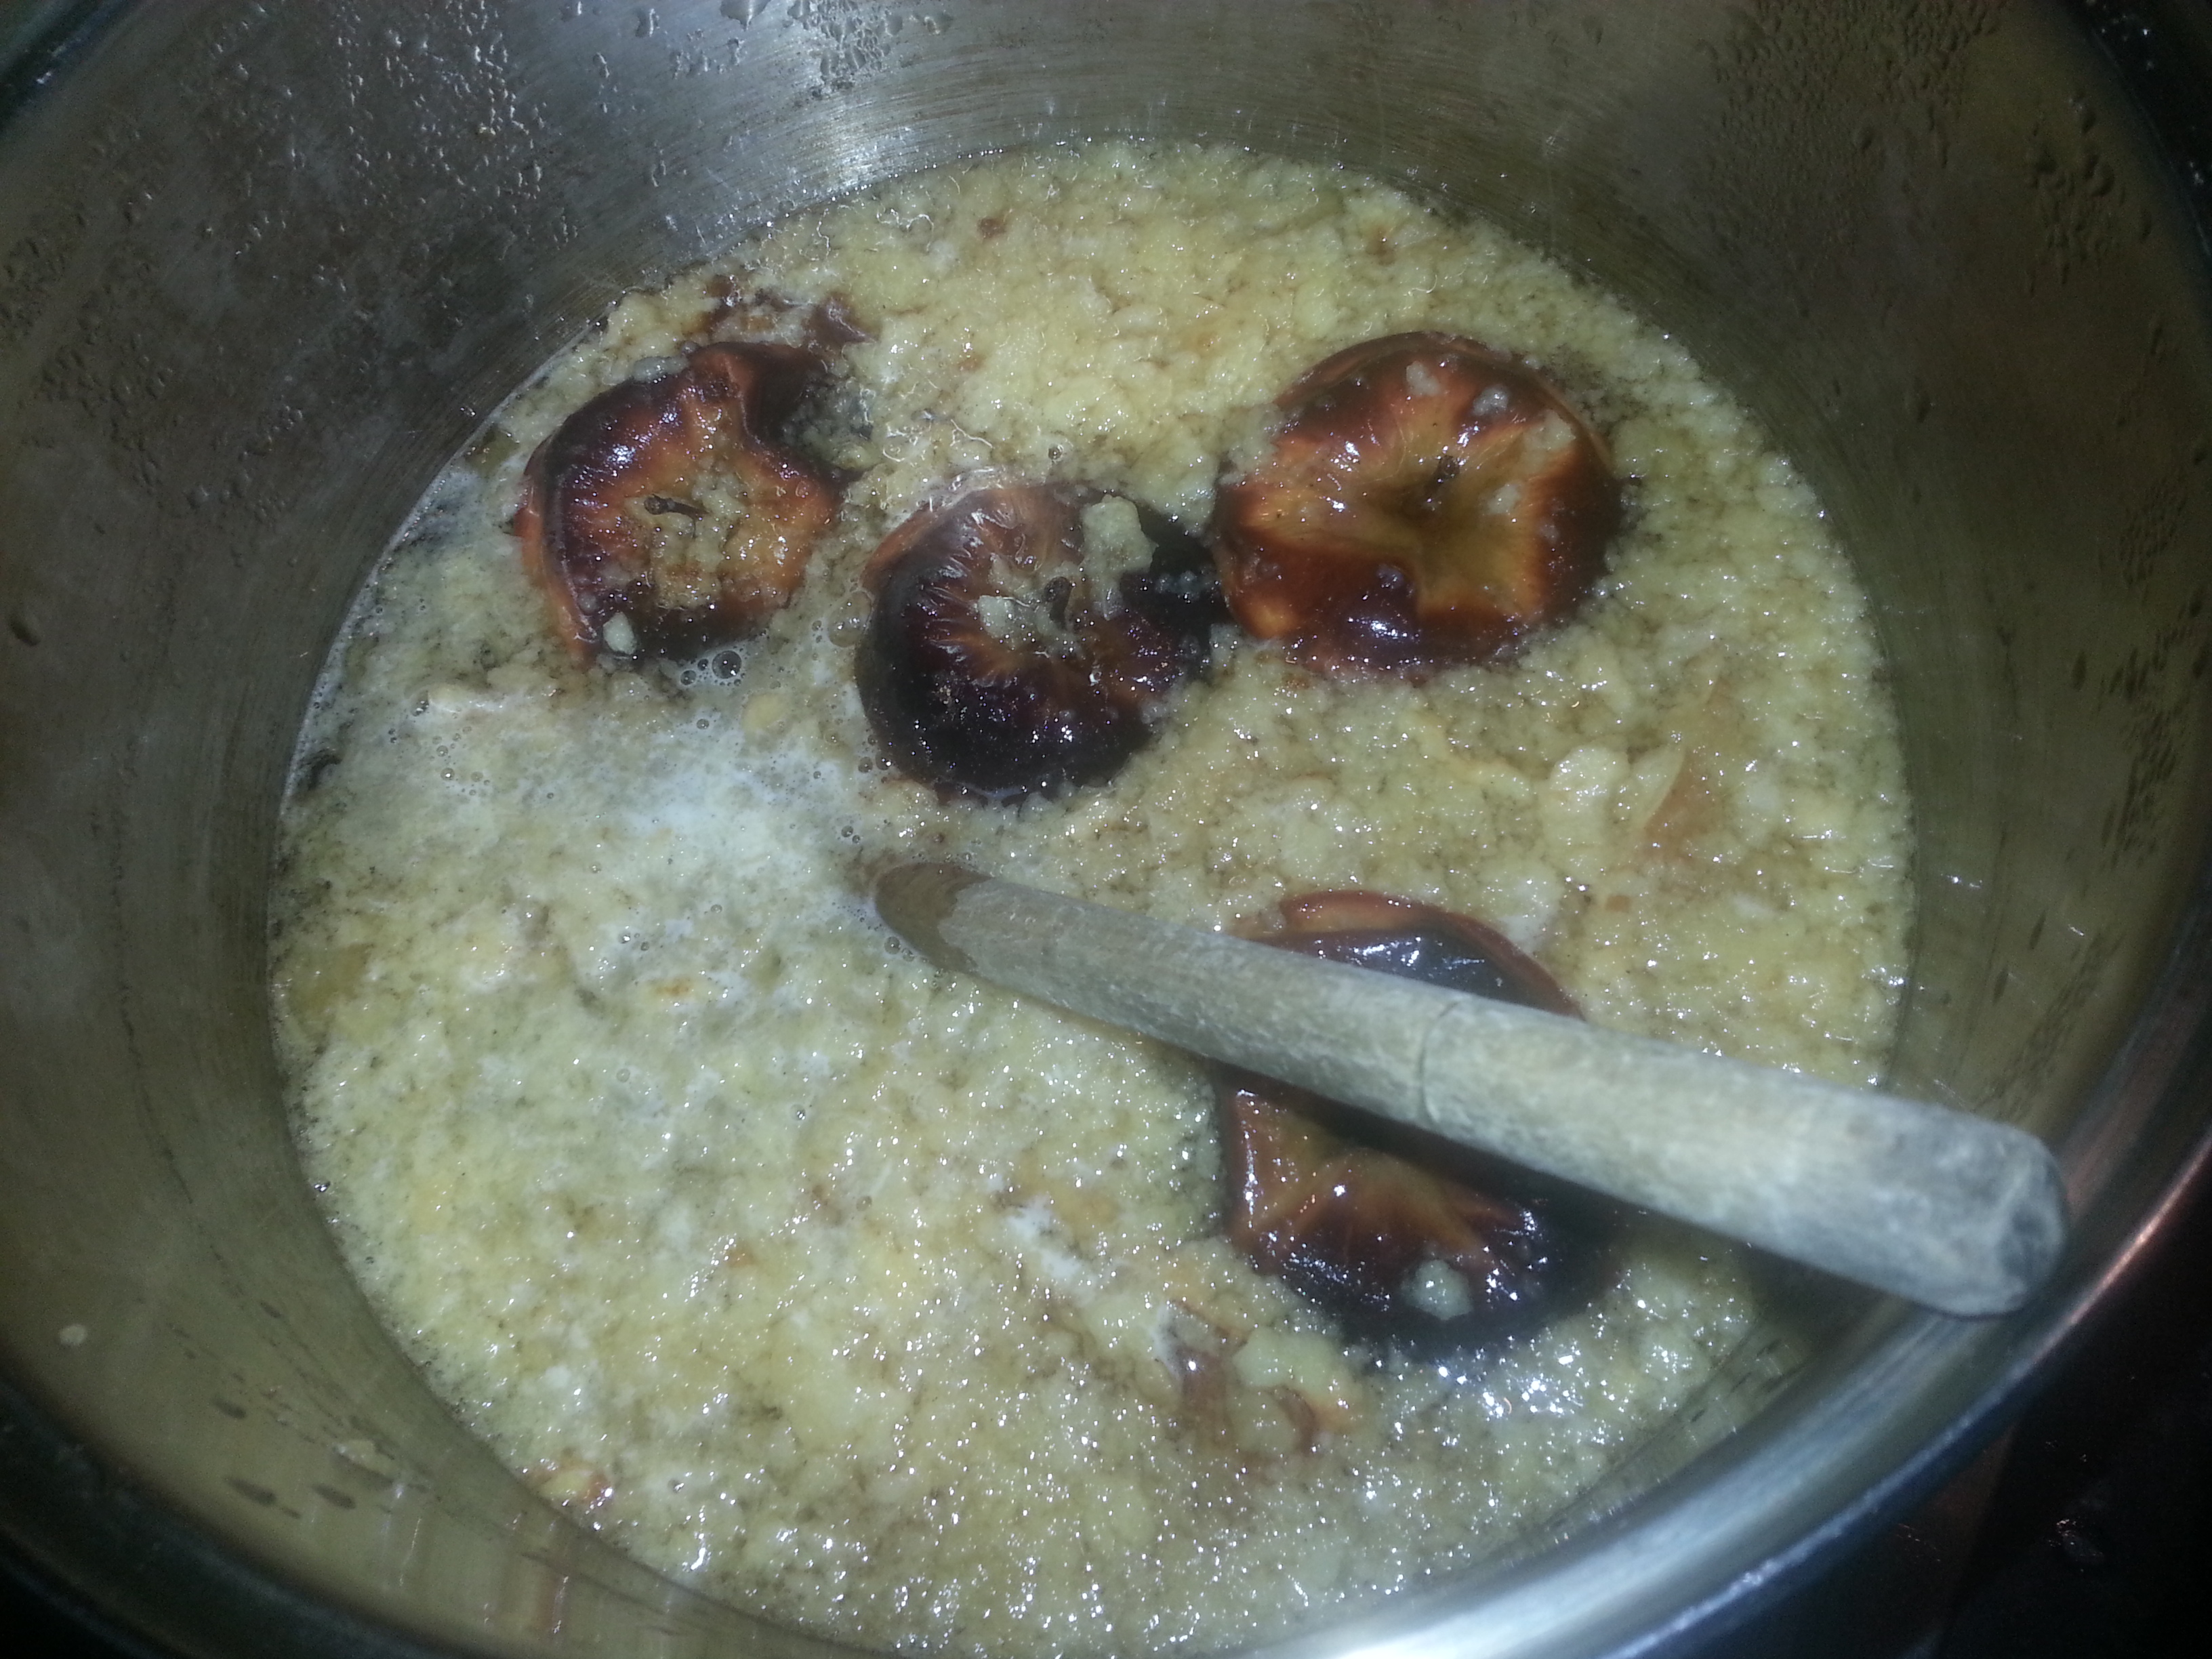
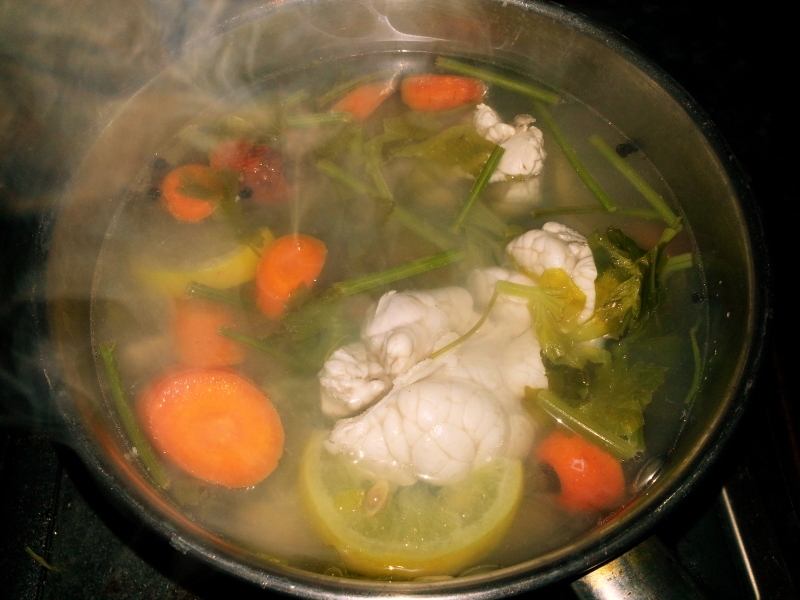
Prepare the apples; cut around them a circle halfway down, this stops them bursting when cooking, place on a tray and bake in a moderate oven until they have begun to collapse, around 30 minutes. Whilst you wait for the oven to do its job, pour the cider into a large pan with the cinnamon stick, at least 3 generous tablespoons of sugar and 250ml of rum and half of the water. Bring to a simmer and add more sugar and rum, and dilute accordingly with more water. Lastly, for tradition’s sake, atop with slices of toast.
If you like the blogs and podcast I produce, please consider treating me to a virtual coffee or pint, or even a £3 monthly subscription: follow this link for more information.
By recent request, I have written another post on fruit curds. I have come up with several more recipes since I wrote the original post and they all originate from a common source; a single recipe that pops up in River Cottage Handbook No.2: Preserves by Pam ‘the Jam’ Corbin. This is a truly excellent book (as are all the RCHandbooks), that deserves a post of its own as part of my rather irregular Favourite Cookbooks series.
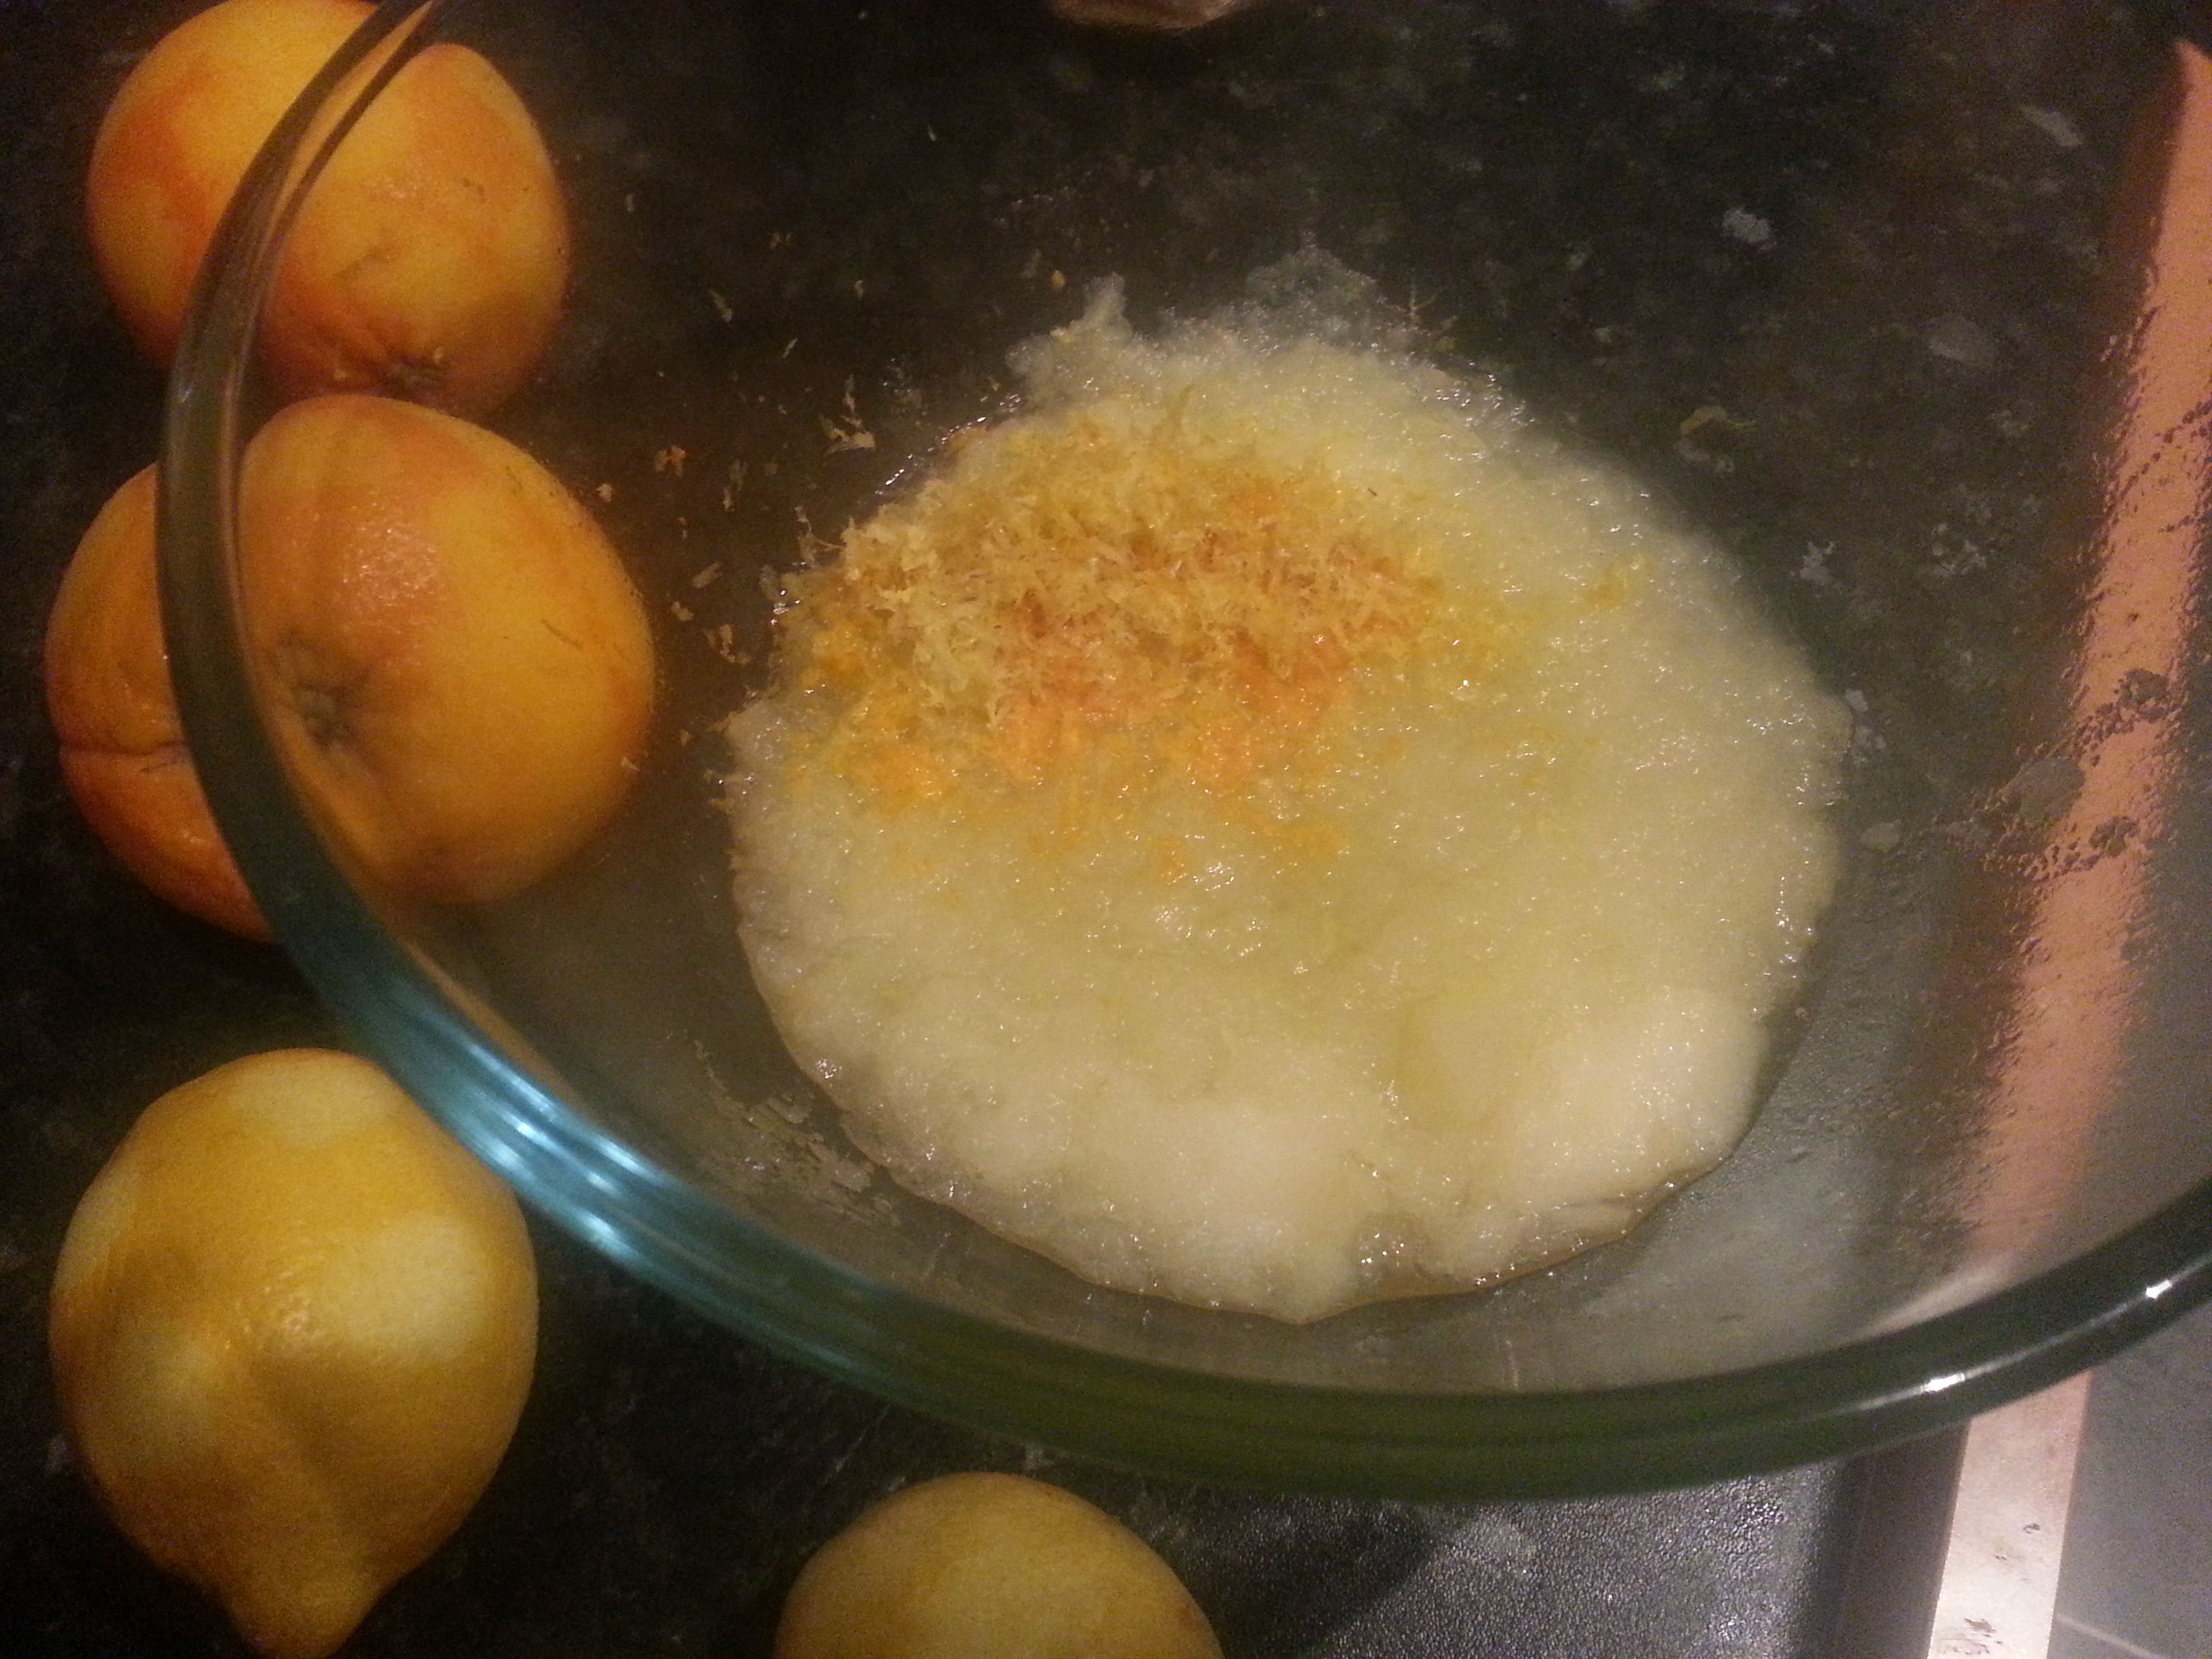
Anyway, this recipe is the best I’ve come across, it is for lemon and Bramley apple curd – and it is ripe for modification. Apple purée is used, giving a great texture, making a light nicely-set curd that needs less sugar than your typical lemon curd. Below is the original recipe that I have only very slightly tweaked, and then there is a few more: blood orange, spiced orange and pink grapefruit.
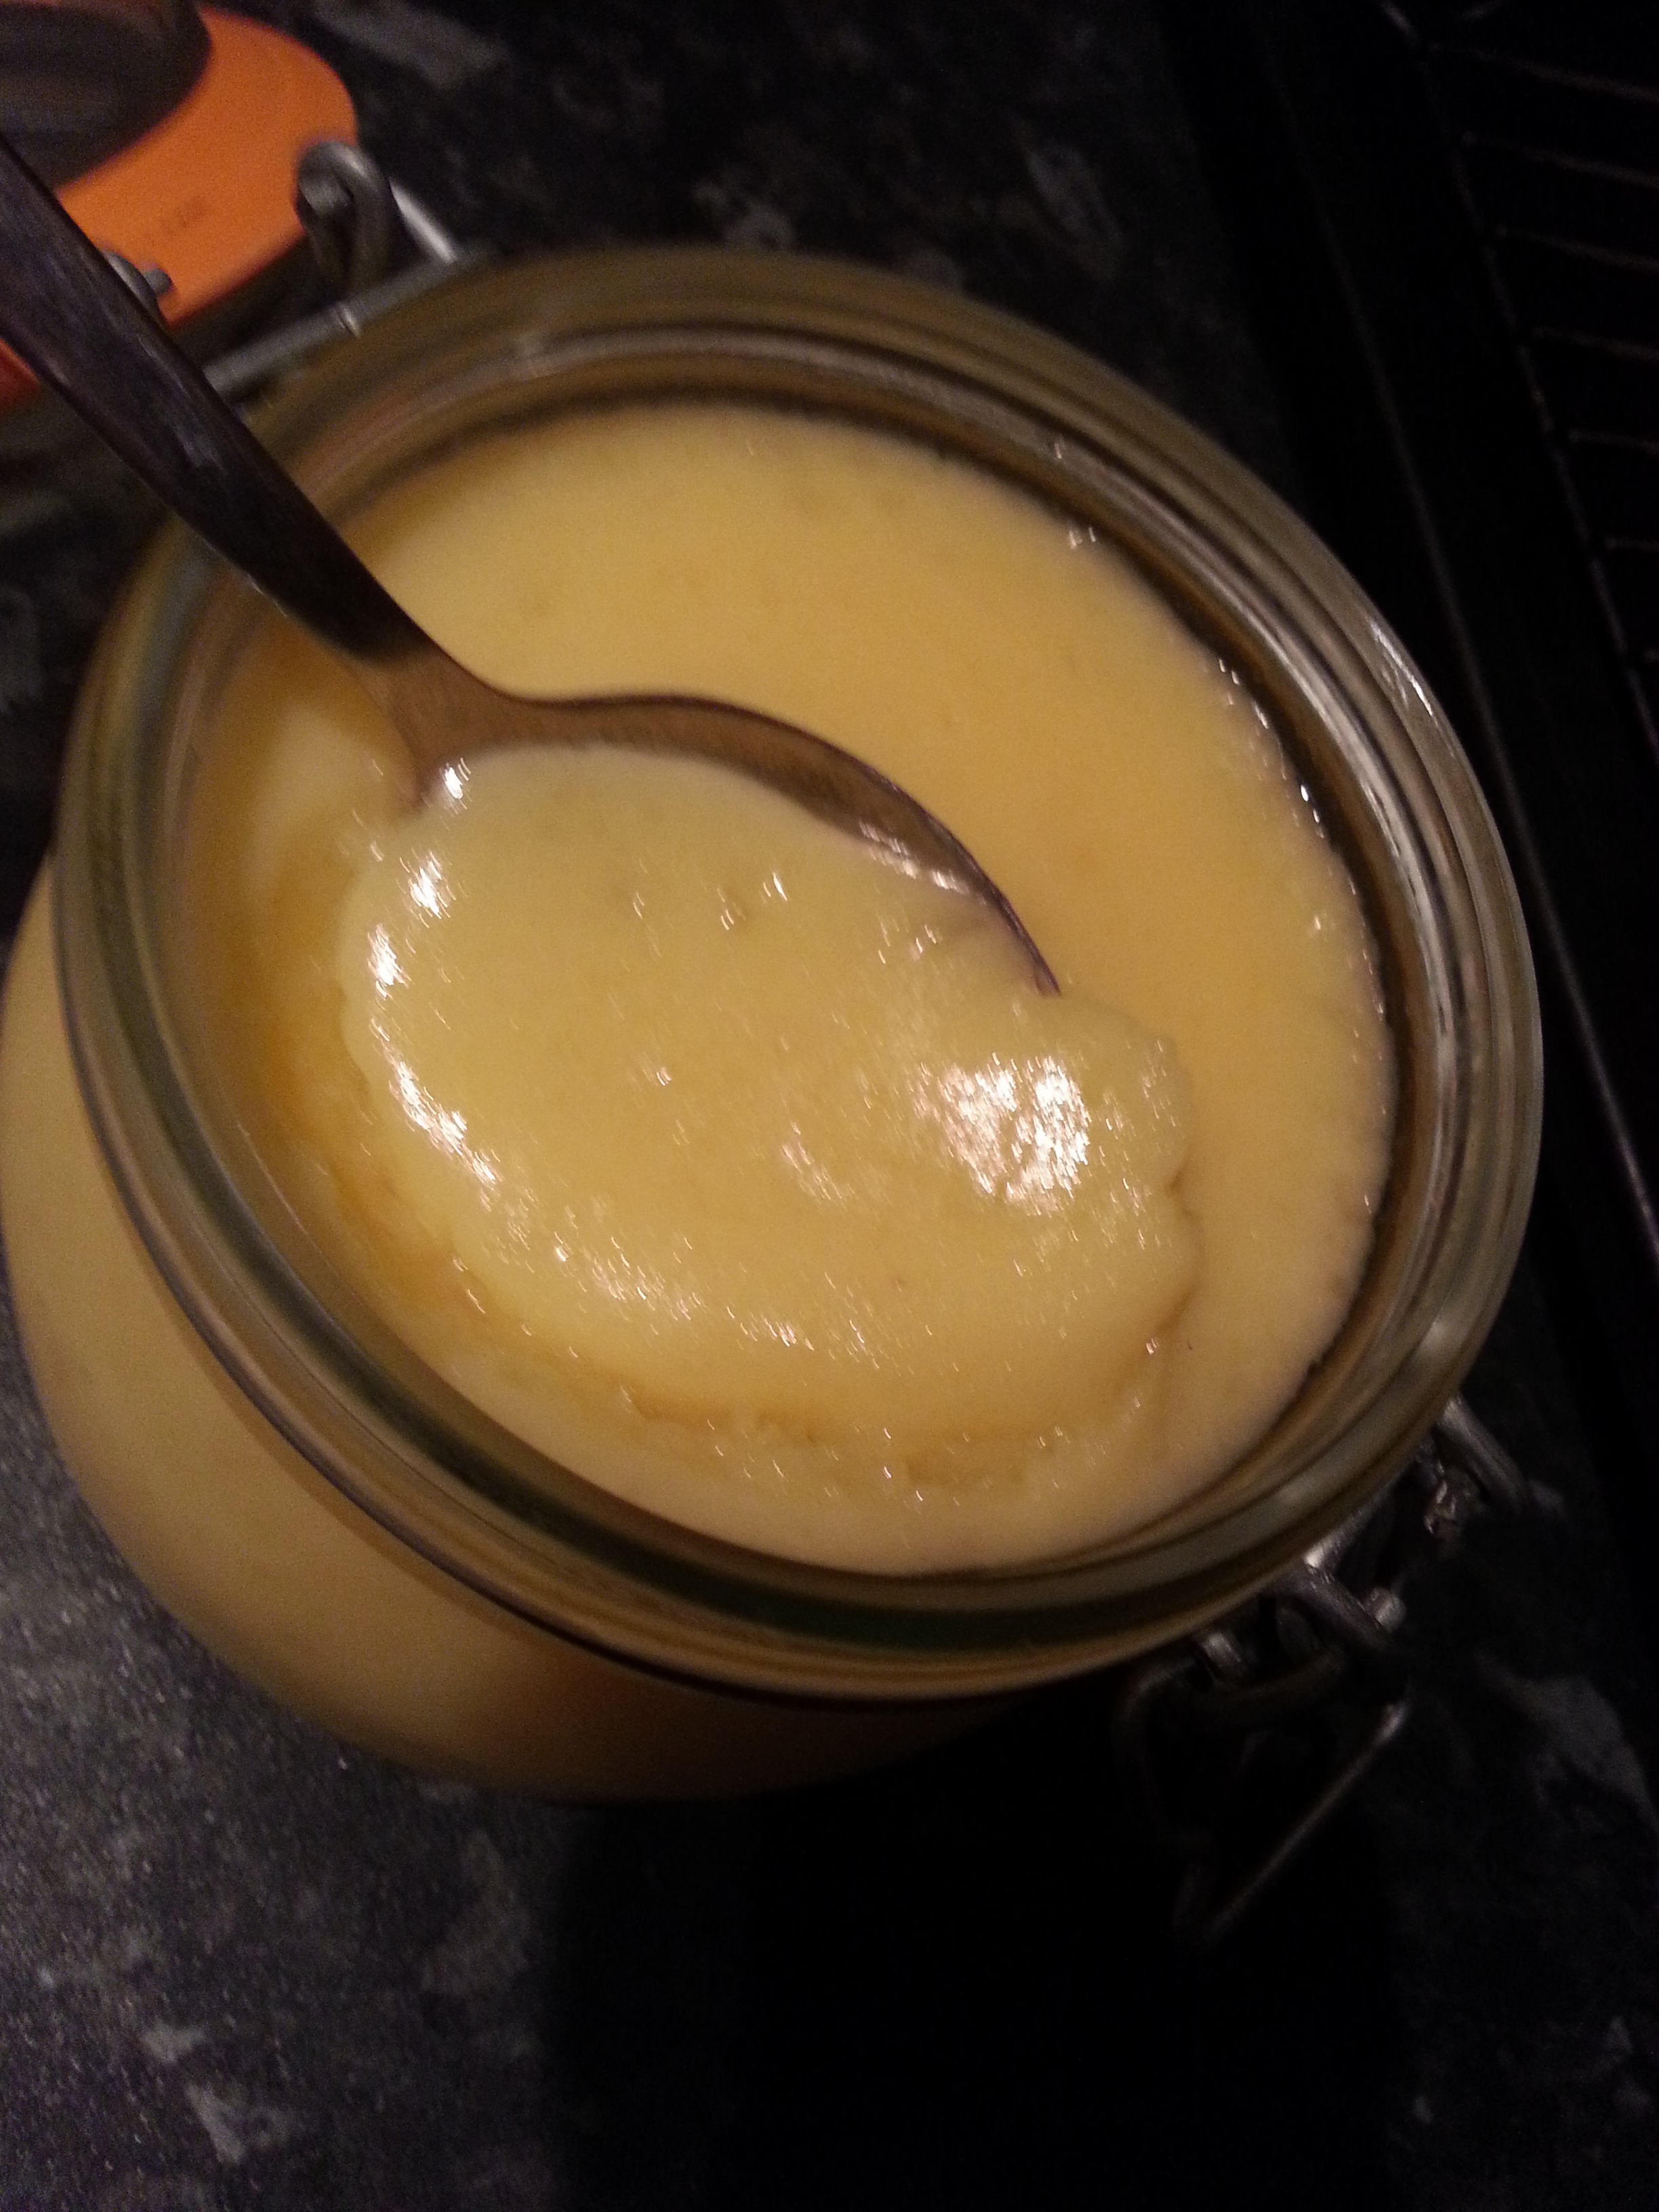
Lemon and Bramley Apple Curd
This recipe makes around 1200ml of curd.
500g Bramley apple curd, peeled, cored and chopped
150ml water
Zest and juice of 2 lemons
125g butter, cubed
350-400g granulated sugar
5 medium eggs
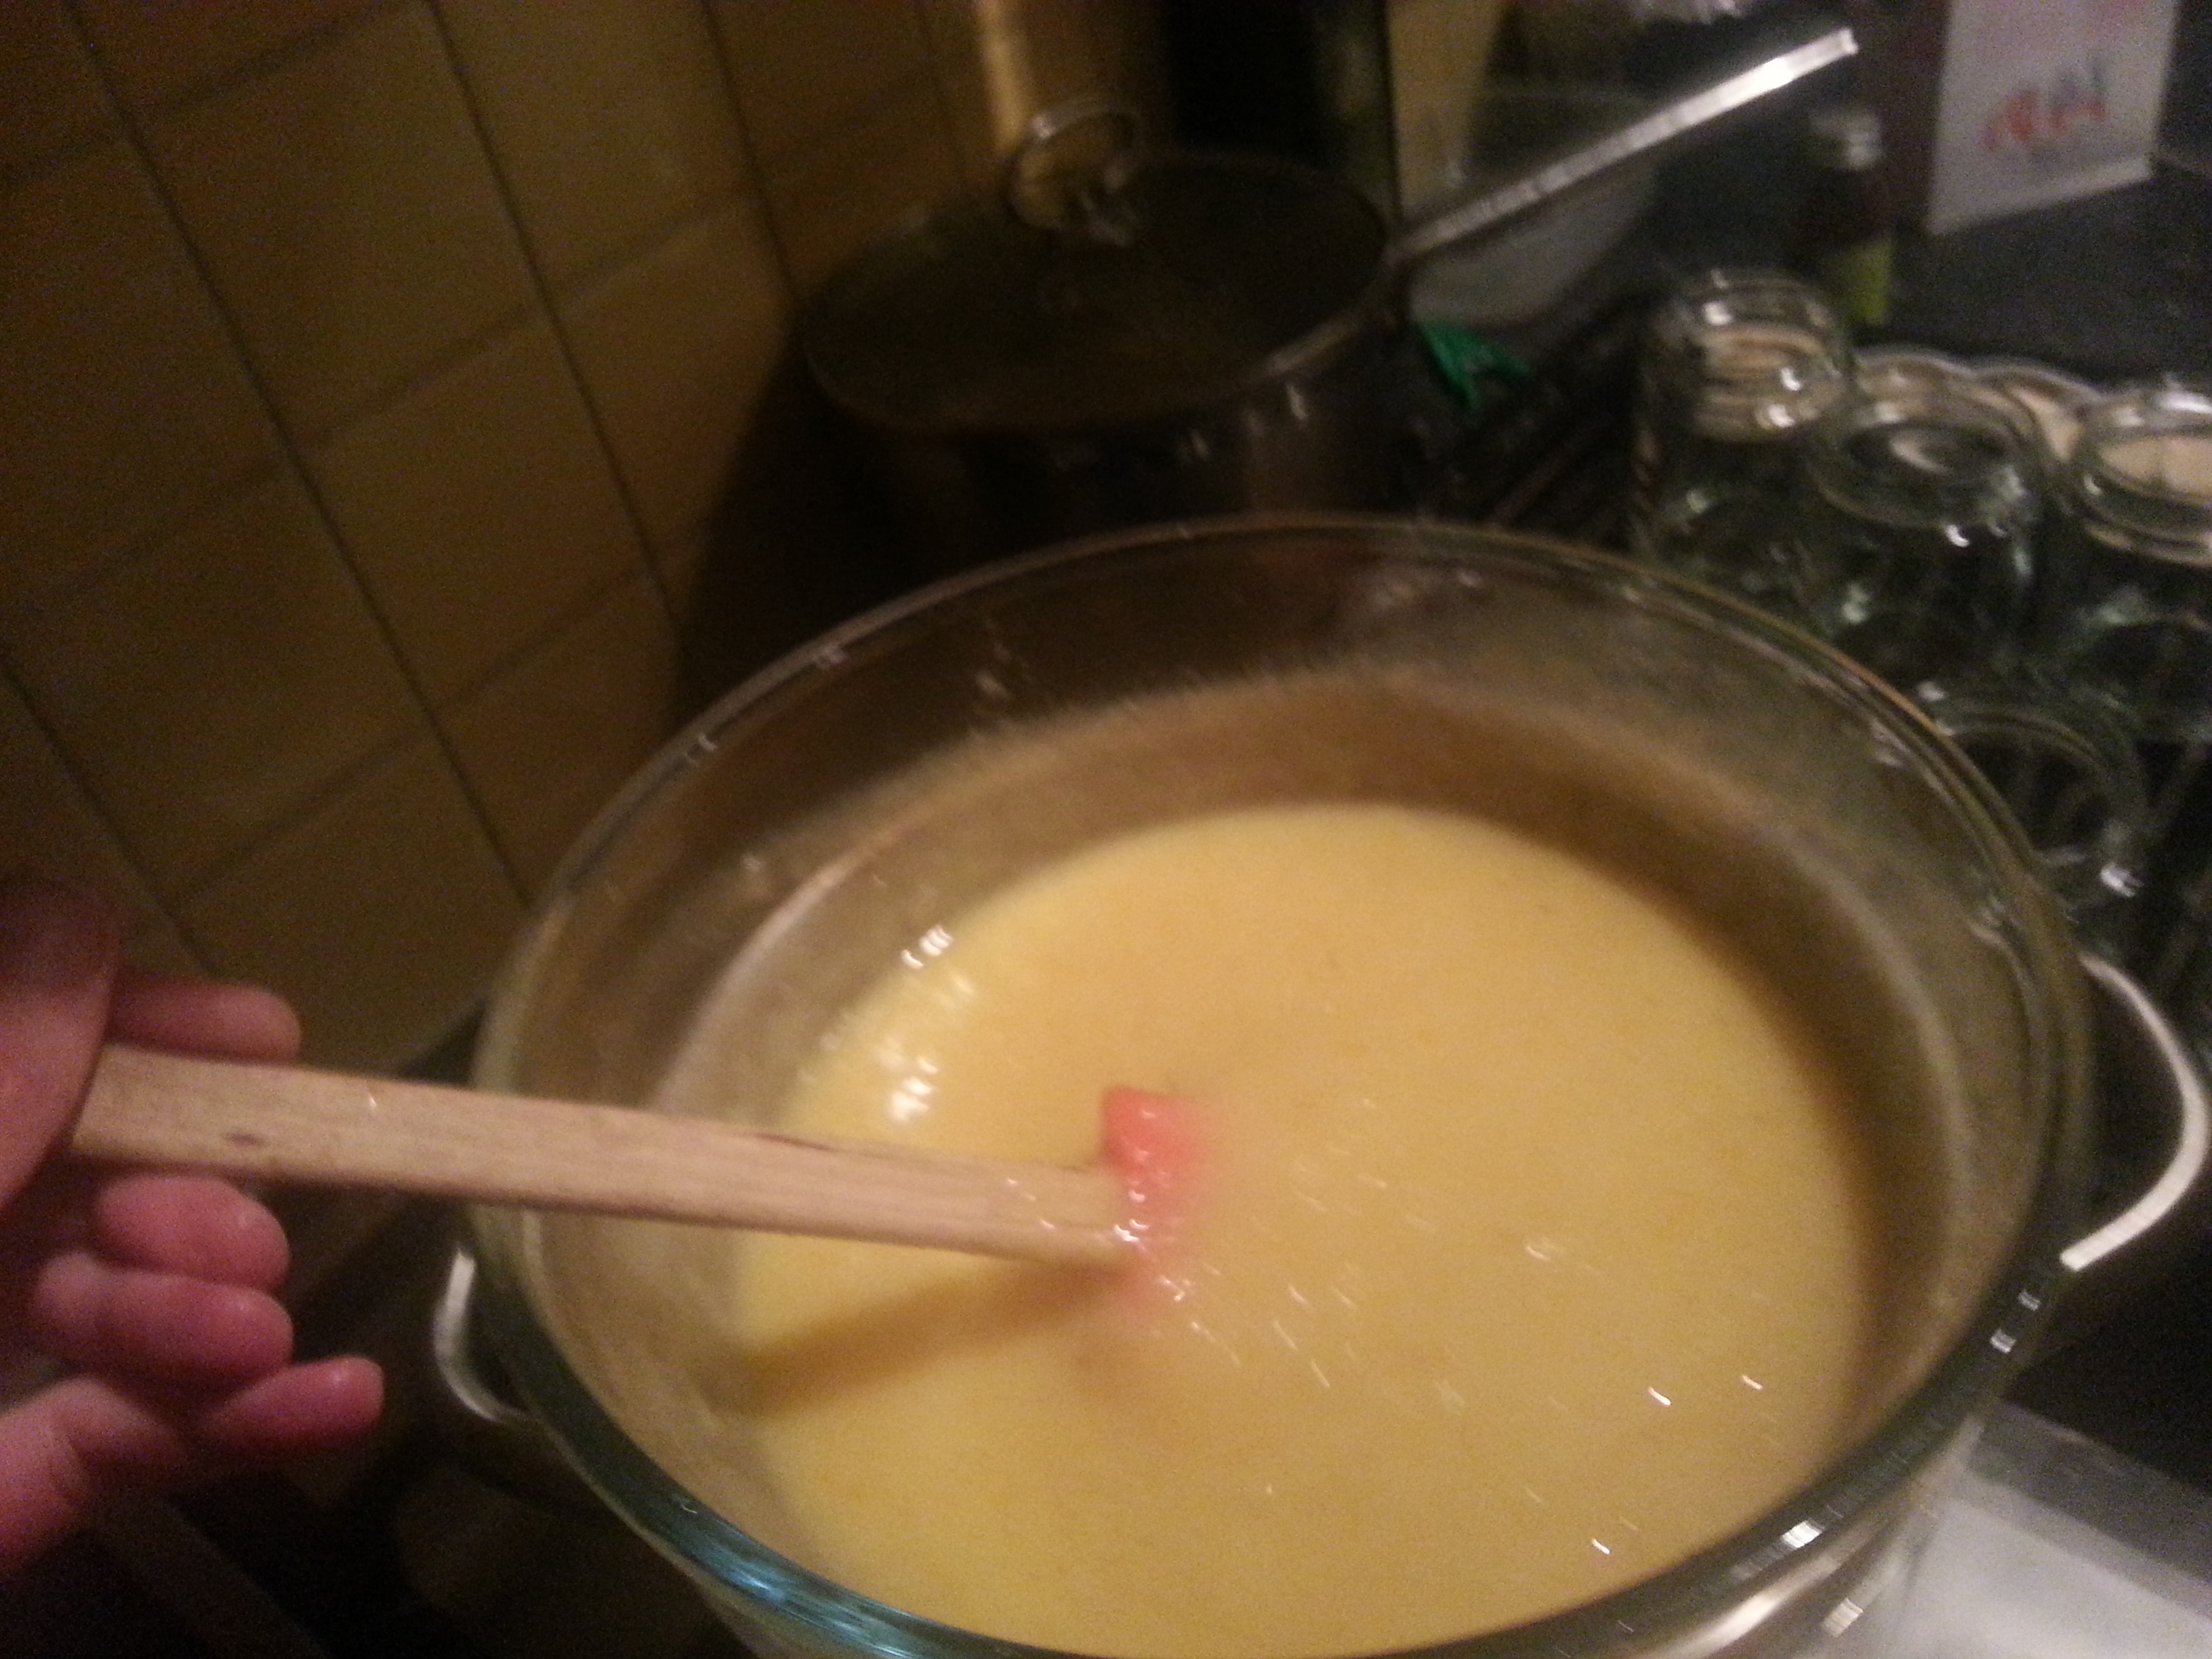
Put the apples and water in a small saucepan, cover and simmer until the apples break down into a purée. When cooked, put them into a large glass mixing bowl with all of the remaining ingredients except the eggs. Mix together – the heat of apples will dissolve the sugar and begin to melt the butter – and place the bowl atop a pan of briskly simmering water, making sure the water doesn’t touch the base of the bowl.
Whisk the eggs well and pass them through a sieve straight into the mixture, stirring them in well. Keep an eye on things and stir the curd frequently until it thickens; it doesn’t require constant stirring, but don’t be going off and dusting the sills. If you want to be scientific about it, eggs thicken at around 80⁰C, but temperatures of 75⁰C and above will thicken the curd sufficiently. Taste and add more sugar if liked – remembering that cold curd will taste much less sweet than hot curd.
Pot in sterilised jars (25 minutes in a 125⁰C oven does the trick), cool and refrigerate. The curd will keep for 5 weeks.
Some variations
You can pretty much use any fruit juice you like, but you always need a little bit of lemon to add bite as well as to take advantage of its flavour enhancing properties.
Blood orange curd: as above but use the juice and zest of one lemon and two blood oranges.
Spiced orange curd: use the juice and zest of two lemons and two oranges, along with half a teaspoon of mixed spice. When the curd has thickened, add two teaspoons of orange flower water.
Pink grapefruit curd: use the juice and zest one lemon and two pink grapefruits.
If you like the blogs and podcast I produce, please consider treating me to a virtual coffee or pint, or even a £3 monthly subscription: follow this link for more information.
Recently I have been thinking of re-igniting my interest in home-brewing. Previous attempts to make alcohol have never been successful. I have made white wine that tasted of rotten eggs, and made dandelion wine that, when bottled, exploded spectacularly in my lounge. Now I have a couple of books that spell out the process, and I am a little more confident that I can do it.
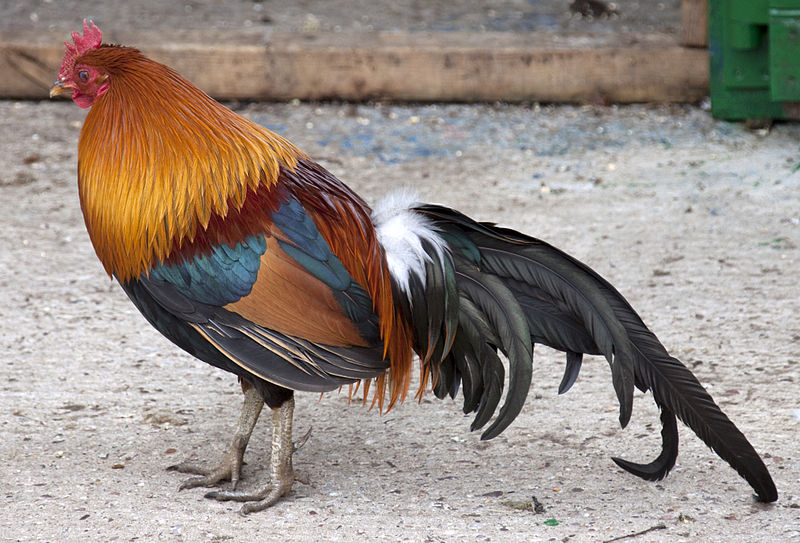
Naturally I have been hitting the old cookbooks for some historical inspiration and came across this recipe for cock-beer. In this recipe from 1780, you essentially make a giant cock tea-bag to impart its essence into your brewing beer:
Take 10 gallons ale, a large cock (the older the better). Slay, caw and gut him, and stamp him in a stone mortar. Add spice and put all in a canvas bag. Lower him into the ale while still working [i.e. fermenting]. Finish working and bottle.
That is actually a toned down receipt – many times live cockerels were used. Goodness knows how people didn’t die. Perhaps they did!
It doesn’t stop at cocks in beer, oh no, in Cornwall sheep’s blood – hot from the slaughter – was added to cider; and what did it taste like? According to Andrew Boorde, the 16th Century physician and traveller: “[it] is stark nought, looking whyte and thicke as pygges had wrastled in it.”
There were many tales of men’s heads being thrown into the hogshead along with the beer, and perhaps they weren’t just tales, because the cockerel wasn’t added to the beer for flavour (I suspect that the spices were added to mask the flavour of the bird). The idea is that the animal’s strength, courage and vigour would be imparted into the brew. So these beers were in fact more remedies than proper drinks.
William III: Cock Beer Lover
That said, two brave brewers called Chris Thomas and Adam Cusick, brewed a batch from this very recipe, obviously with a certain amount of interpretation. They did welch a little bit by using a cooked chicken. However a delicious ale was produced that was mellow and ‘shared distinct similarities with a strong Belgian ale’. Apparently, William III’s drink of choice was cock beer, and it has been noted several times through the centuries for its superior quality.
My gut feeling is that is must be foul (no pun intended), yet it gets all this praise. Well, when I become a seasoned brewer of beer, I might just give it a go.
One last thing: tantalisingly, it has been suggested that the word cocktail (a work whose origin is famously unknown) comes from cock-ale. O how I wish it was true.
If you like the blogs and podcast I produce, please consider treating me to a virtual coffee or pint, or even a £3 monthly subscription: follow this link for more information.
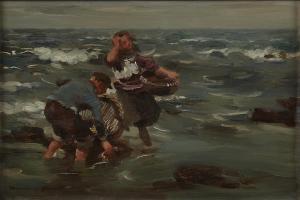
The Dulse Gatherers by William Marshall Brown, 1863-1936
Nobody really eats dulse, or any other seaweed for that matter, in England these days, though they used to. It is a pity because I do like the stuff. It is eaten in Ireland and parts of Scotland still; I ask friends to bring back a bag of it whenever they cross the seas. I recently received a bag from my friend Hugh.
Dulse had been eaten for over one thousand years in North-Western Europe, the ancient Celtic Warriors of old ate dulse as they were marching, and during the seventeenth century British sailors ate it to prevent scurvy (although it was originally used as an alternative to chewing tobacco). Even today, its healthful properties are noted; my friend Evelyn from Ballymena, Northern Island tells me:
When I was pregnant, the midwife thought I was very healthy as my blood pressure and iron levels were so good. Iron goes up to 17 mg/dl max but I was the first person she’d seen that had 15 – apparently quite unheard of for a lady, especially a pregnant lady! We put it down to the dulse (nothing else remotely healthy going on at that time in my diet), and she’s been recommending it to everyone.
Its popularity in Ireland as well as Scotland led to dulse being popular in the USA too when they emigrated over the Pond, although none of my American friends seem to have heard of it.
The dulse industry has obviously died a bit of a death in England, and the rest of the UK and Ireland, compared to days of yore. Charles Dickens, writing in 1858, reminisces about childhood holidays in Aberdeen where there were often over a dozen ‘dulse-wives’ selling dulse:
[O]f all the figures on the Castlegate, none where more picturesque than the dulse-wives. They sat in a row on little wooden stools, with their wicker creels placed before them on the granite paving stones. Dressed in clean white mutches, or caps, with silk-hankerchiefs spread over their breasts, and blue stuff wrappers and petticoats, the ruddy and sonsie dulse-women looked the types of health and strength… Many a time, where my whole weekly income was a halfpenny, a Friday’s bawbee, I have expended it on dulse, in preference to apples, pears, blackberries, cranberries, strawberries, wild peas and sugar-sticks.
He recalls a conversation:
A young one would say: “Come to me, bonnie laddie, and I’ll gie ye mair for yer bawbee than any o’ them.”
An old one would say: “Come to me, bonnie laddie, and I’ll tell what like yer wife will be.”
“Yer dinner ken yerself.”
“Hoot aye – I ken brawly: she’ll hae a head and feet, an mou’, and eyen, and may be a nose, and will be as auld as me, if she lives as lang.”
“Aye: but ye gie me very little dulse for my bawbee.”
“Aye,” replies the honest woman, adding another handful, “but sic a wife is weel worth mair siller.”
The dulse-wives exploded into laughter, when the woman suggested some one like herself, as the ideal wife which youth is doomed always to pursue and never to attain.
Oh! those dulse-wives.
My friend Evelyn reminisces:
It comes with shells and little crustaceans on it; my friend Maisie used to spend hours ‘cleaning’ dulse & would then give me nice little bags with no icky bits on them. Strangely it doesn’t seem to fall under any health and safety rules. Old men that live by the sea just grab a load and dry it on the rocks in the sun.
You can also buy it dried and flaked in sealed bags looking like reddish tea leaves. Even better, of course, you can forage for it. I must say seaside foraging forms a hole in my knowledge. I should try and remedy that.
Cooking with Dulse
Dulse can be eaten as is, or used in salad and sandwiches. I personally think it is best eaten cooked so I’ve included a couple of simple recipes for you.
Mashed Potato with Dulse
This is a great recipe and much healthier than regular mash because it uses olive oil as opposed to butter. It’s vegan and gluten free too, so you shouldn’t get any complaints from anyone!
It could not be easier, really. First, scrub and then boil some potatoes in their skins without adding any salt. Remove the skins and mash them. Next, finely shred the dulse and fry it in olive oil – you’ll need about 15 grams of dulse for every kilogram of potatoes used. Of course, if you are using the flakes, you can sprinkle them straight into the hot oil. This takes just a few seconds. Add the oil and dulse to the spuds and mix, mashing in some extra olive oil if need be. Season.
Serve with lamb, beef, chicken or fish
If you like the blogs and podcast I produce, please consider treating me to a virtual coffee or pint, or even a £3 monthly subscription: follow this link for more information.
Lamb & Dulse Broth with Dulse Shards
I came up with this soup when I found some frozen lamb stock secreted at the back of a freezer-drawer recently. It draws on that classic combination of lamb and seaweed. This recipe requires the rock-dried dulse to make the sweet-tasting shards, but any dulse can be used for the soup itself.
Ingredients
1 tbs butter or olive oil
1 carrot, diced
1 stick celery, diced
a sprig of thyme
a sprig of rosemary
a bay leaf
60g red lentils
2 or 3 tbs dried, chopped dulse
1 litre well-flavoured lamb stock
salt & pepper
For the dulse shards:
‘leaves’ of dried dulse
sunflower, groundnut or rapeseed oil for frying
Melt the butter or oil in a saucepan, add the carrot, celery and herbs. Fry gently for 10 or 15 minutes until the vegetables are soft and translucent. Add the lentils and fry for another two minutes before adding the dulse and lamb stock. Bring to a simmer and cook for around 20-25 minutes until the lentils have cooked and broken up, thickening the broth. Season.
Meanwhile, prepare the dulse shards. Heat up some oil in a frying pan and when hot, throw just one or two dulse pieces into the oil. The dulse will immediately sizzle, crisp and change colour as if by magic. After just a few seconds, remove and drain on kitchen paper. Fry all your dulse pieces in this way, and break them up into shards and place them gently on top of your finished soup.
As promised in my last post a good recipe for a basic vegetable stock which is definitely robust enough to be swapped for chicken or fish stock in any recipe.
It is hard to be exact when making stock because it depends upon the vegetables you like, the vegetables you have and what the stock is to be used for. It’s also worth mentioning that if you don’t have tomatoes, for example, don’t worry, just include something else to make up for it.
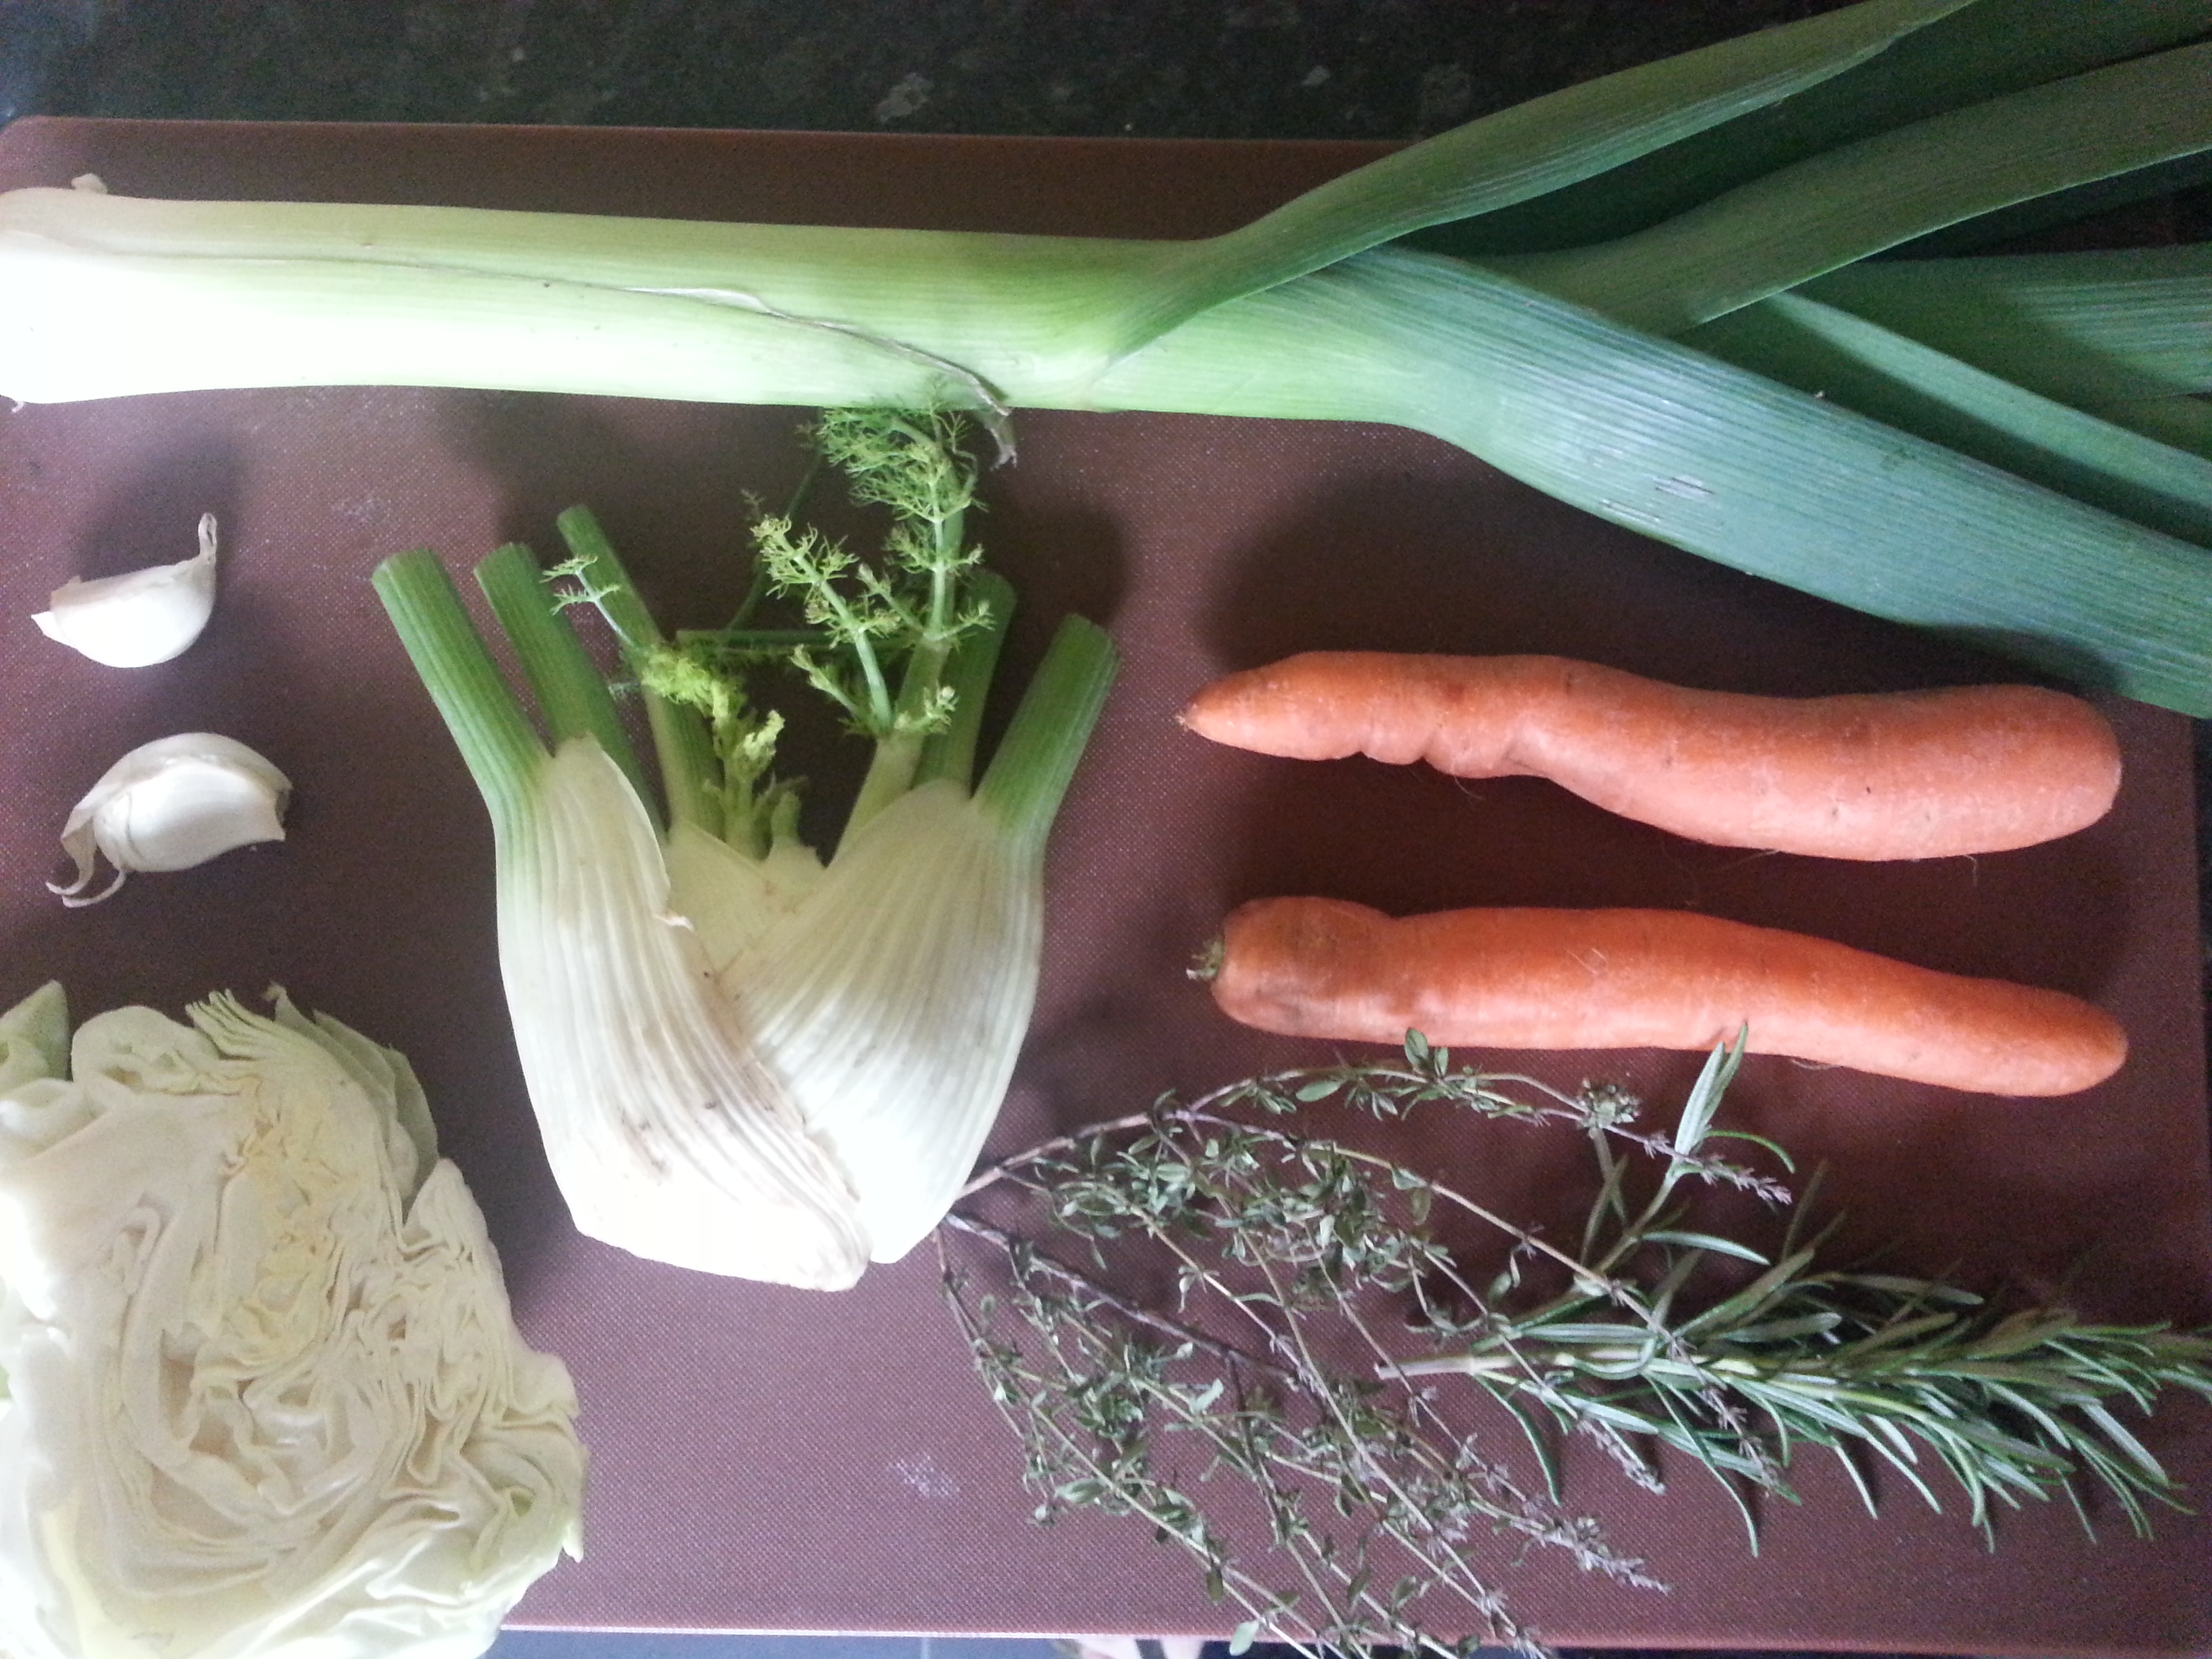
The basics are fundamental. You need at least three of the following: onion, leek, carrot, celery and garlic and then everything else is a bonus. I would say you should use at least 3 more vegetables.
The good thing about a vegetable stock is that because it is only simmered for 20 minutes you can get away with cabbage, cauliflower, broccoli, or any other brassicas before they go all farty. Asparagus trimmings, sweetcorn, pea pods, and anything else you can think of all count. Keep your trimmings in a freezer bag until they are required.
The same goes for herbs: freeze parsley stalks and anything else that is looking a bit sad sat in the bottom of the fridge. Avoid mint as it tends to overpower vegetable stocks.
The spices I like to use are peppercorns, cloves and then either some fennel seeds or some allspice berries, but it’s up to you really; cumin or cardamom, nutmeg or mace, chillies or lemon peel have all worked successfully in the past.
Remember: the whole point of making your own stock is that you don’t get the same thing every time. I have never included a vegetable that hasn’t worked, even ones you won’t suspect like beetroots, cucumbers, lettuces and courgettes.
For more general information on stocks click here.
This recipe makes around 1 ¾ litres of stock.
Ingredients
At least 3 of the following: 1 large onion, 1 carrot, 2 cloves of garlic, 2 sticks celery (with leaves), 1 leek (include the green top)
75g brassica – e.g. cabbage, broccoli, turnip &c
2 tomatoes
½ fennel bulb
Any other vegetable trimmings (if using all trimmings, go for at least 300g in weight)
30g butter or 2 tbs olive oil
2 bay leaves
6-10 parsley stalks
4 springs of thyme
1 sprig rosemary
6 peppercorns
6 allspice berries or a teaspoon of fennel seeds
3 cloves
around 2 litres of water
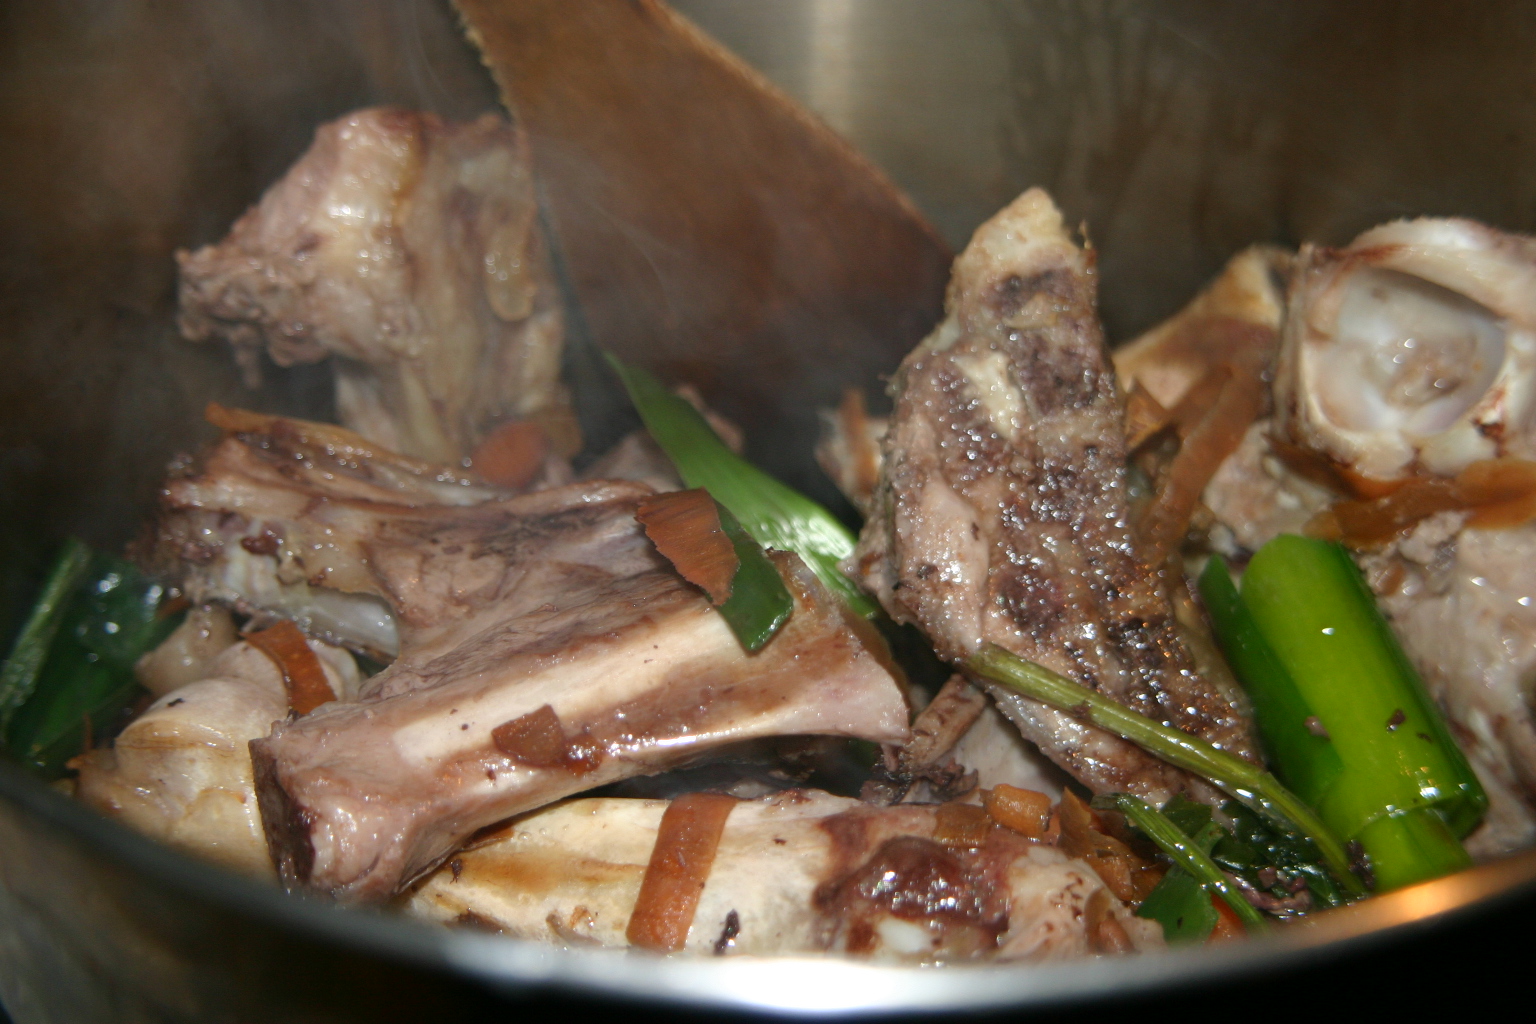
Begin by preparing your mirepoix; a mirepoix is just vegetables chopped very small so that the maximum amount of flavour can be extracted in the minimum amount of time. I go for the easy option and use a food processor.
Heat the butter or oil in a pan and fry the vegetables for around 10 minutes so that they soften but don’t colour.
Tip the vegetables into a large saucepan or stockpot along with your herbs and spices. Cover them with cold water and slowly bring to a bare simmer. Try and make sure the stock doesn’t boil. Simmer the stock on the smallest hob on the lowest possible heat so that it merrily ticks away for around 20 minutes.
Let the stock cool slightly before straining it off. Avoid seasoning it with salt – wait until you’ve made the dish you are to use the stock for.
Your vegetable stock is now ready to use.
If you want, you can reduce it, but you must be careful not to boil it hard as the subtle flavours will evaporate and the stock will look and taste like overcooked sprouts. The best way reduce it is to pour the stock into a wide pan and let it simmer and reduce gently.
If you like the blogs and podcast I produce, please consider treating me to a virtual coffee or pint, or even a £3 monthly subscription: follow this link for more information.
Stock is the body and soul of soups – Lindsay Bareham
I have been making my own stocks for years now and it is part of my regular kitchen routine. I sequester bones, meat offcuts, fish heads and trimmings, vegetable peelings and herb stalks in bags in the bottom of my freezer so that I can combine them appropriately whenever I need to. It’s a thrifty way of living; often making a large batch of stock costs only the price of the fuel that cooked it.
For those that do not cook much at home, stock-making is sometimes regarded as some kind of alchemy, yet this is a misconception, and indeed there are many very complicated stock recipes, but the home cook (I include myself here) need not bother with these. The chances are you have made stock several times and have thrown it down the sink without a second thought, because in its most basic form, the water you cook your vegetables in is a good, light vegetable stock.
From a history point of view, one cannot pin-point when stocks were first made, and one cannot unravel the origins of stock from soup. Take this example from Good Things in England by Florence White:
[The soup] is nothing more than the water in which young cabbage has been boiled…It is extremely good and delicate and tastes very much like chicken broth. It is not merely an economy but a luxury; one of the best of health and beauty drinks.
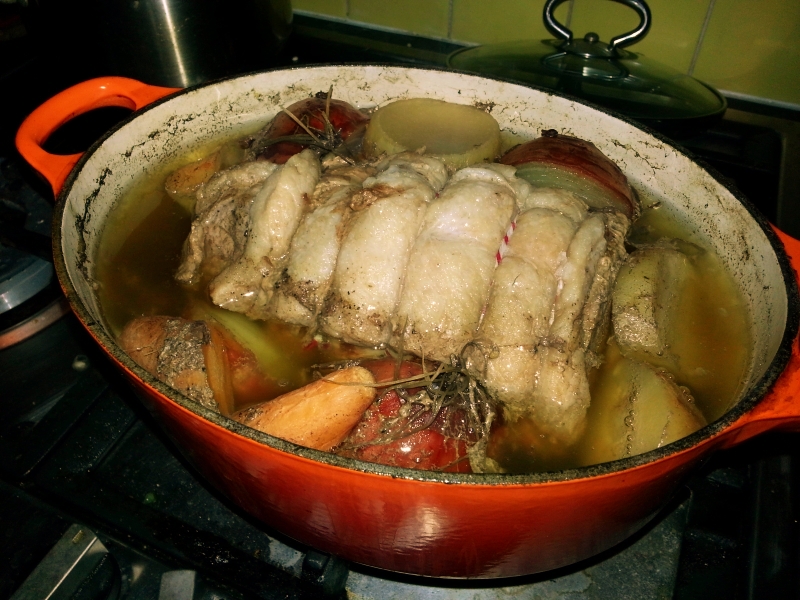
Wise and thrifty cooks throughout the millennia used the water that their tough meat joints were simmered in or their fish poached in and used them as the base of another dish. One of my favourite dishes is poached silverside of beef which consists of beef, herbs, a couple of veg and water. The resulting broth makes beautifully-tasting soup.
Poached Silverside of Beef
Seeing as we are trying to be thrifty folk, I thought I would give you a quick guide to stock-making. As I have mentioned, it will save you money, and – like when you make your own bread – you will see how sublime it can taste. Every stock you make will taste a little different each time and it can be tailored to suit its use, e.g. add a few fennel seeds to a stock for a fish soup. Best of all, your soups and stews won’t taste of stock cubes. There is nothing wrong with having a stash of them in your food cupboard, I would do too, but with my very frustrating onion and tomato intolerances, I usually have to do my own. The point is, that when you use bought stock cubes, every soup and stew ends up tasting the same.
If you like the blogs and podcast I produce, please consider treating me to a virtual coffee or pint, or even a £3 monthly subscription: follow this link for more information.
What makes up a stock?
This is the beauty of stock-making; there are no hard-and-fast rules with respect to ingredients.
All good stocks should contain some flavoursome vegetables and aromatic herbs and spices, often called a bouquet garni, as well as the main ingredient: this might be meat and bones, fish, or, more vegetables. The stock might be seasoned or enriched with salt, wine, soy sauce, Worcester sauce, tomato puree, mushroom ketchup or any number of other things, though it is usually best to do this once the soup or stew that the stock is being used for has been made.
Stock vegetables
The vegetables used in your stock are often key to the quality as they add a lot of depth. The three basic vegetables used for most stocks are carrots, celery and onion, though I personally add garlic and leek to this ‘trinity’ (a trinity in five parts?). My general rule of thumb is to try and include at least three of the five. Anything else is a bonus, really. Fennel is a good addition, if used sparingly, as are tomatoes, mushroom peelings, pea pods. Lentils, parsnips and potatoes add an earthiness, but should be avoided if you don’t like your stock cloudy. Brassicas such as cabbage, cauliflower, of sprouts should be used very sparingly, especially in meat or poultry stocks that have a lengthy cooking time, they are great in vegetables stocks though. Vegetables need to be roughly chopped in long-cooked meat stocks, and chopped small (a mirepoix as it is called in the trade) in quick-cook vegetable and fish stocks. A food processor makes an easy job of it.
Herbs, spices and other aromatics
Like the vegetables, the herbs and spices you add will depend upon what you have and they are essential. Must-haves herbs include bay leaves, parsley stalks, thyme and rosemary. Other herbs are great if you can get hold of them. Dill stalks in a fish stock are delicious as is a tiny mint sprig in a summertime lamb stock. I keep and freeze all my herb stalks to use later in stocks – there’s no need to throw them away. Must-have spices include black peppercorns, cloves and allspice berries.
The thinly-pared rinds of citrus fruits are also used quite a lot: a strip of orange peel transforms a game stock and lemon rind really lifts chicken, vegetable and fish stocks.
These herbs and spices are often tied up into a faggot or bouquet garni, though I never bother to tie mine up for stock, though I do for stews and soups where careful and efficient removal is required.
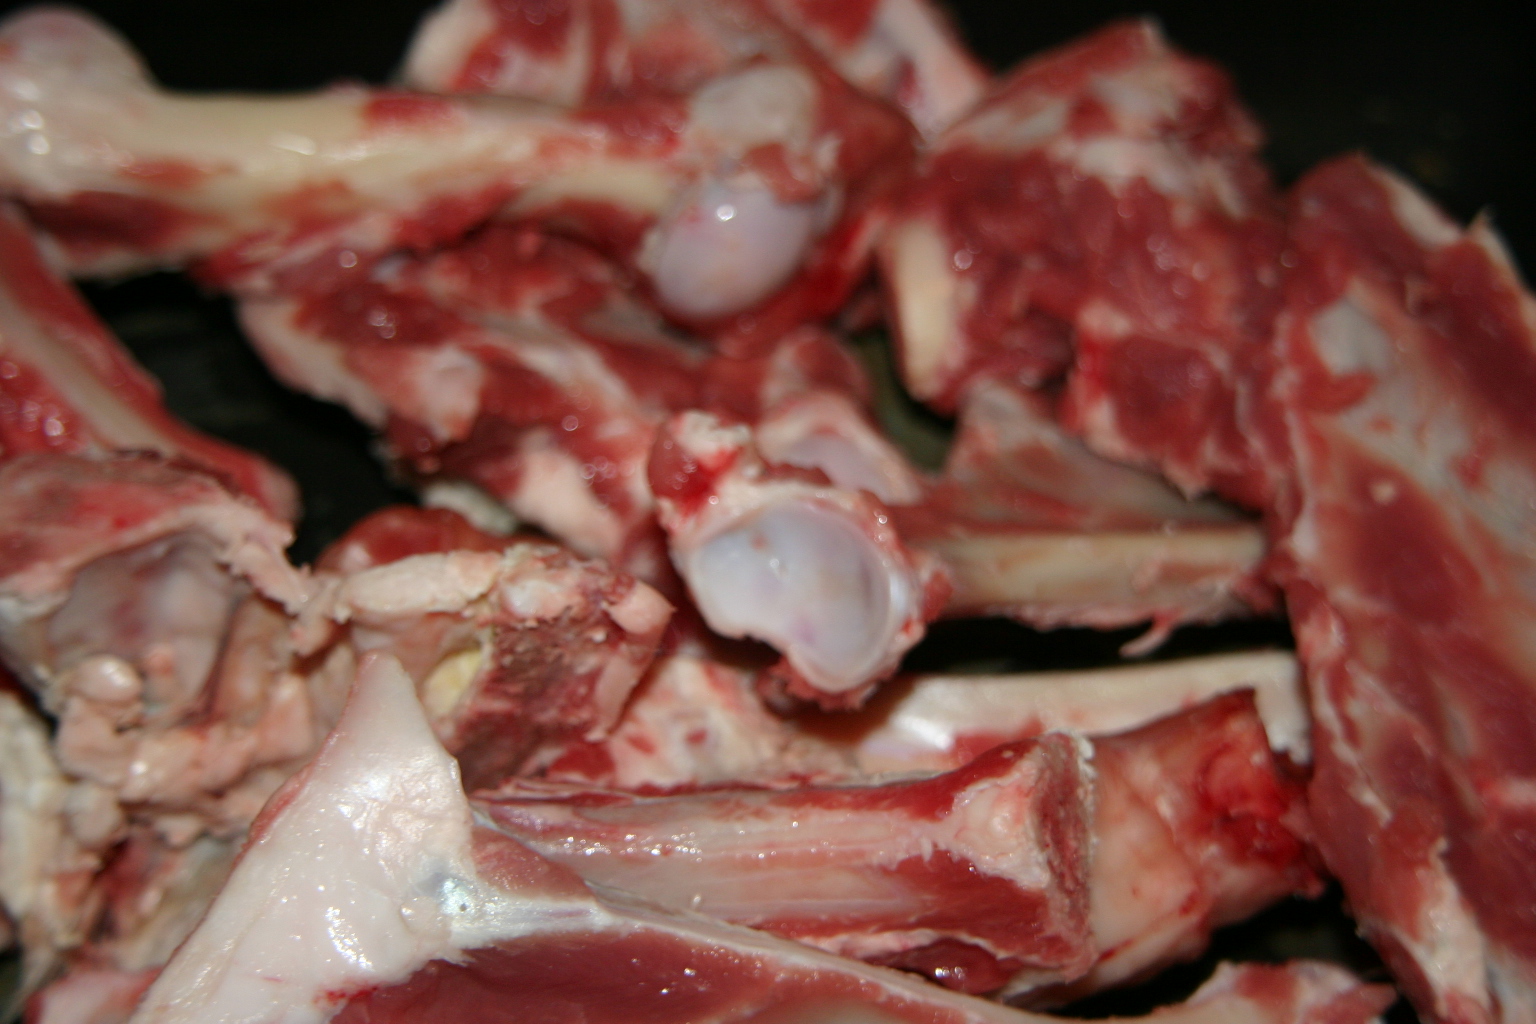
Poultry, meat and game
Use whatever you have – raw meat and bones, or bones from a roast. A little goes a long way: I have made game stock using a single woodcock carcass that still tasted great. It is best to avoid bones that have already been stewed as most of the flavour will already have leached out, but do add any left-over pan juices, jelly or gravy. Raw meat or bones will benefit greatly from a quick roasting in a hot oven for 20 minutes or so.
The important thing here is to treat your stock meat properly – if you boil the stock hard, the tasty amino acids and textural gelatine will not go into your stock, but will either form a nasty grey scum or will be trapped within the meat. Low simmers and long cooking times are essential.
It is best to avoid kidneys and livers in stocks, as their flavour is far too strong, but hearts, tongues and heads all make good additions.
Fish
Fish stocks, in contrast to meat stocks, can be made in minutes. Use bones and trimmings in your stock, but avoid oily fish such as mackerel and sardines. Mussel, clam, cockle or oyster liquor would be delicious, if you ever have any.
Clarifying Stock
You might want to clarify your stock after straining it. This is straight-forward enough to do and there are several methods. The quick method is to whisk a mixture of egg whites and broken egg shells into the hot stock. The eggs grab hold of and magically mop-up the cloudy substances. The slow – and best – method is to freeze the stock, tie it in muslin and let the melting stock drip through. This method makes beautifully clear stocks.
There are a few tricks to avoid cloudiness in the first place: Don’t use starchy vegetables like potatoes, lentils and parsnips and avoid peppercorns. The best way is it leave the stock be; prodding, poking and rearranging items is the surest way to cloud it.
Poaching sweetbreads in a light vegetable stock called a court-bouillon
Some stock-making rules:
Start with cold water and bring to a simmer slowly. This is the most important rule of all. As the water gradually heats, the flavours leach out and don’t boil away and connective tissues break down to release their gelatine. The stock should never get hotter than a bare simmer; you want the odd gurgle, nothing more
Remove the scum before you add the herbs and spices. If you don’t the scum gets all caught up in it, making a nasty grey mess. Skim the scum, then add the aromatics.
Remove the layer of fat. Nobody wants greasy soup. The best way to do this is to let it cool and then scrape the fat layer away. If time is an issue, lay paper napkins on the stock’s surface.
The amount of water you use depends on your pot. Don’t follow the recipe when it comes to adding water. Arrange the ingredients in your pan with few gaps and add enough water to just cover.
Break the bones and cut up the meat. This increases the surface area and therefore increases the flavour of your stock.
When storing stock, cool it quickly and keep in the fridge up to 2 or 3 days. Any longer than that, freeze it.
Reducing stocks enhance the flavours and mean you can store more in the freezer. You must strain the stock and skim it of fat before reducing it. Meat stocks you can boil it quite heard, but vegetable and fish stocks need to be treated a little more gently.
Stock recipes
Every post I write a post with a stock recipe or information about stock I tag it appropriately. Click here to see the posts.
I will post a good vegetable stock recipe in the next day or so, as it is the most useful of all the stocks and I already have posted a duck stock recipe.
The best advice is really to use stock recipes as a guide only, use what you have to hand. Keep your vegetable and meat trimmings in a bag in your freezer and you’ll find that you’ll quickly fill them.
I have been writing posts of late on the huge variety of cuts we can get from meat, whether prime cuts or more humble (or should that be umble?) cuts, but I fear I may not be able to cook you all this one!
The umbilical cords of calves born on dairy farms were often collected by thrifty farmers and turned into a dish known as ‘muggety pie’ by famers’ wives. There’s a description of it in the excellent book Food in England by Dorothy Hartley; she says:
The umbilical cord of the calf was washed, soaked in salt water, and cut into short lengths which were then split open end to end twice, and cut, so making small oblong pieces. These were then boiled, till soft, with onions and seasoning, chopped again and made into a pie, using the gelatinous stock and some milk to make the filling gravy. The whole white pie was then covered with crust and baked.
Muggety pie was popular in the West Country, particularly in Gloucestershire and Cornwall, “all jelly soft it was…it was the jelly gravy was the best part – some did put taters and a turnip and sech, but ‘twas best plain, and good cold,” told old farm-hand.
Foods like muggety pie are dishes that probably never travelled much further than the dairy or cattle farmers’ houses and quickly forgotten. It was borne out of a necessity that no longer exists, but why kill an animal for meat that can be sold on when there is good protein laying there in the hay?
So, if there are any diary or cattle farmers that have a spare umbilical cord or two hanging around, let me know and I’ll bake you a delicious pie!
Don’t worry though, you don’t have to miss out on muggety pie because it can also be made out of sheep’s intestines or a sheep’s pluck (i.e. lungs, heart and liver) that latter of which should easily be found at butchers given a little notice…
If you like the blogs and podcast I produce, please consider treating me to a virtual coffee or pint, or even a £3 monthly subscription: follow this link for more information.
I have written a few posts on foraging and natural history in Britain, here’s a little post about a lovely edible mushroom:
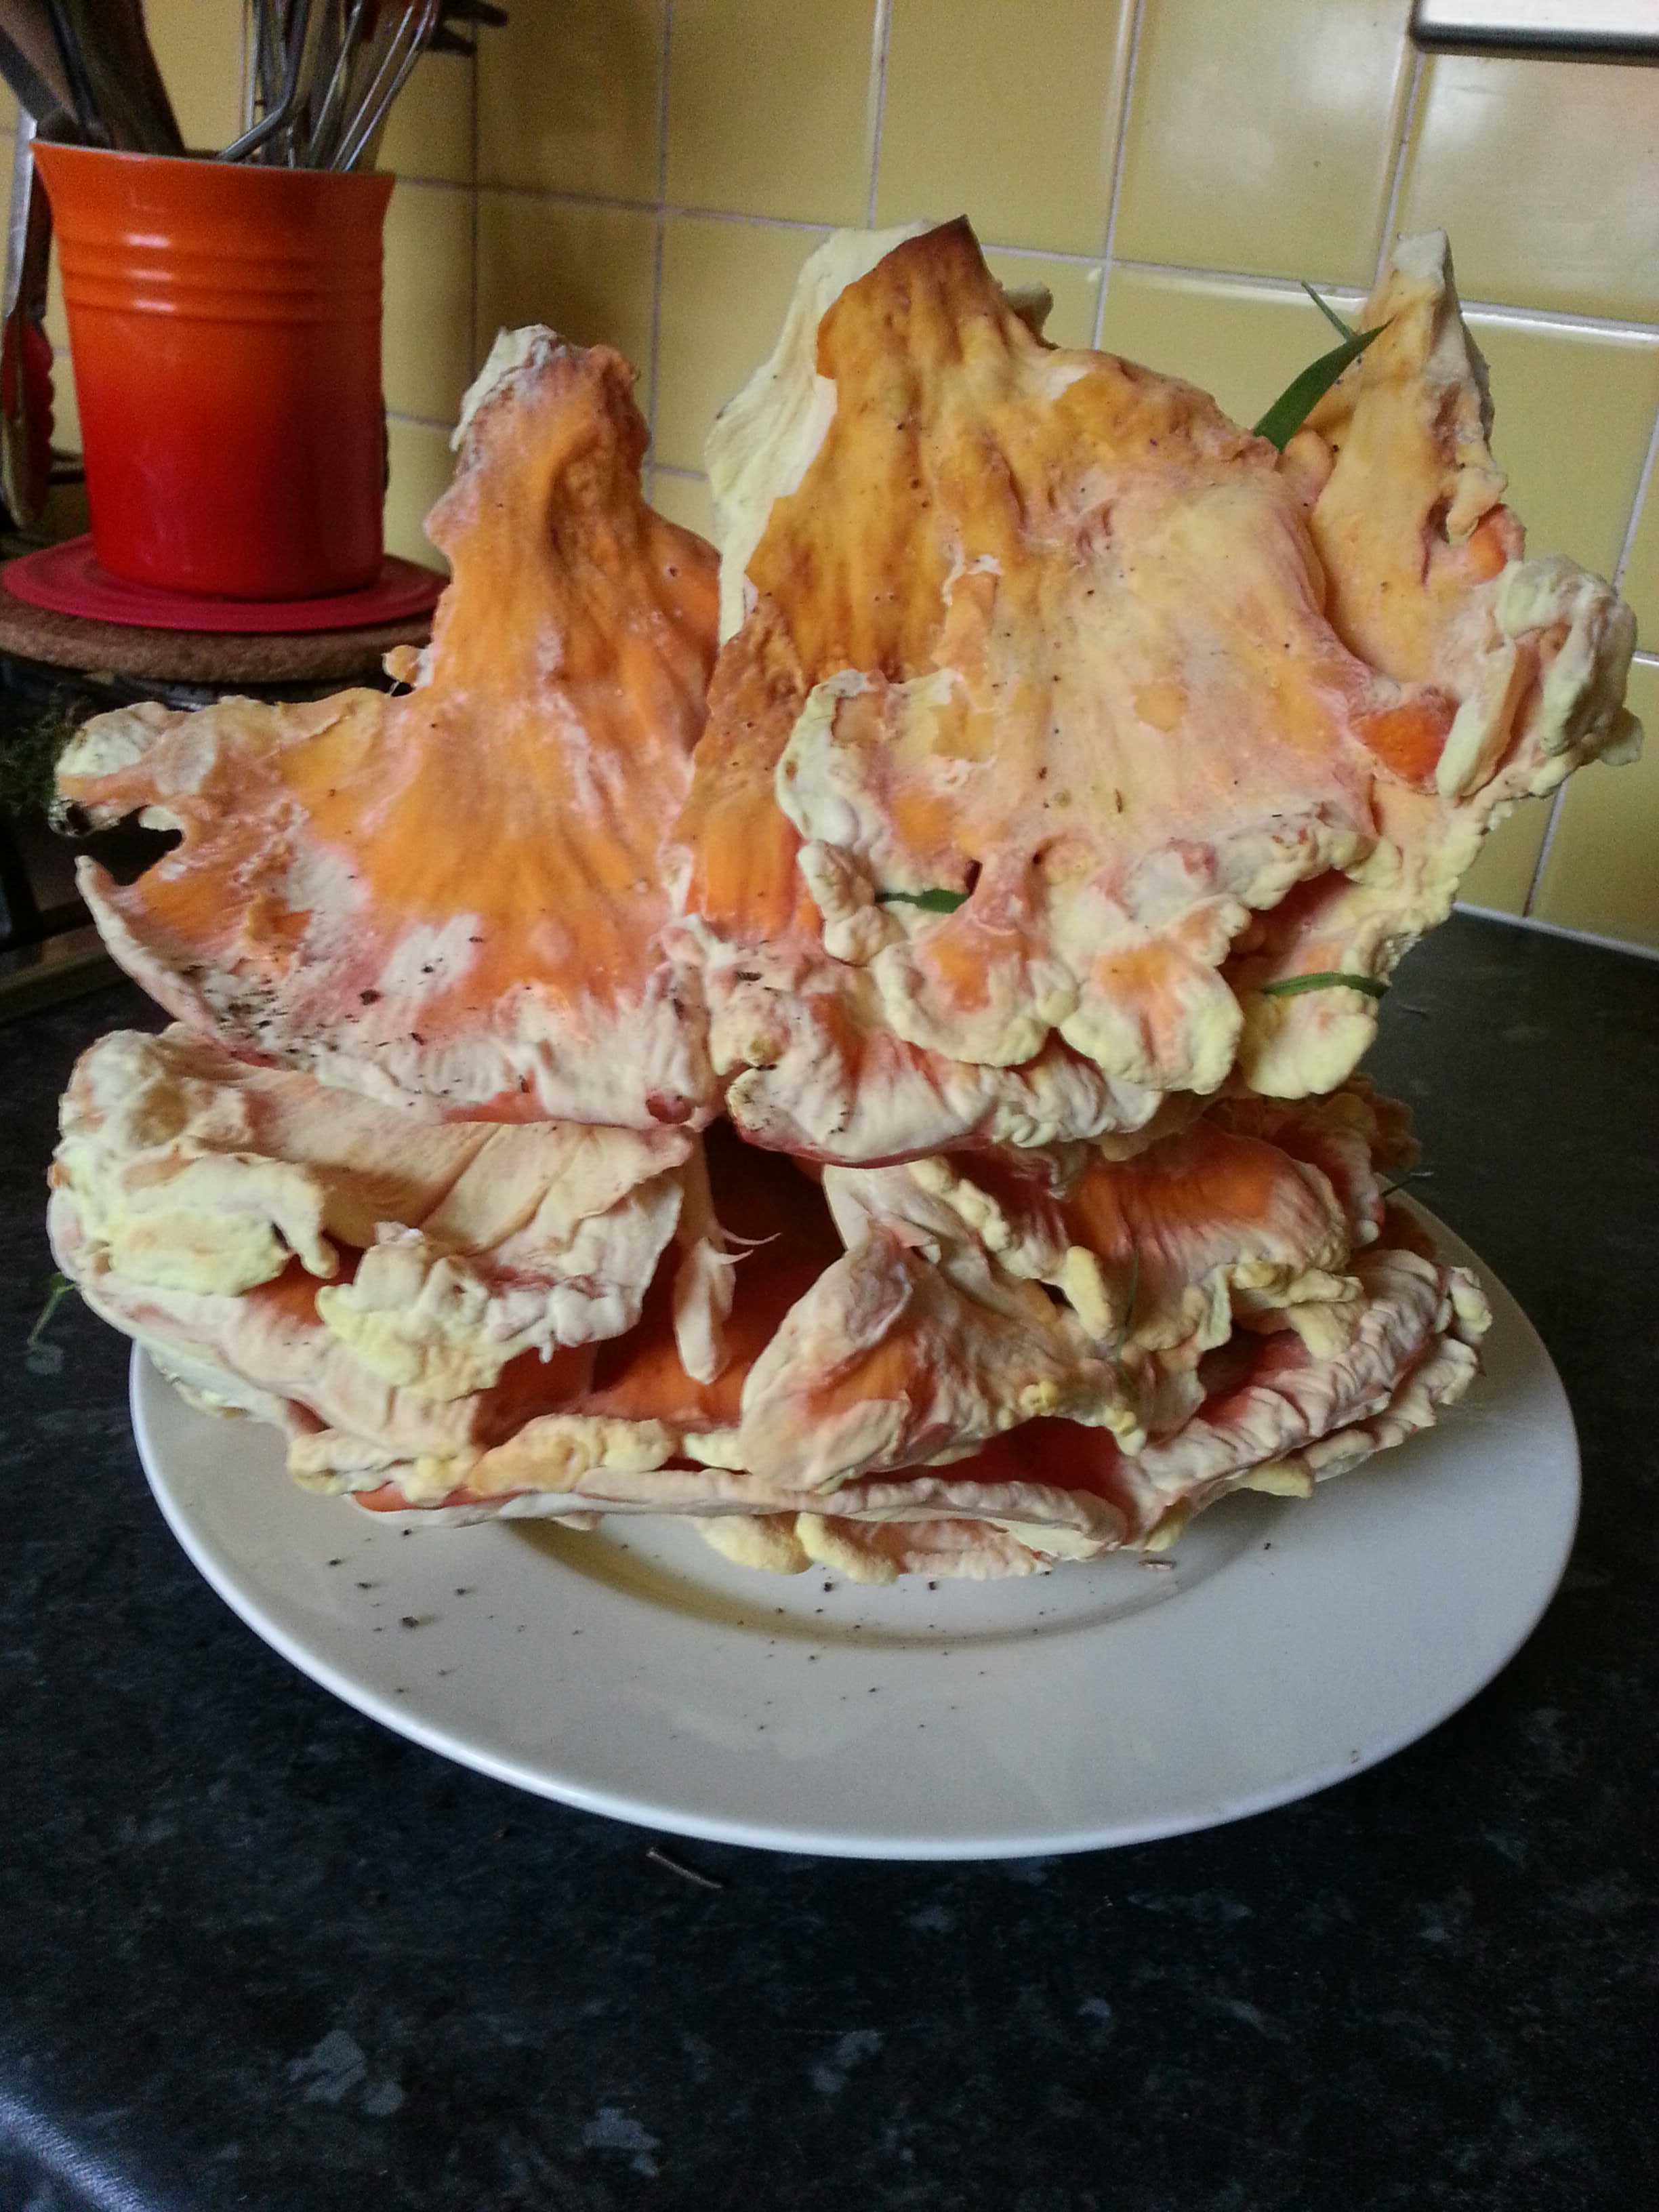
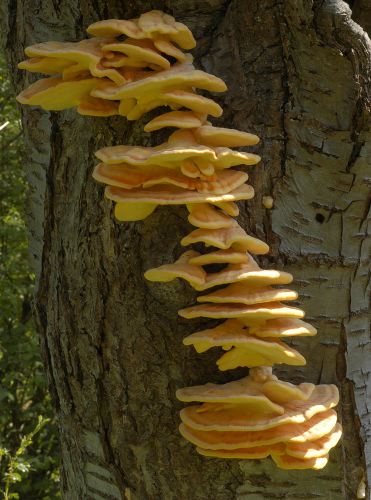
As I was walking in Lyme Park at the weekend I kept an eye out for edible goodies. Lyme Park is great for oyster mushrooms because of the large number of beech trees in the forests there. However, I did not expect to find a splendid chicken-of-the woods growing on a dead tree trunk just off the path to the children’s play area! Goodness knows how many had walked past it unaware of the delicious treat..
Although I am by no means an expert, I recognised it straight away – a large bracket fungus with multiple brackets with a beautiful and almost garish orange and sulphur-yellow coloration. In fact, another name for it is the sulphur polypore (the polypore part is because it doesn’t have gills on its underside like a typical fungus, but many tiny pores). There really is nothing else like it, so you can be pretty certain of what it is.
However, before I go on: always confirm you have correctly identified the fungus and check more than one field guide. The two I use are the River Cottage Handbook No.1: Mushrooms, for quick reference and the Collins Fungi Guide for more detailed descriptions. If you are not 100% sure of what you are picking, don’t pick it!
As with all fungi there is a certain amount of variation – there can be many brackets or a few, they can be a range of widths from a few inches to a couple of feet, the brackets can be neat and flat, or can look as though they’ve poured out and frozen, like orange lava, in a Dali-esque manner. The one I found had grown around blades of grass, trapping them like flies on amber. I didn’t take it all because I thought I’d see if the intact part would grow back – if I’m lucky I might be able to collect a regular ‘crop’ over the next few months!
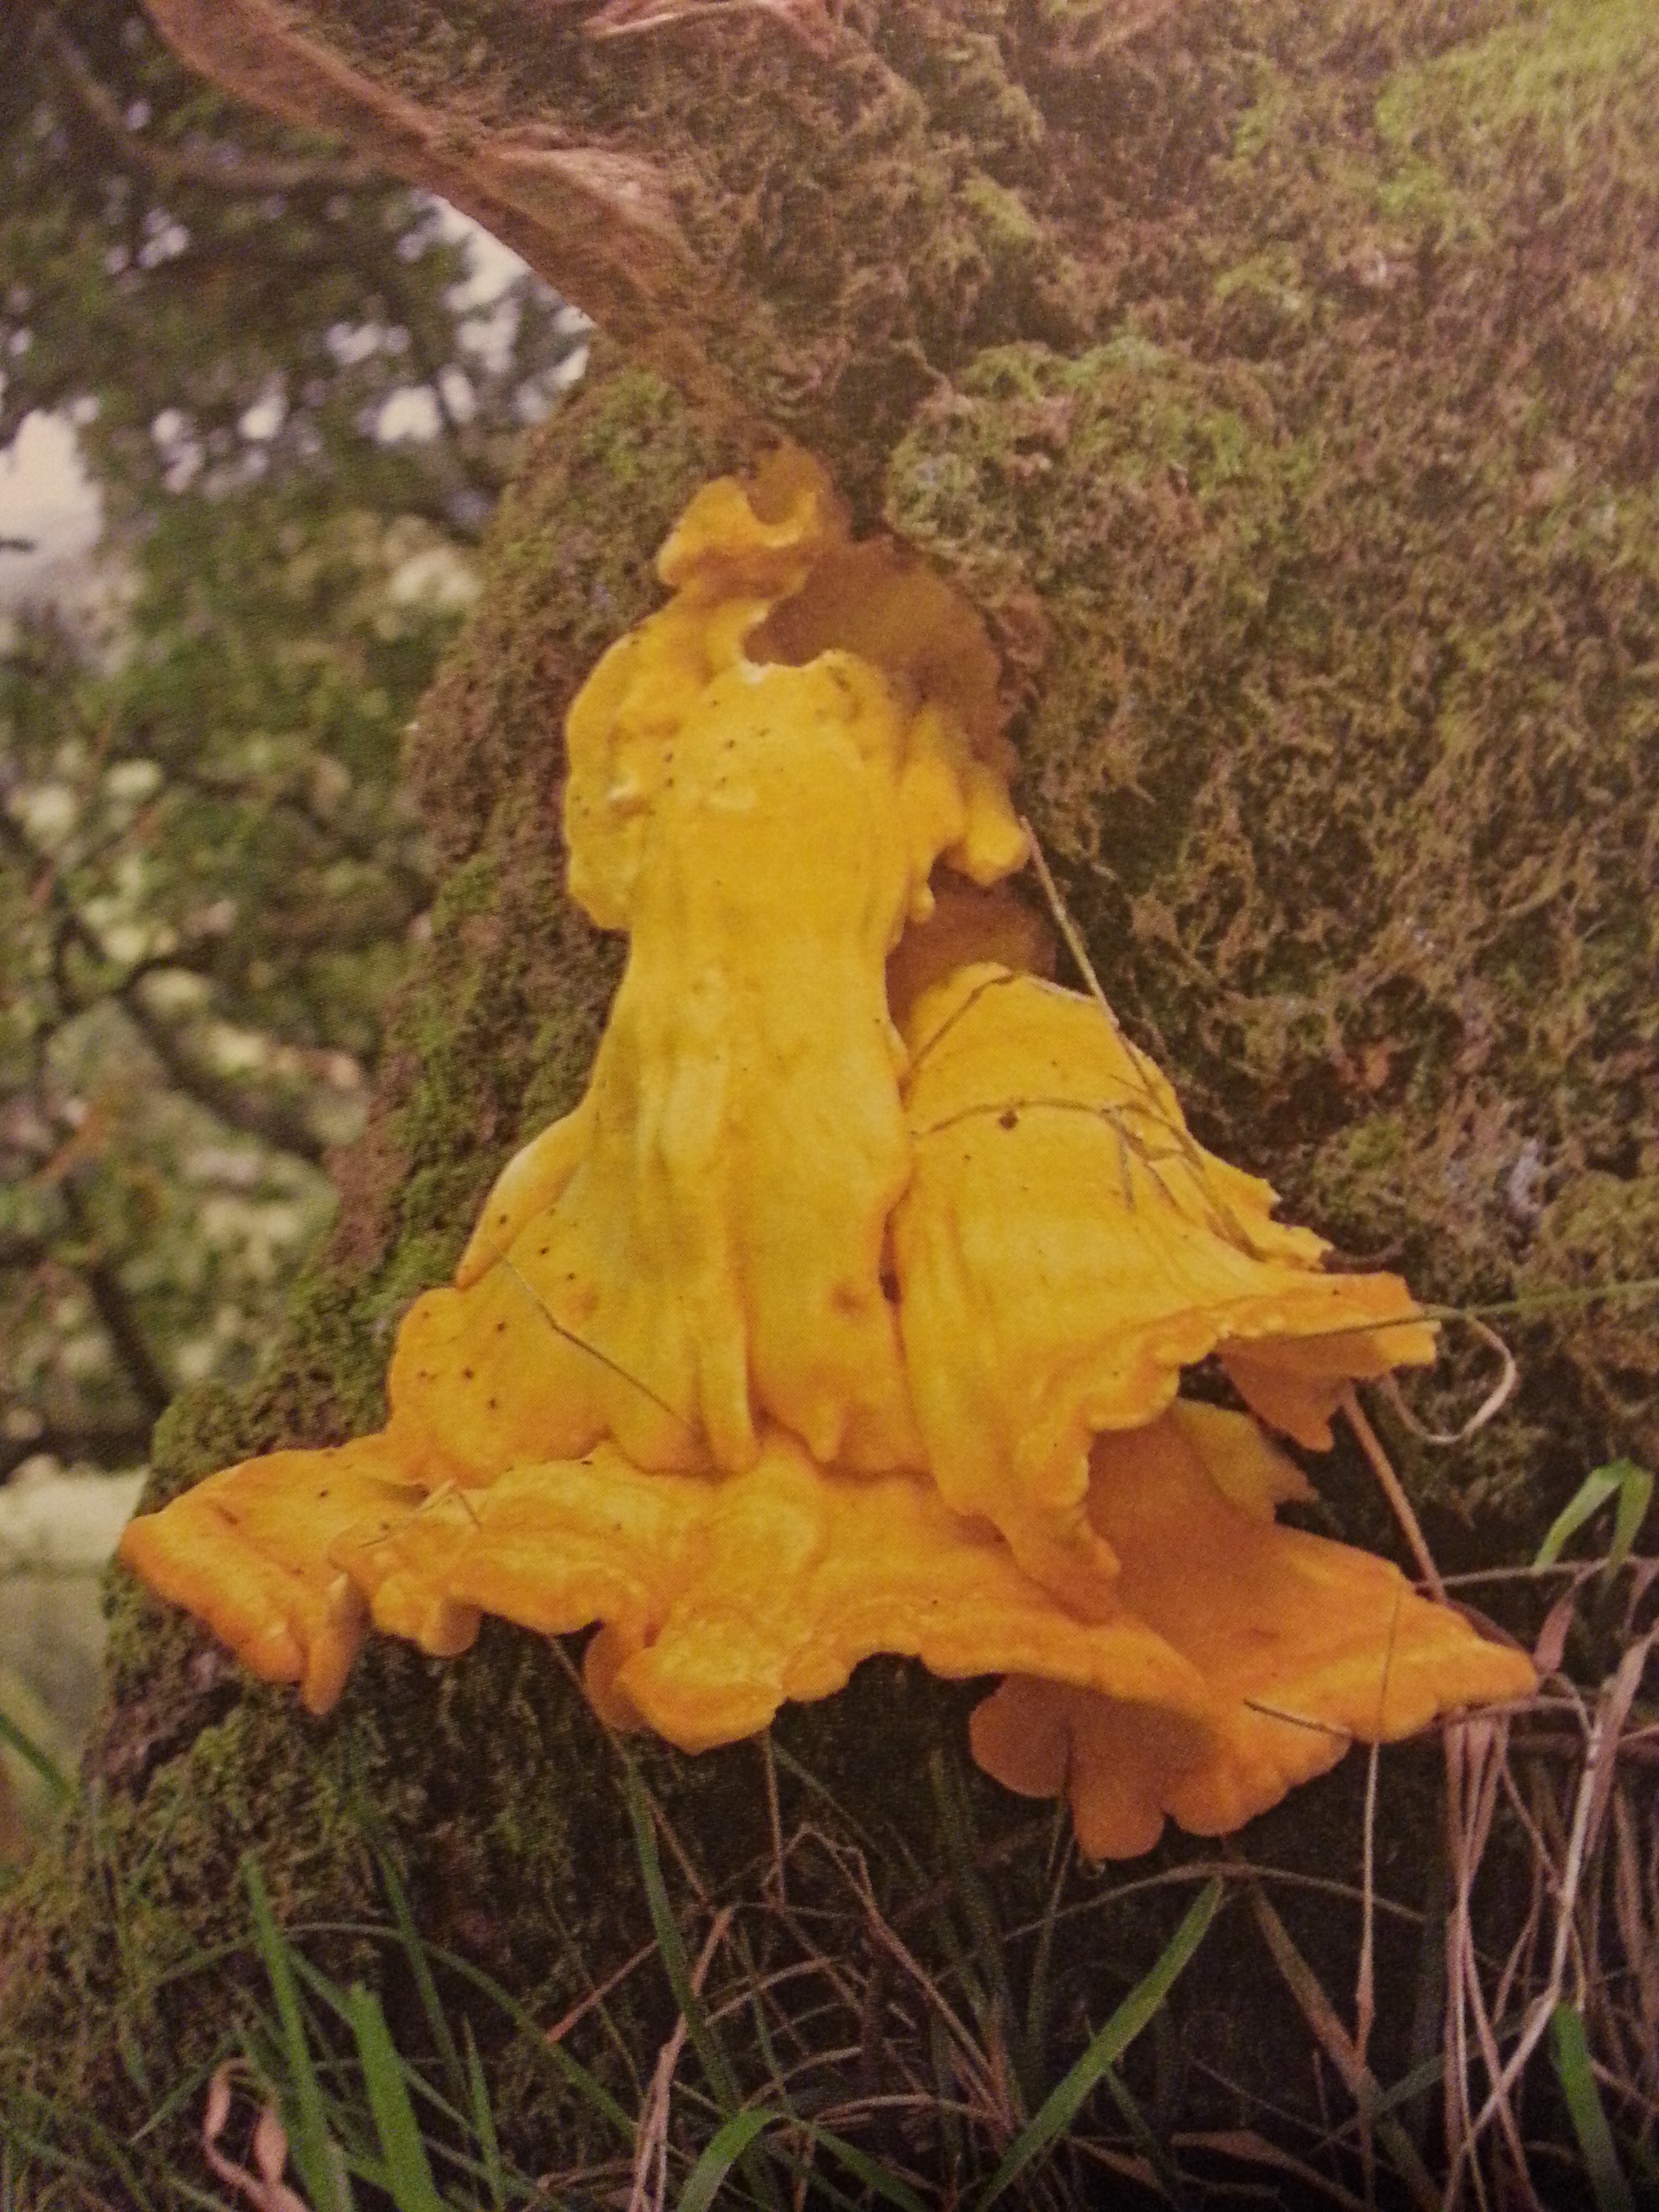
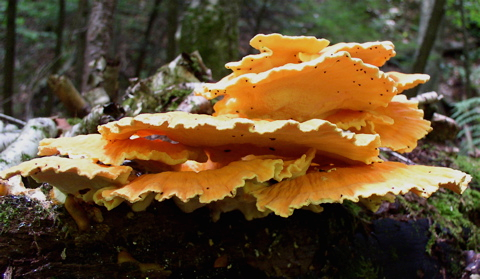
Unfortunately, I didn’t take a photo in situ because my phone has run out of batteries, but here’s a few pictures I have found in books and on the ‘net that shows off this variation:
From (in order) John Wright, First Nature, Cornell University, Malcolm Storey
Chicken-of-the-woods, or to give its scientific name Laetiporus sulphurous, is only found on trees, and the trees can be living or dead. It is usually found in the Summer and Autumn, and occasionally in Winter if it is a mild one. It grows most commonly upon oak and also yew, cedar, cherry wood, sweet chestnut, and willow. It is worth pointing out that all Laetiporus species are edible except if found growing on poisonous trees such as yew and cedar.
Whilst on the subject of edibility, I should also mention that Laetiporus sulphurous is only edible when cooked.
If you like the blogs and podcast I produce, please consider treating me to a virtual coffee or pint, or even a £3 monthly subscription: follow this link for more information.
Cooking with Chicken-of-the-Woods
This fungus is called chicken-of-the-woods because it’s firm flesh is pale and fibrous but tender, like chicken breast. For that reason it makes an excellent meat substitute for vegetarians. What a coincidence it is that I have a friend visiting me who is vegetarian; we could put the chickeniness to the test.
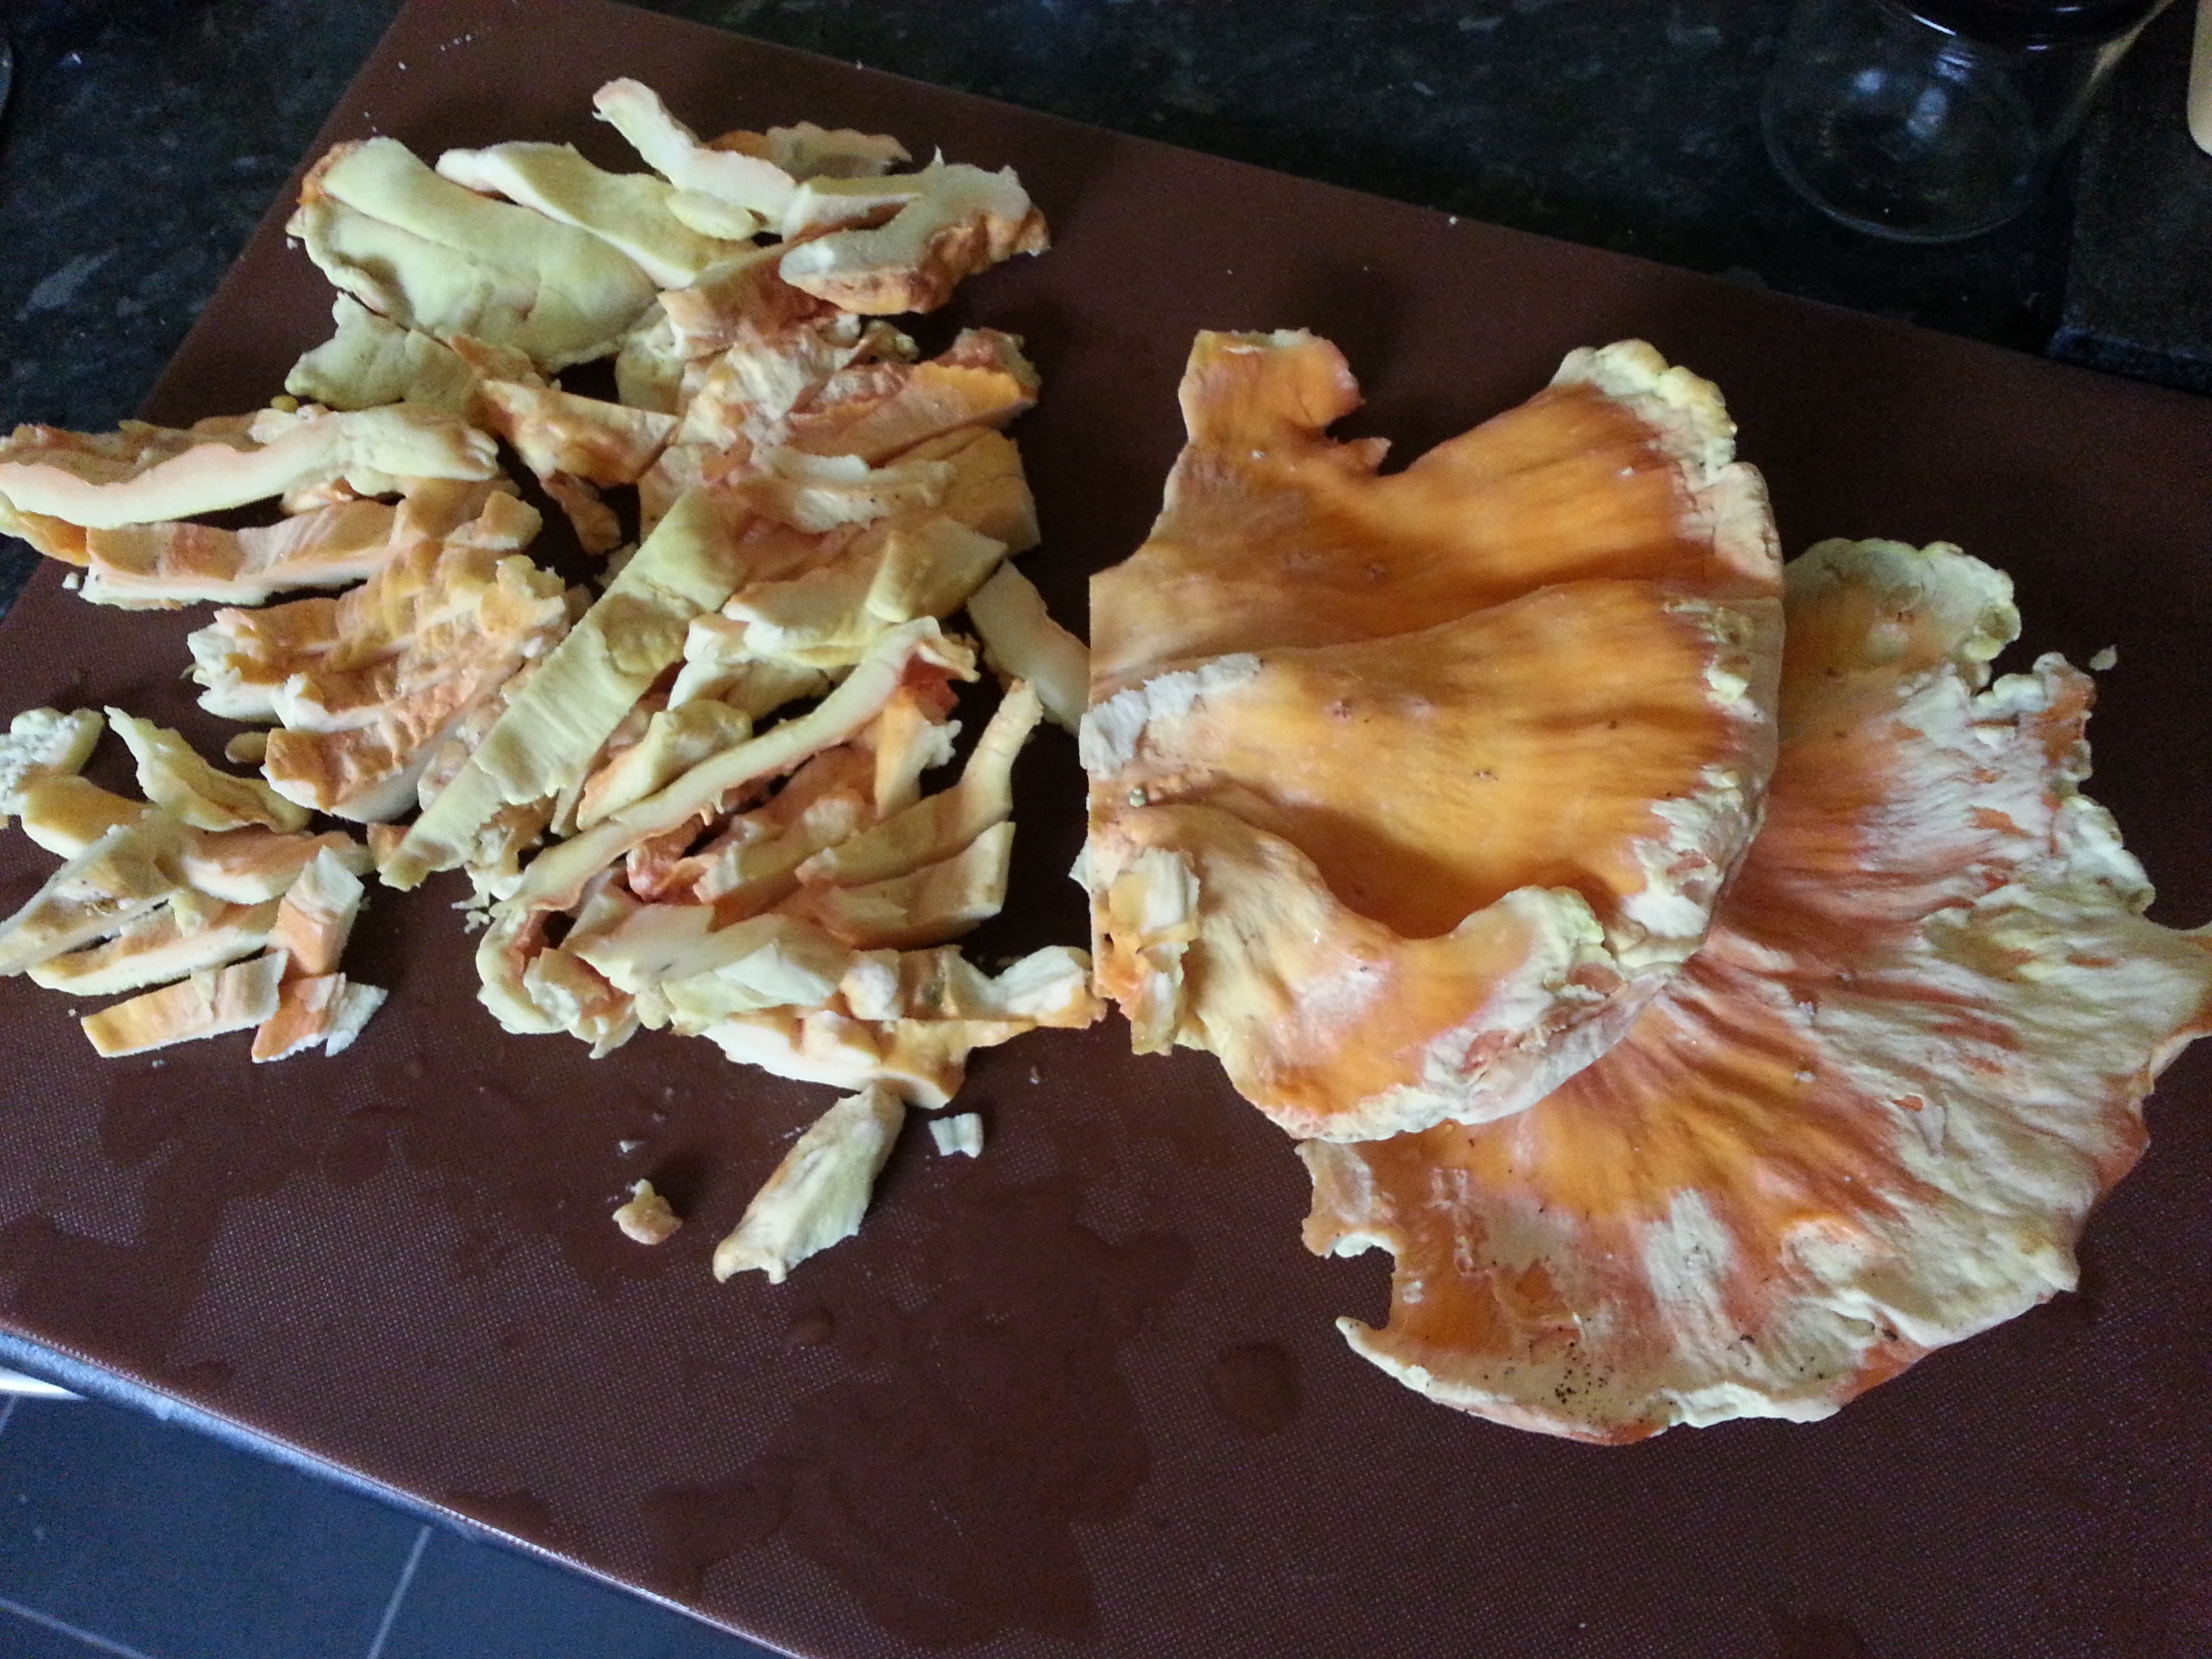
I did hope it was good because the chicken-of-the-woods I found was pretty big, weighing in at 2 kilograms and bigger than my head! It therefore would keep me and my visiting friend Stuart in meals for most of the week.
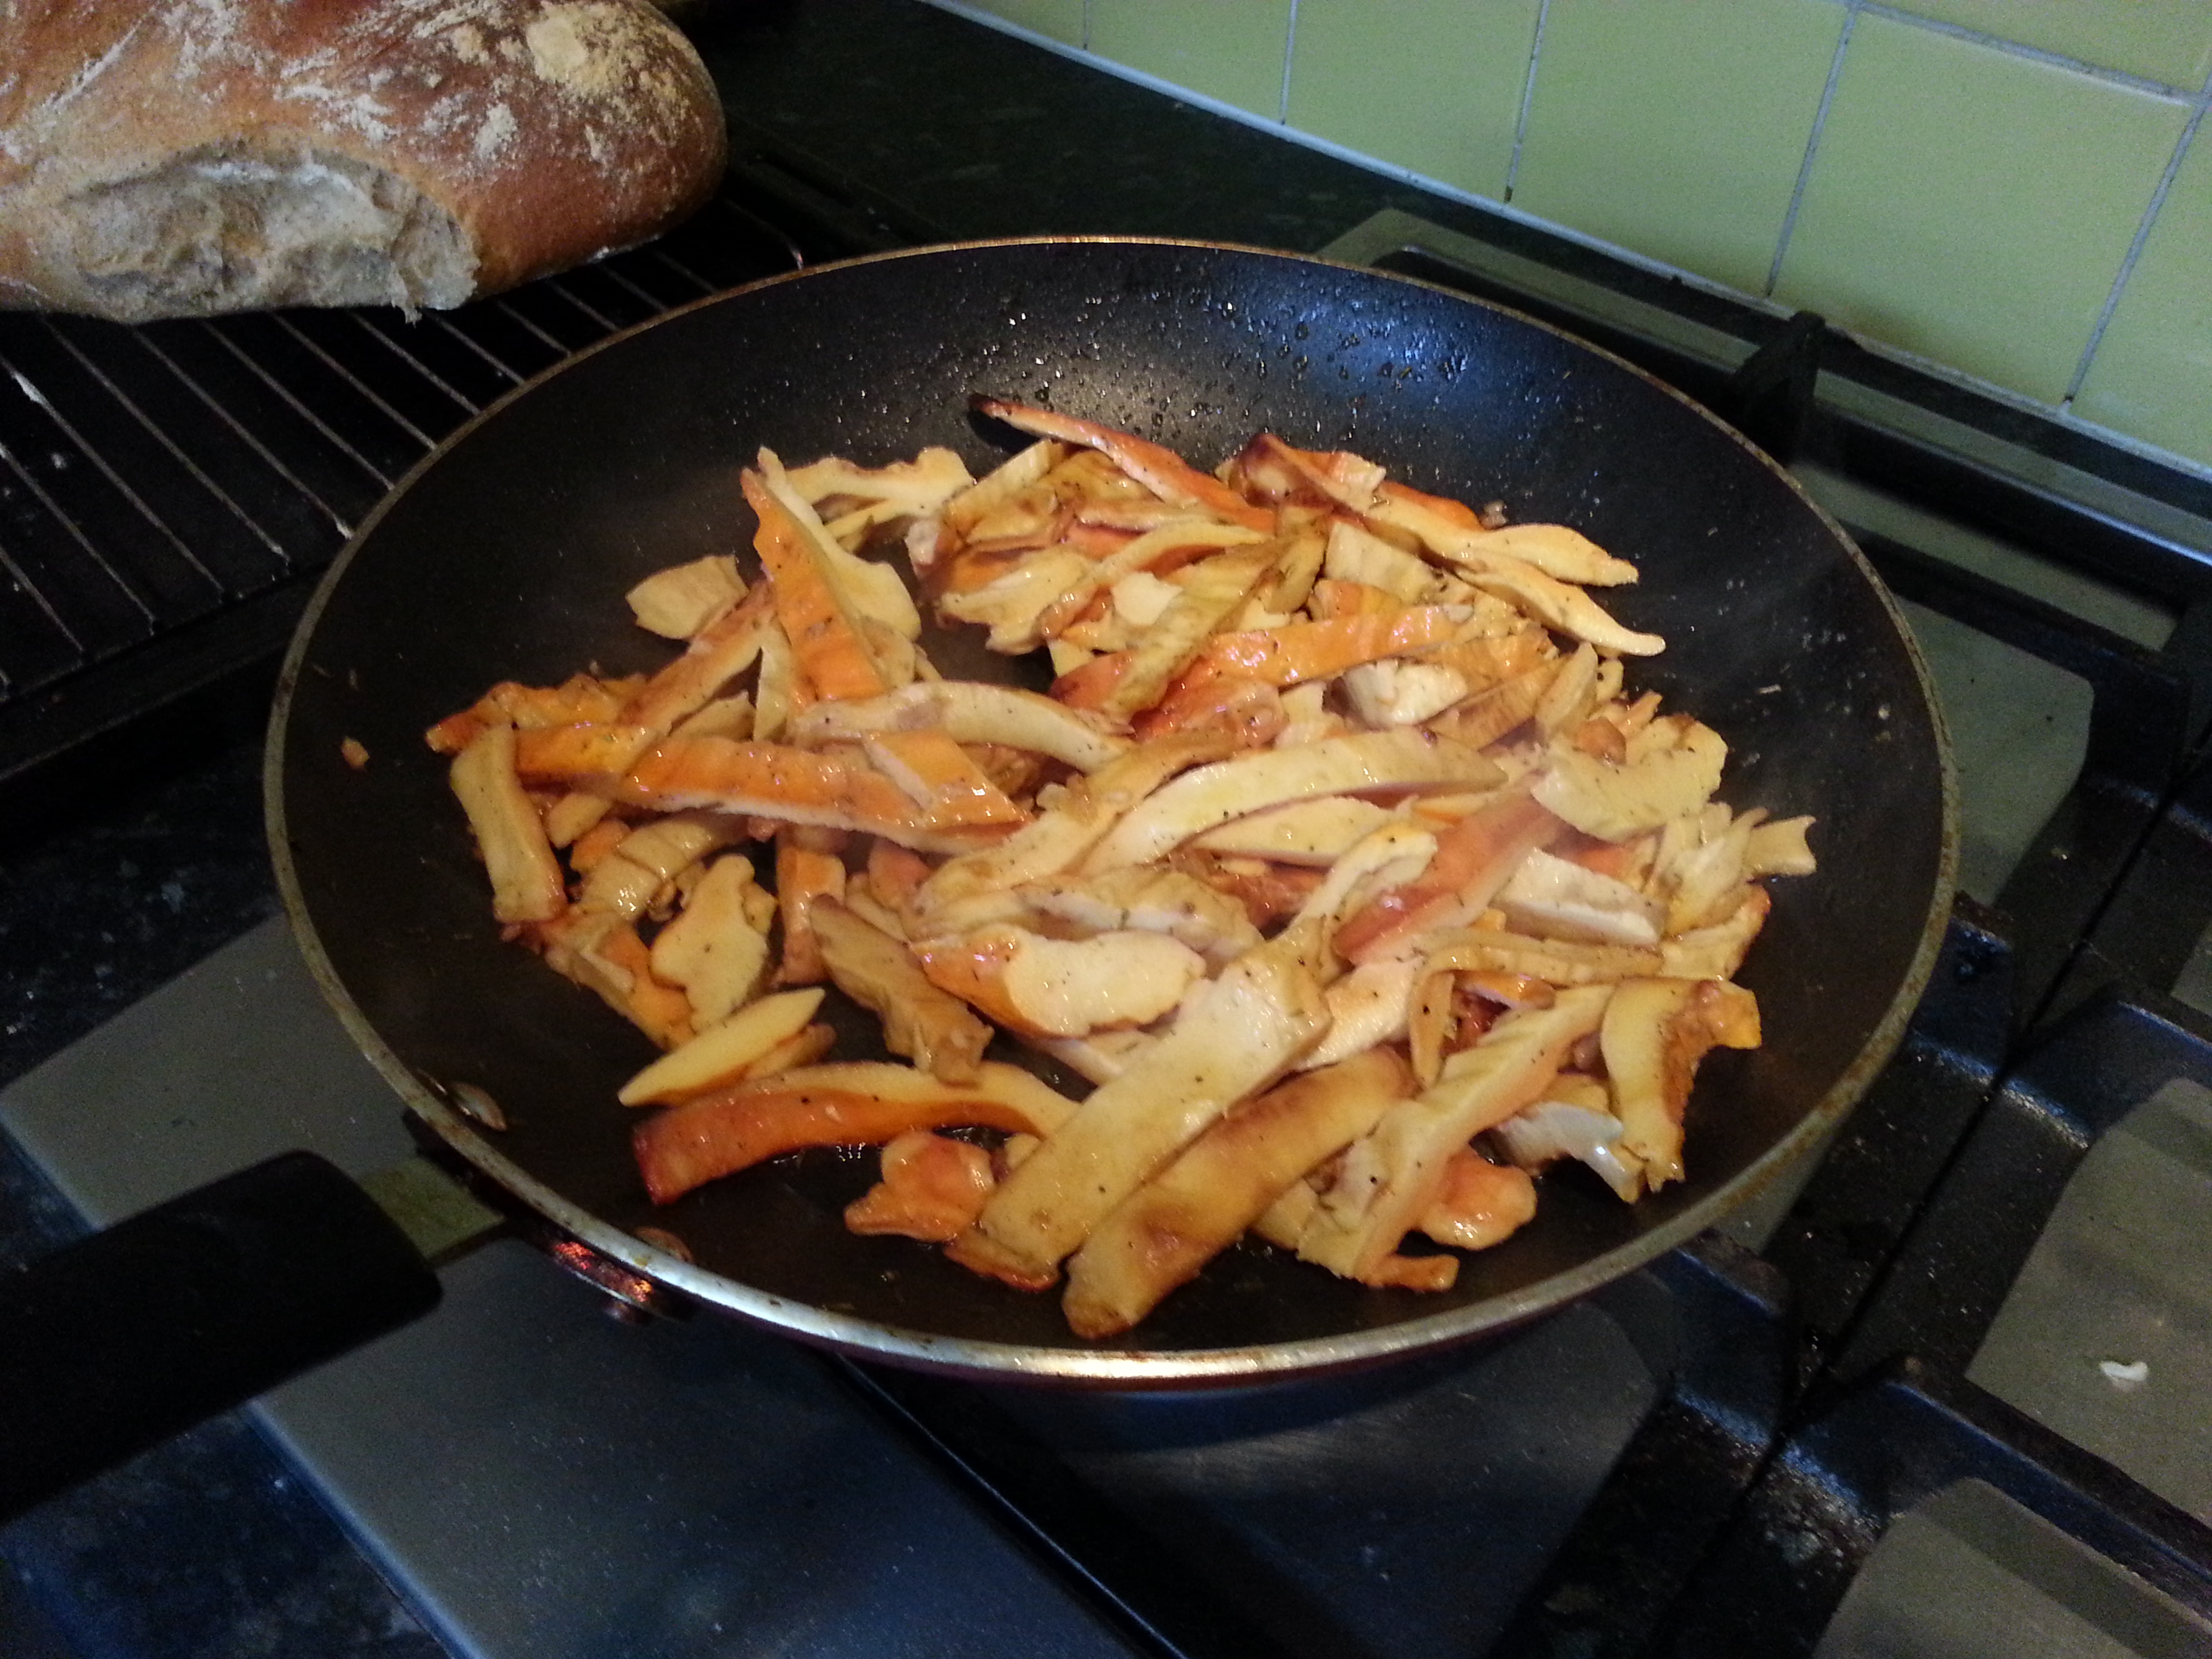
Preparing it is simple. Separate the brackets from each other and trim away and tough woody bits then rinse it under the tap briefly to get rid of any soil and creepy-crawlies, then slice it reasonably thinly. Then it is just a question of integrating it into a recipe. As you slice, you’ll notice that the flesh is rather dry, so when frying it you should add a little water so that it can absorb it and become more typically mushroomy in texture.
Its firm flesh is tender and yielding and definitely has a truffle aroma and flavour when cooked – there’s a lot of umami going on in that mushroom! It’s definitely the tastiest wild mushroom I have found thus far. We couldn’t understand why it hasn’t been cultivated as food because it was so substantial and satisfying, and better than any TVP, Quorn or other mock meats. Maybe I’ve found a gap in the market…
Here’s what I made with it:
One third was turned in simple mushrooms on toast – a recipe can be found for that here – the only changes I made was to add a little water after a few minutes’ sautéing, and to omit the cream/milk. Whenever you try a mushroom the first time, this is the thing to cook for it shows it off in all its glory! It fed 4.
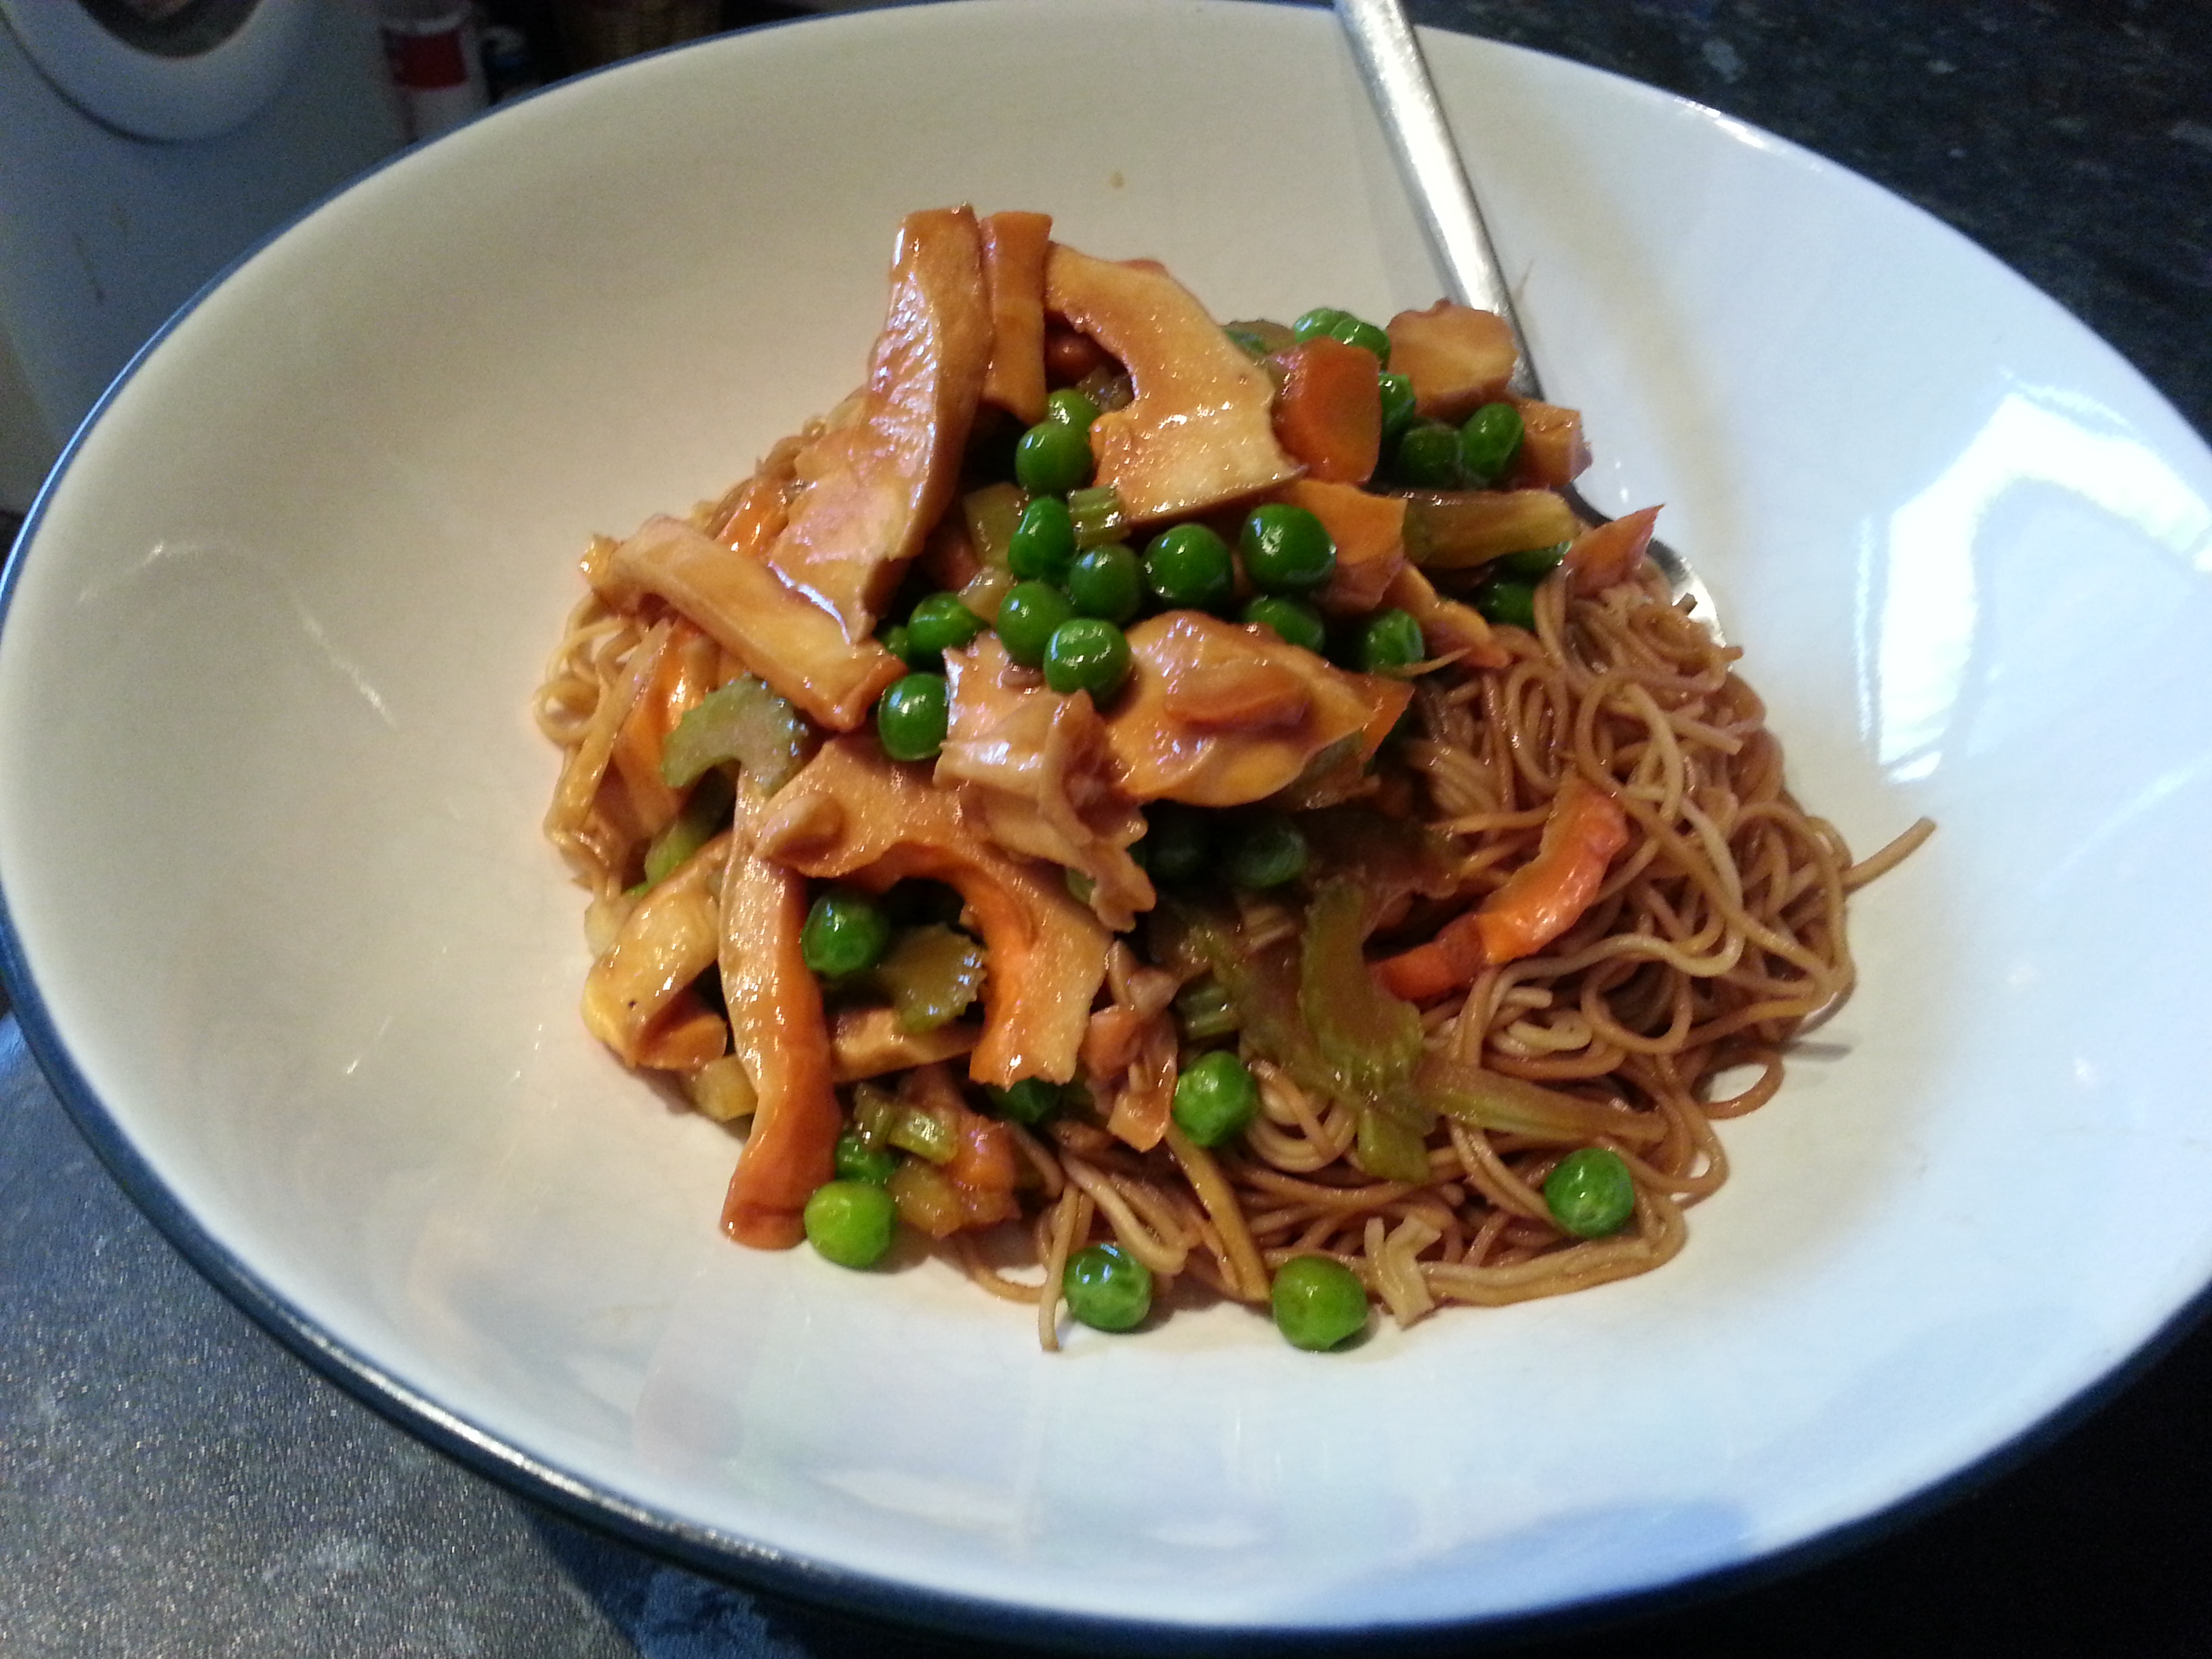
The second third was used in a stir fry with the typical stir-fry veg, soy, (vegetarian) oyster sauce and, again, some water. This really showed off its meaty qualities. Excellent. This fed 2.
The last third was a spinach and chicken-of-the-woods lasagne. I made a simple béchamel sauce flavoured with Lancashire cheese, black pepper and nutmeg, then sautéed the mushrooms in olive oil, added some water and steamed the spinach on top of the mushrooms. Everything was layered up in the usual way, finished with some Parmesan and breadcrumbs and baked. This fed 4….
Now it is all used up, and we didn’t even get bored of it. I do hope another grows back on that tree trunk…
No, I haven’t died, so cancel the wake. I’ve been a little busy of late and the poor old blog has suffered from scant postings. For that I apologise. I need to catch up with a heck of a lot of food stories, recipes and history with you all; I may not have been blog-writing, but I have been eating!
At the end of June, I popped down to the beautiful city of Bath for the weekend to visit friends and had a jolly old time. The great thing about Bath is that it has such history; you cannot help but find something to be amazed by at the turn of every street corner.
Entrance to the Roman Baths
The spa at Bath has attracted people for millennia – there is archaeological evidence of human settlement going back 10 000 years. The city of Bath itself was founded in 863BC by a chap called Bladud. Suffering from leprosy, he had been ostracised from society and found that bathing in the warm, muddy springs, after seeing pigs doing the same, cured him. It must have put him in fine fettle because he later went on to become the ninth King of the Britons and to father King Lear.
Of course it was the Romans that really transformed the place, creating Aqua Sulis with the baths that are still there today in fine working order.
From the point of view of food, however, Bath really came into its own in the eighteenth and nineteenth centuries when it was deluged by the middle classes that wanted to get away. The Roman Baths and Pump Room were restored to their former glories after centuries of neglect, making Bath the best of all the spa towns. This wasn’t just because of its locality to London, or that it was in a lovely part of England; it was because Bath simply had the best of everything. Bath was a trade epicentre: excellent salt marsh lamb from Wales, a seemingly endless supply of fruit and vegetables from Tewkesbury, cider from Glastonbury, apricots, cherries and plums from the Cotswolds, cream and junkets from Devon and Somerset, excellent freshwater fish – especially elvers – from the Severn Valley as well as sea fish from the ports of Cornwall, all came to one place. And that was just British produce! I haven’t mentioned the French brandy, the Spanish wine or the exotic spices from further afield.
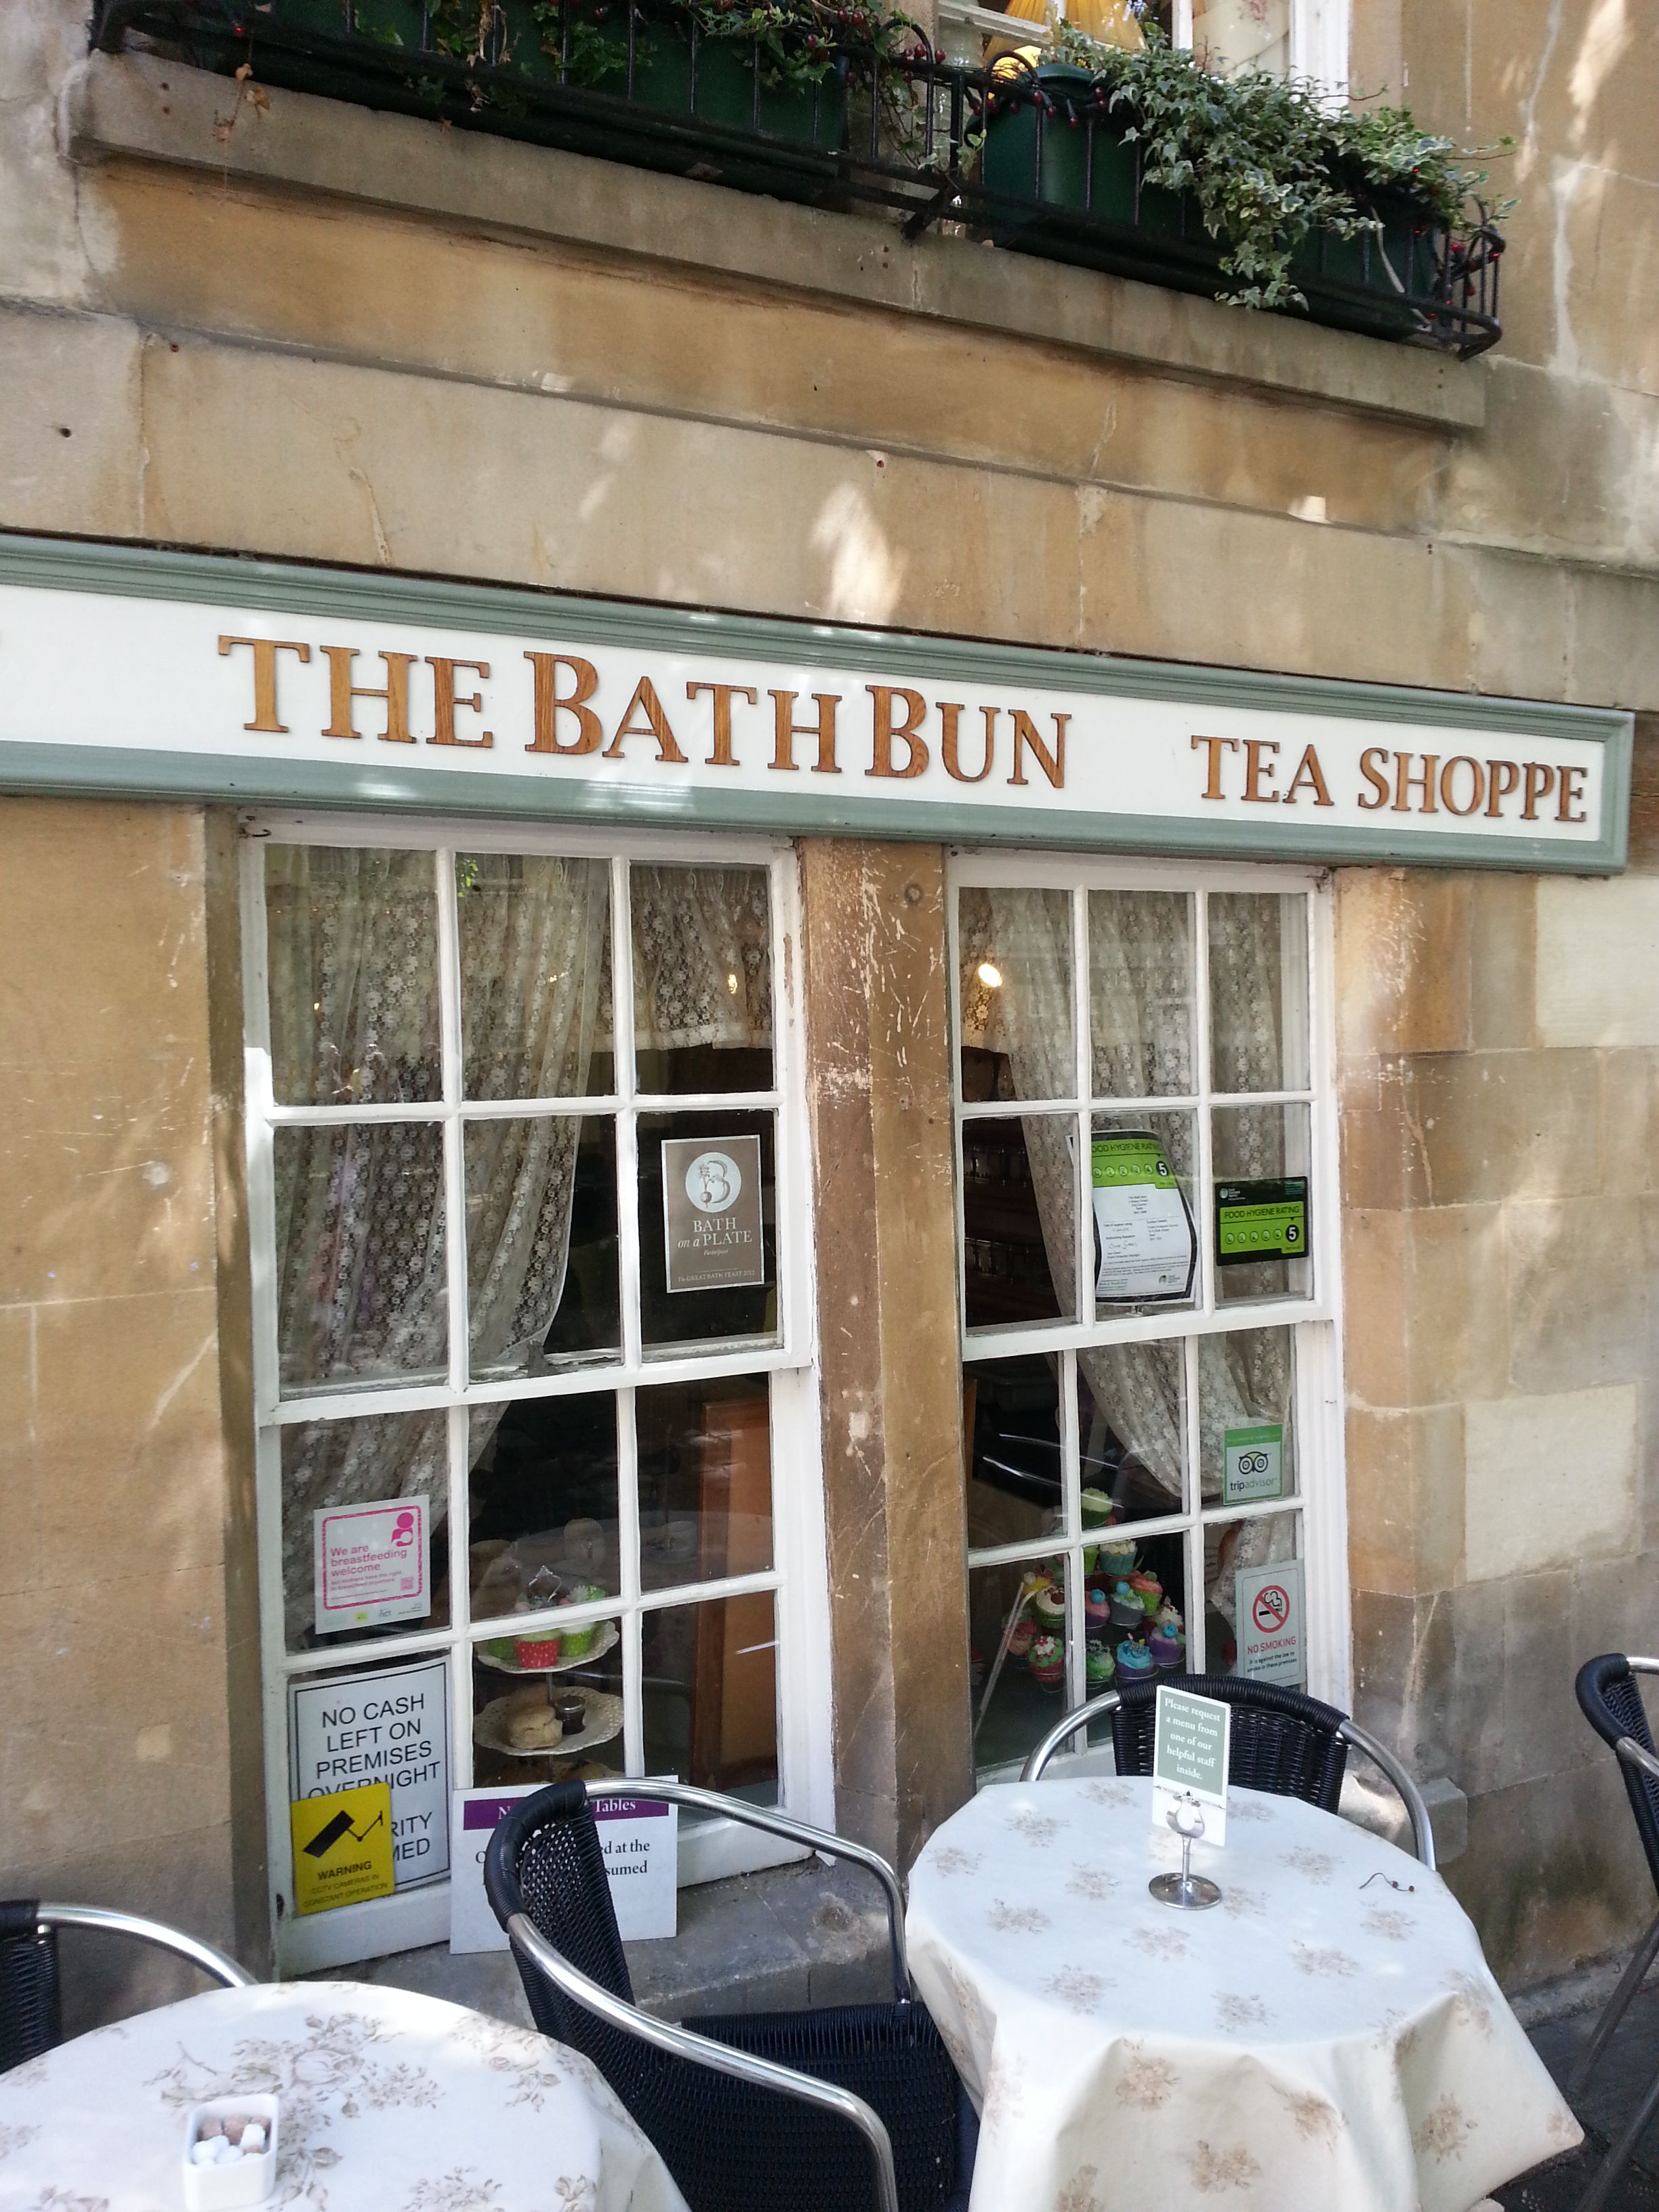
All this has made Bath what it is today. Its food heritage, however, seems to have been boiled down into two things: Bath buns and Sally Lunns.
I’ve never seen either Bath buns or Sally Lunns anywhere other than Bath itself, which just goes to show that we still have regional cooking in an age with a seemingly swirling and mixing population. I like that you don’t see them everywhere; it makes eating one a rare treat to be relished. There are, of course, stories attached to the invention of these enriched breads which should be taken with a huge pinch of salt.
Bath Buns
A bath bun is a large fruit bun, made with dough similar to that of a Chelsea bun or hot cross bun. The bread dough is enriched with eggs, sugar and currants. At the bottom of each bun is a lump of sugar and the freshly-baked bun is finished with a sticky wash, extra currants and crushed loaf sugar or sugar nibs.
Anatomy of a Bath bun
The Bath bun is said to have been invented by a doctor called William Oliver in the 18th century. After his patients visited the Roman baths he would give them a nourishing Bath bun. It was soon apparent that his plan was not working as he expected when he realised his patients were getting somewhat portly. He withdrew the buns and replaced them with hard, dry water biscuits.
I must say that I would have become a hypochondriac if I was one of Oliver’s patients! I would have used any excuse to get my hands on one. They are so delicious – sweet and sticky and very bad for you. I can’t put the attractiveness of the Bath bun better than W Chambers, writing in his Edinburgh Journal of 1855:
The Bath-bun is a sturdy and gorgeous usurper – a new potentiate, whose blandishments have won away a great many children, we regret to say, from their lawful allegiance to the plum-bun. The Bath-bun is not only a toothsome dainty, but showy and alluring withal. It was easier for ancient mariners to resist the temptations of the Sirens, than it is for a modern child to turn away from a Bath-bun…Large, solid, and imposing, it challenges attention, and fascinates its little purchasers.
We can see from this quote that the Bath bun was popular, not just in Bath, but England and Scotland, so what happened to it? Enriched breads are still pretty popular in Britain, even with the advent of comparatively modern chemically-aerated sponge cakes. Strange.
If you like the blogs and podcast I produce, please consider treating me to a virtual coffee or pint, or even a £3 monthly subscription: follow this link for more information.
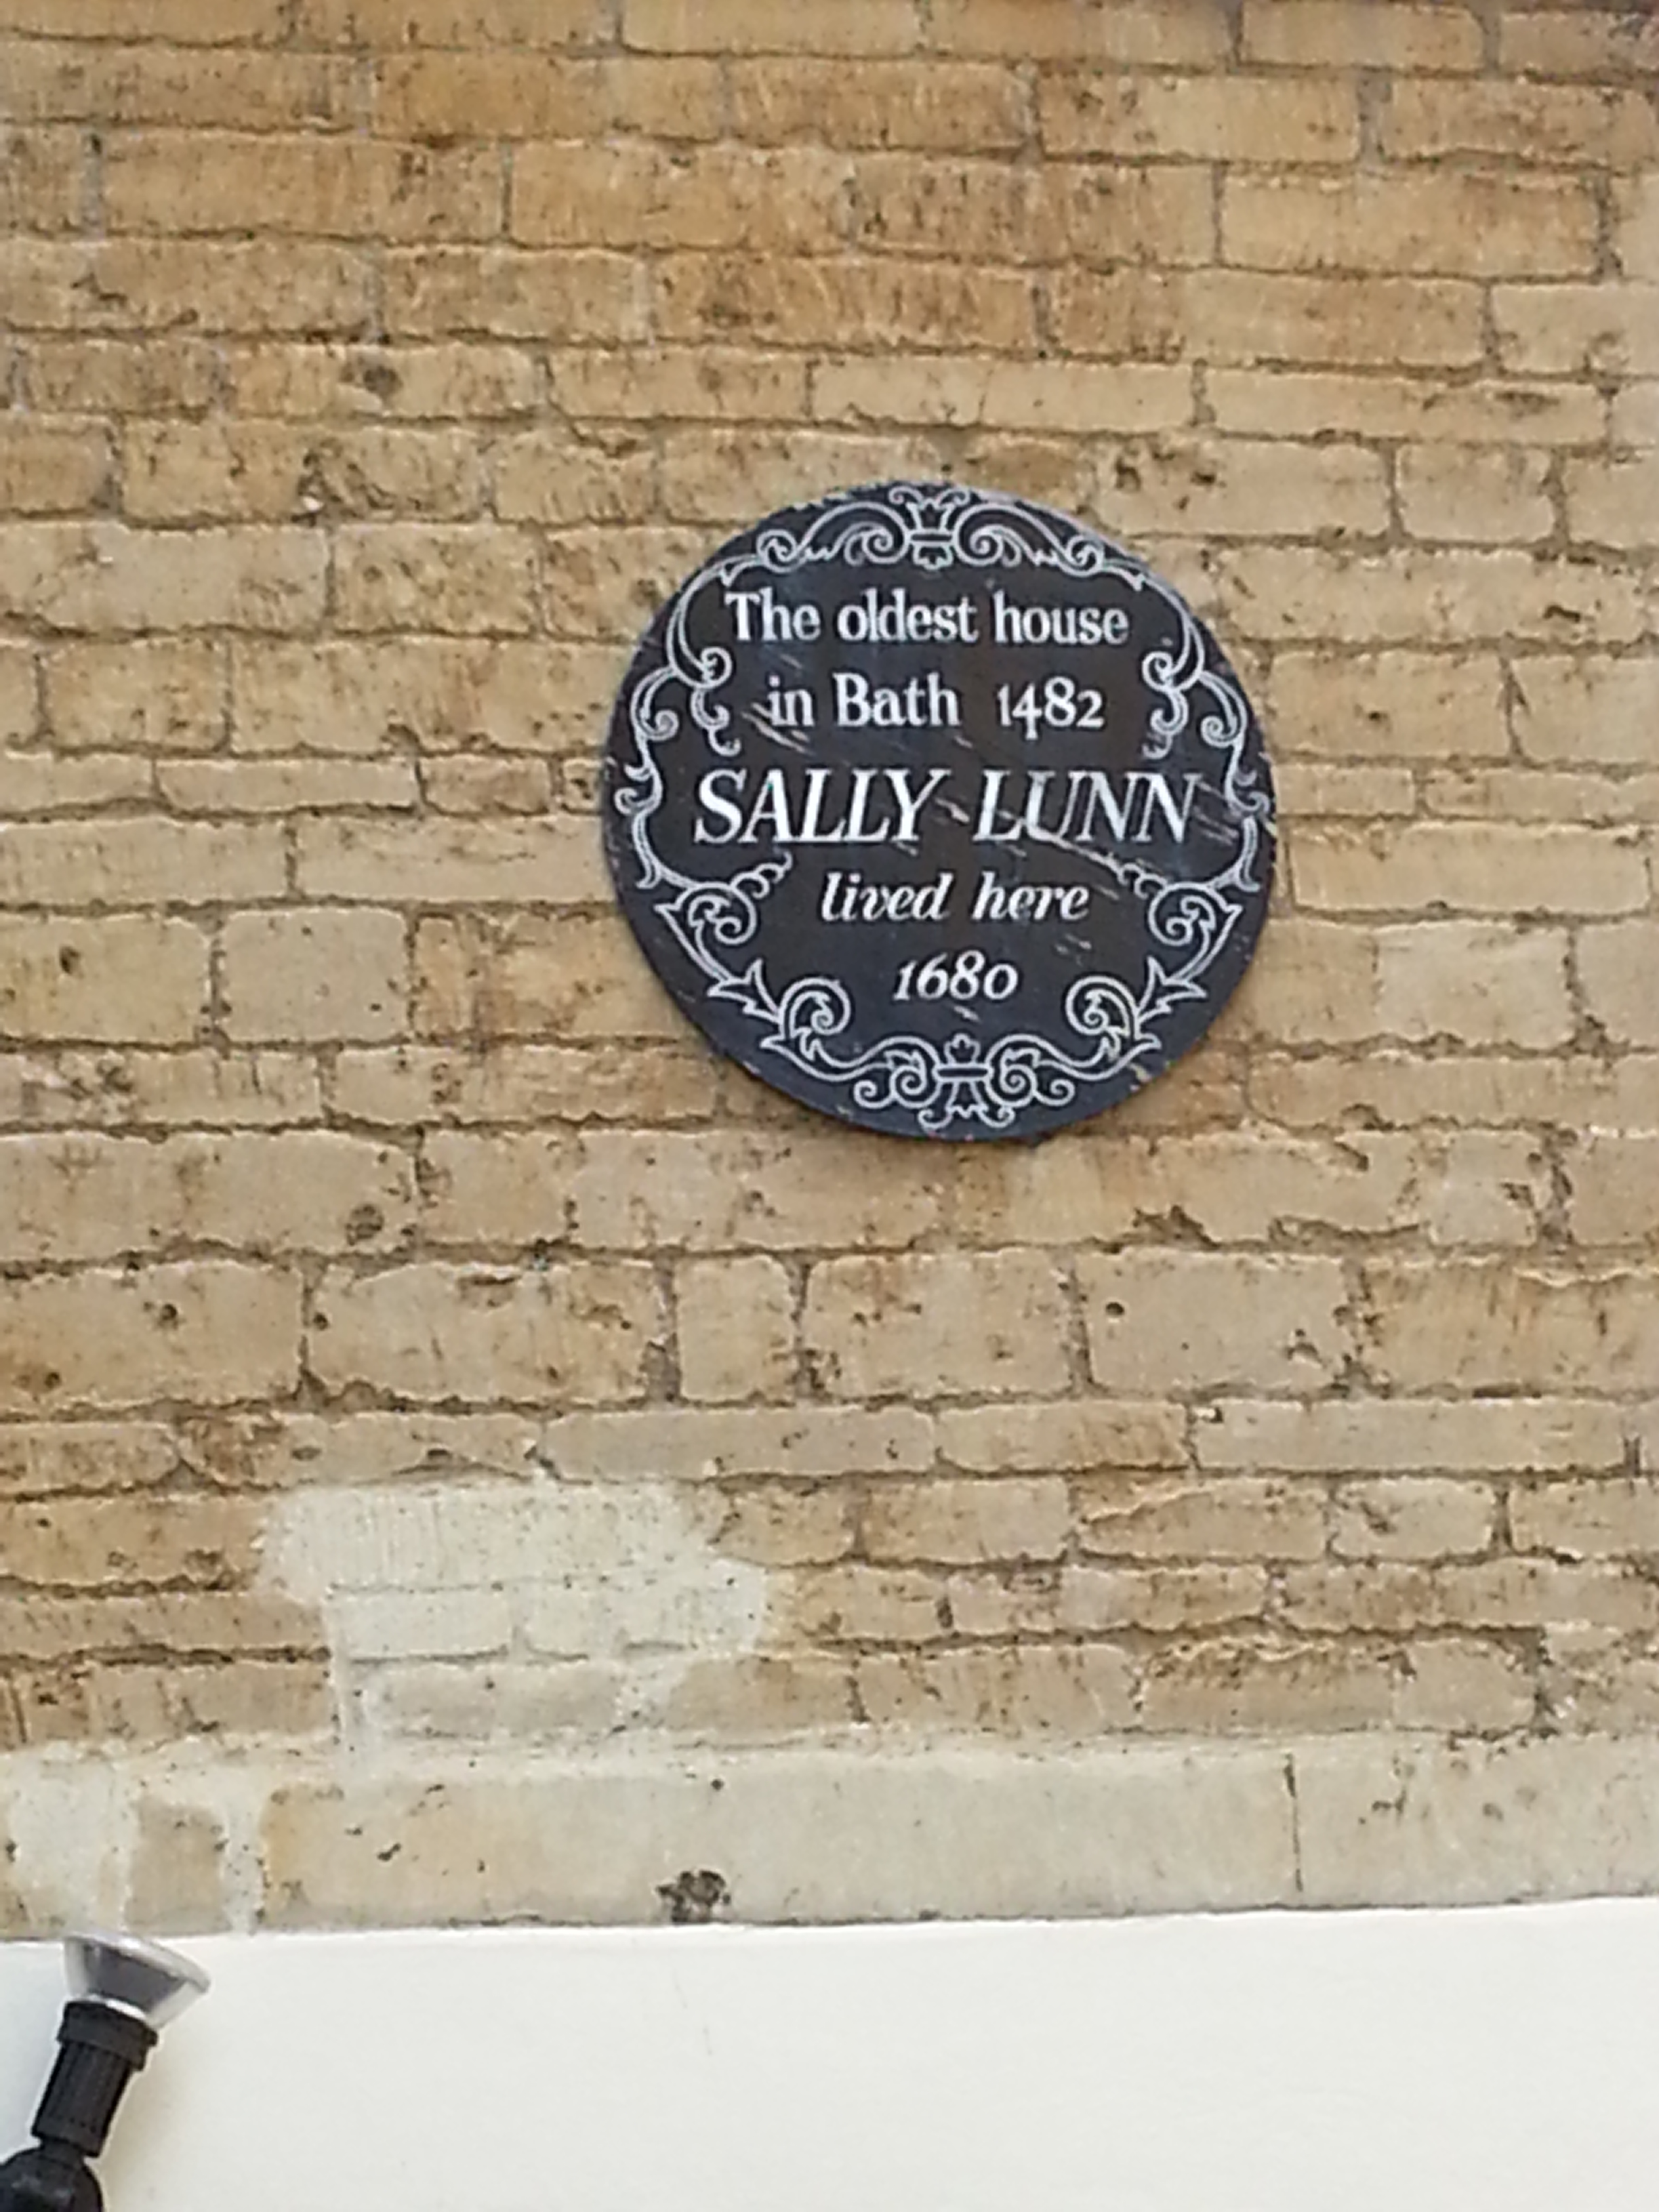
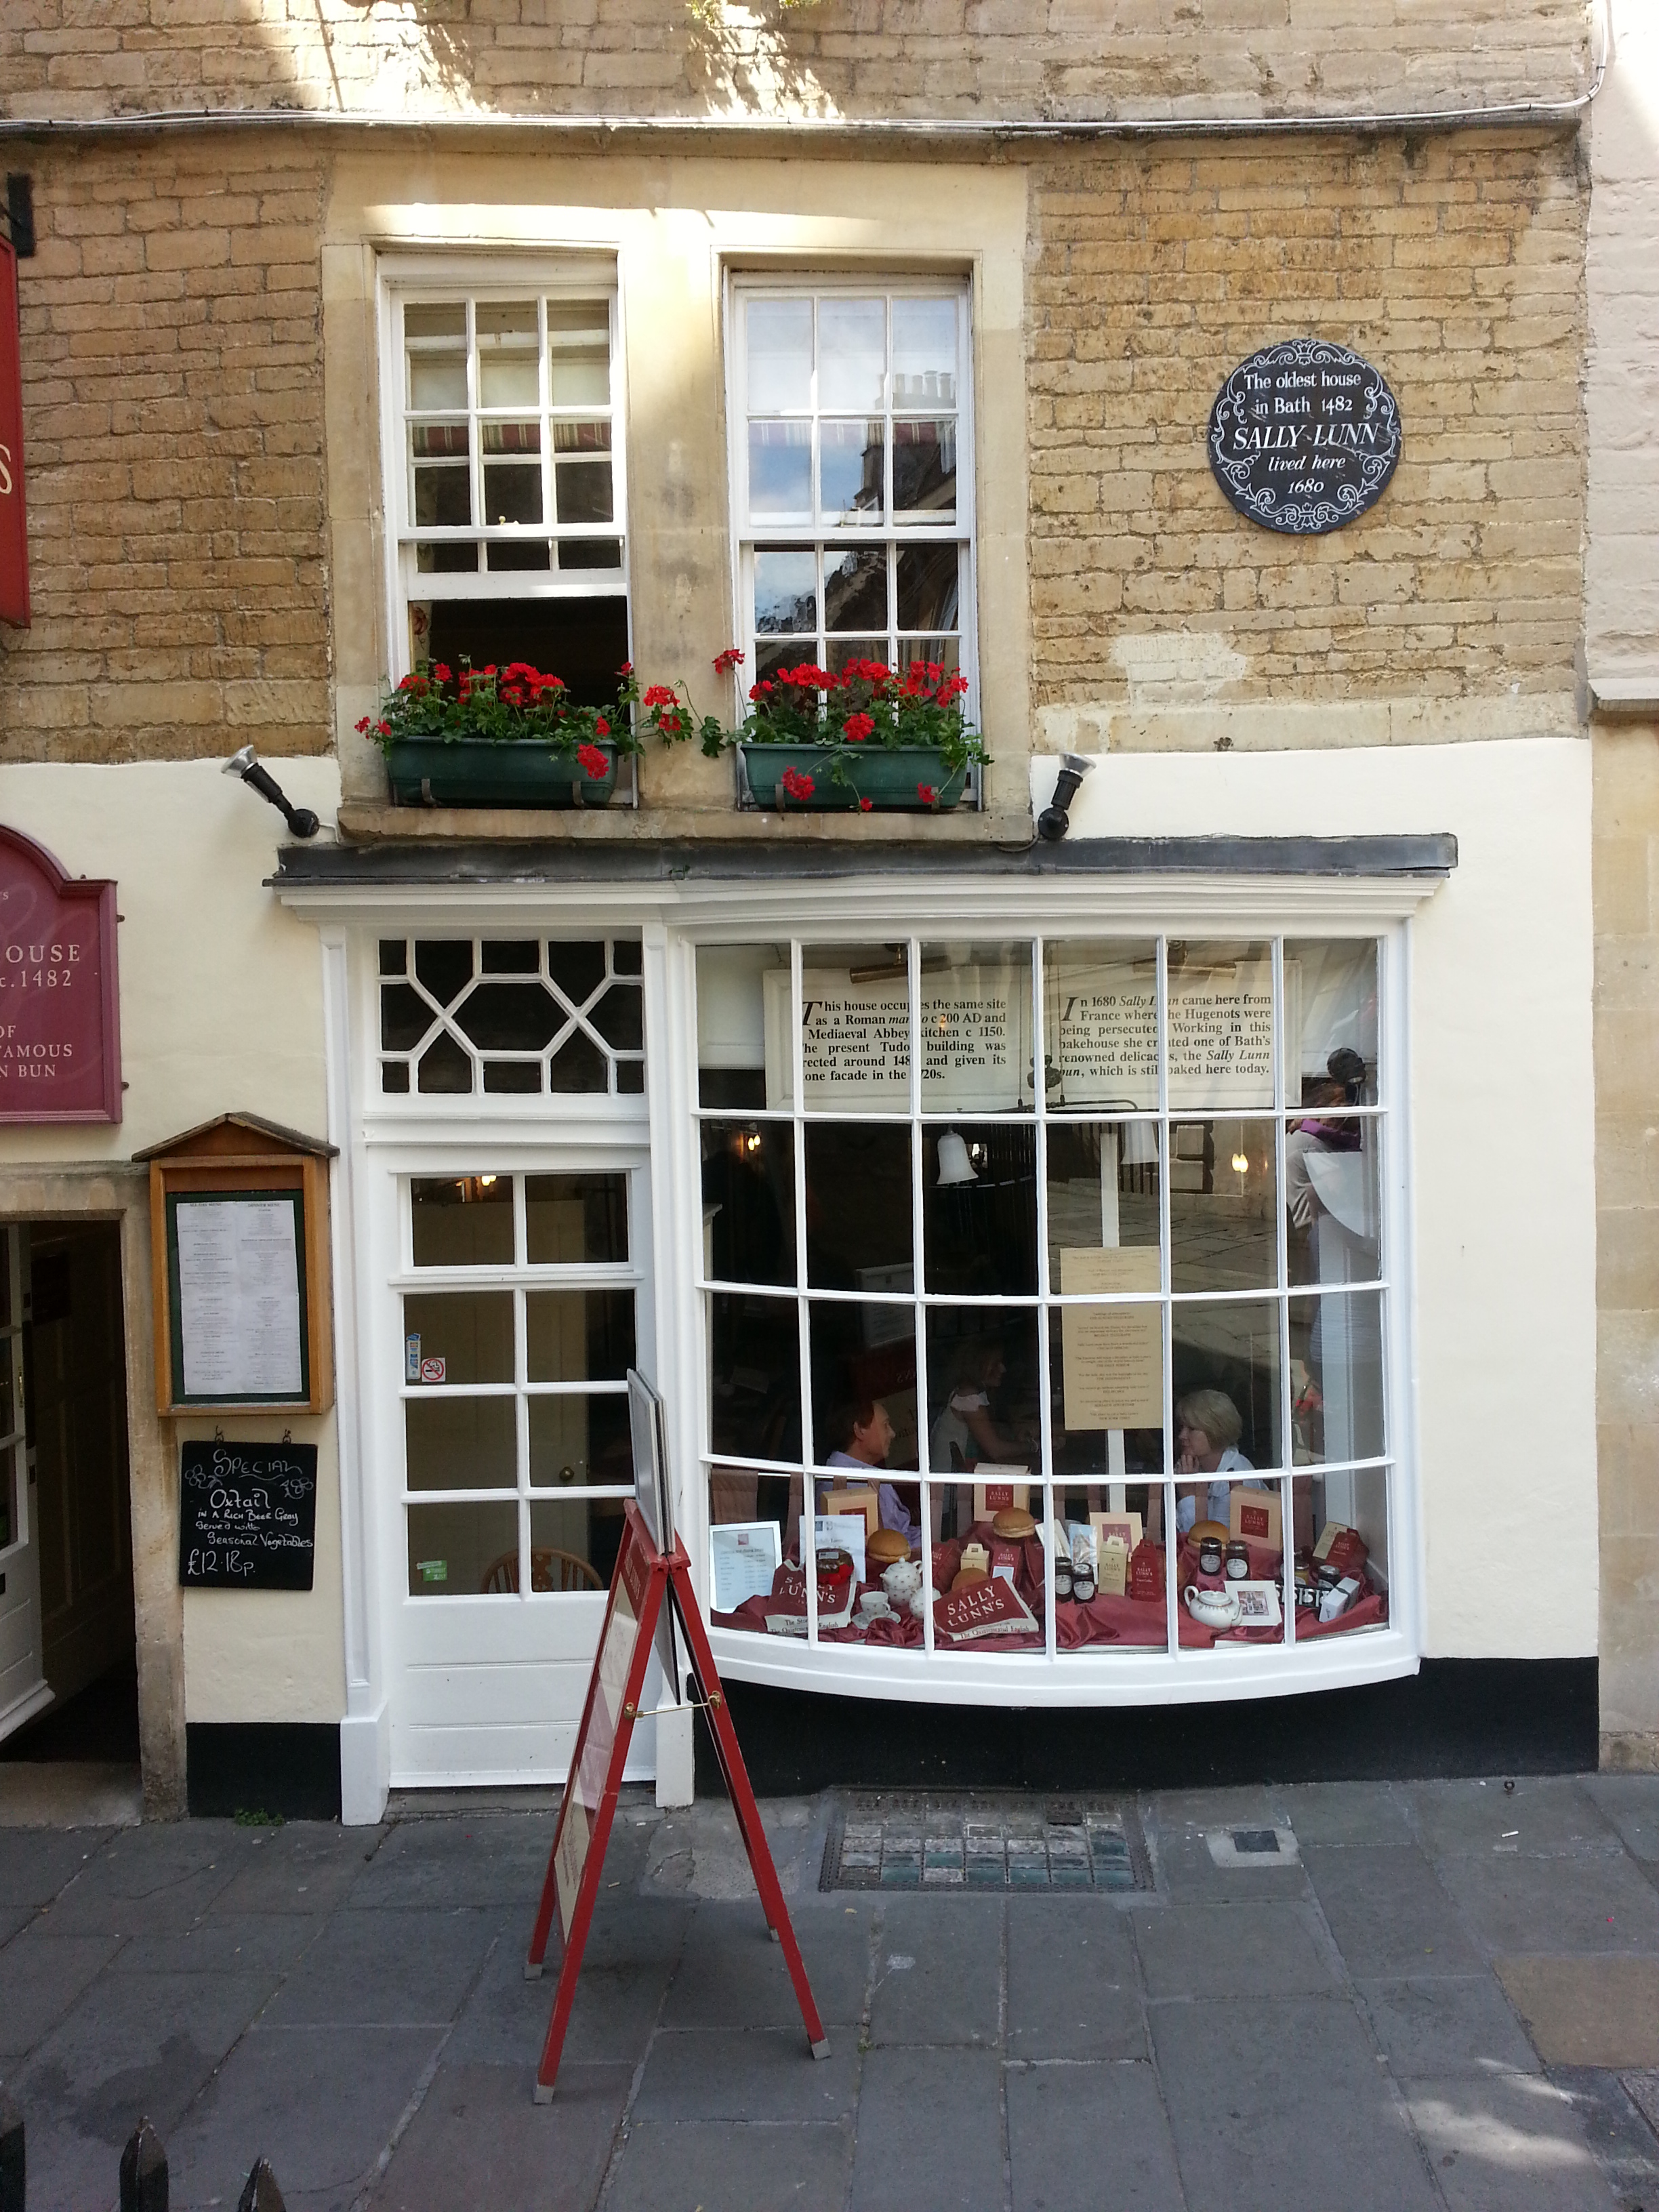
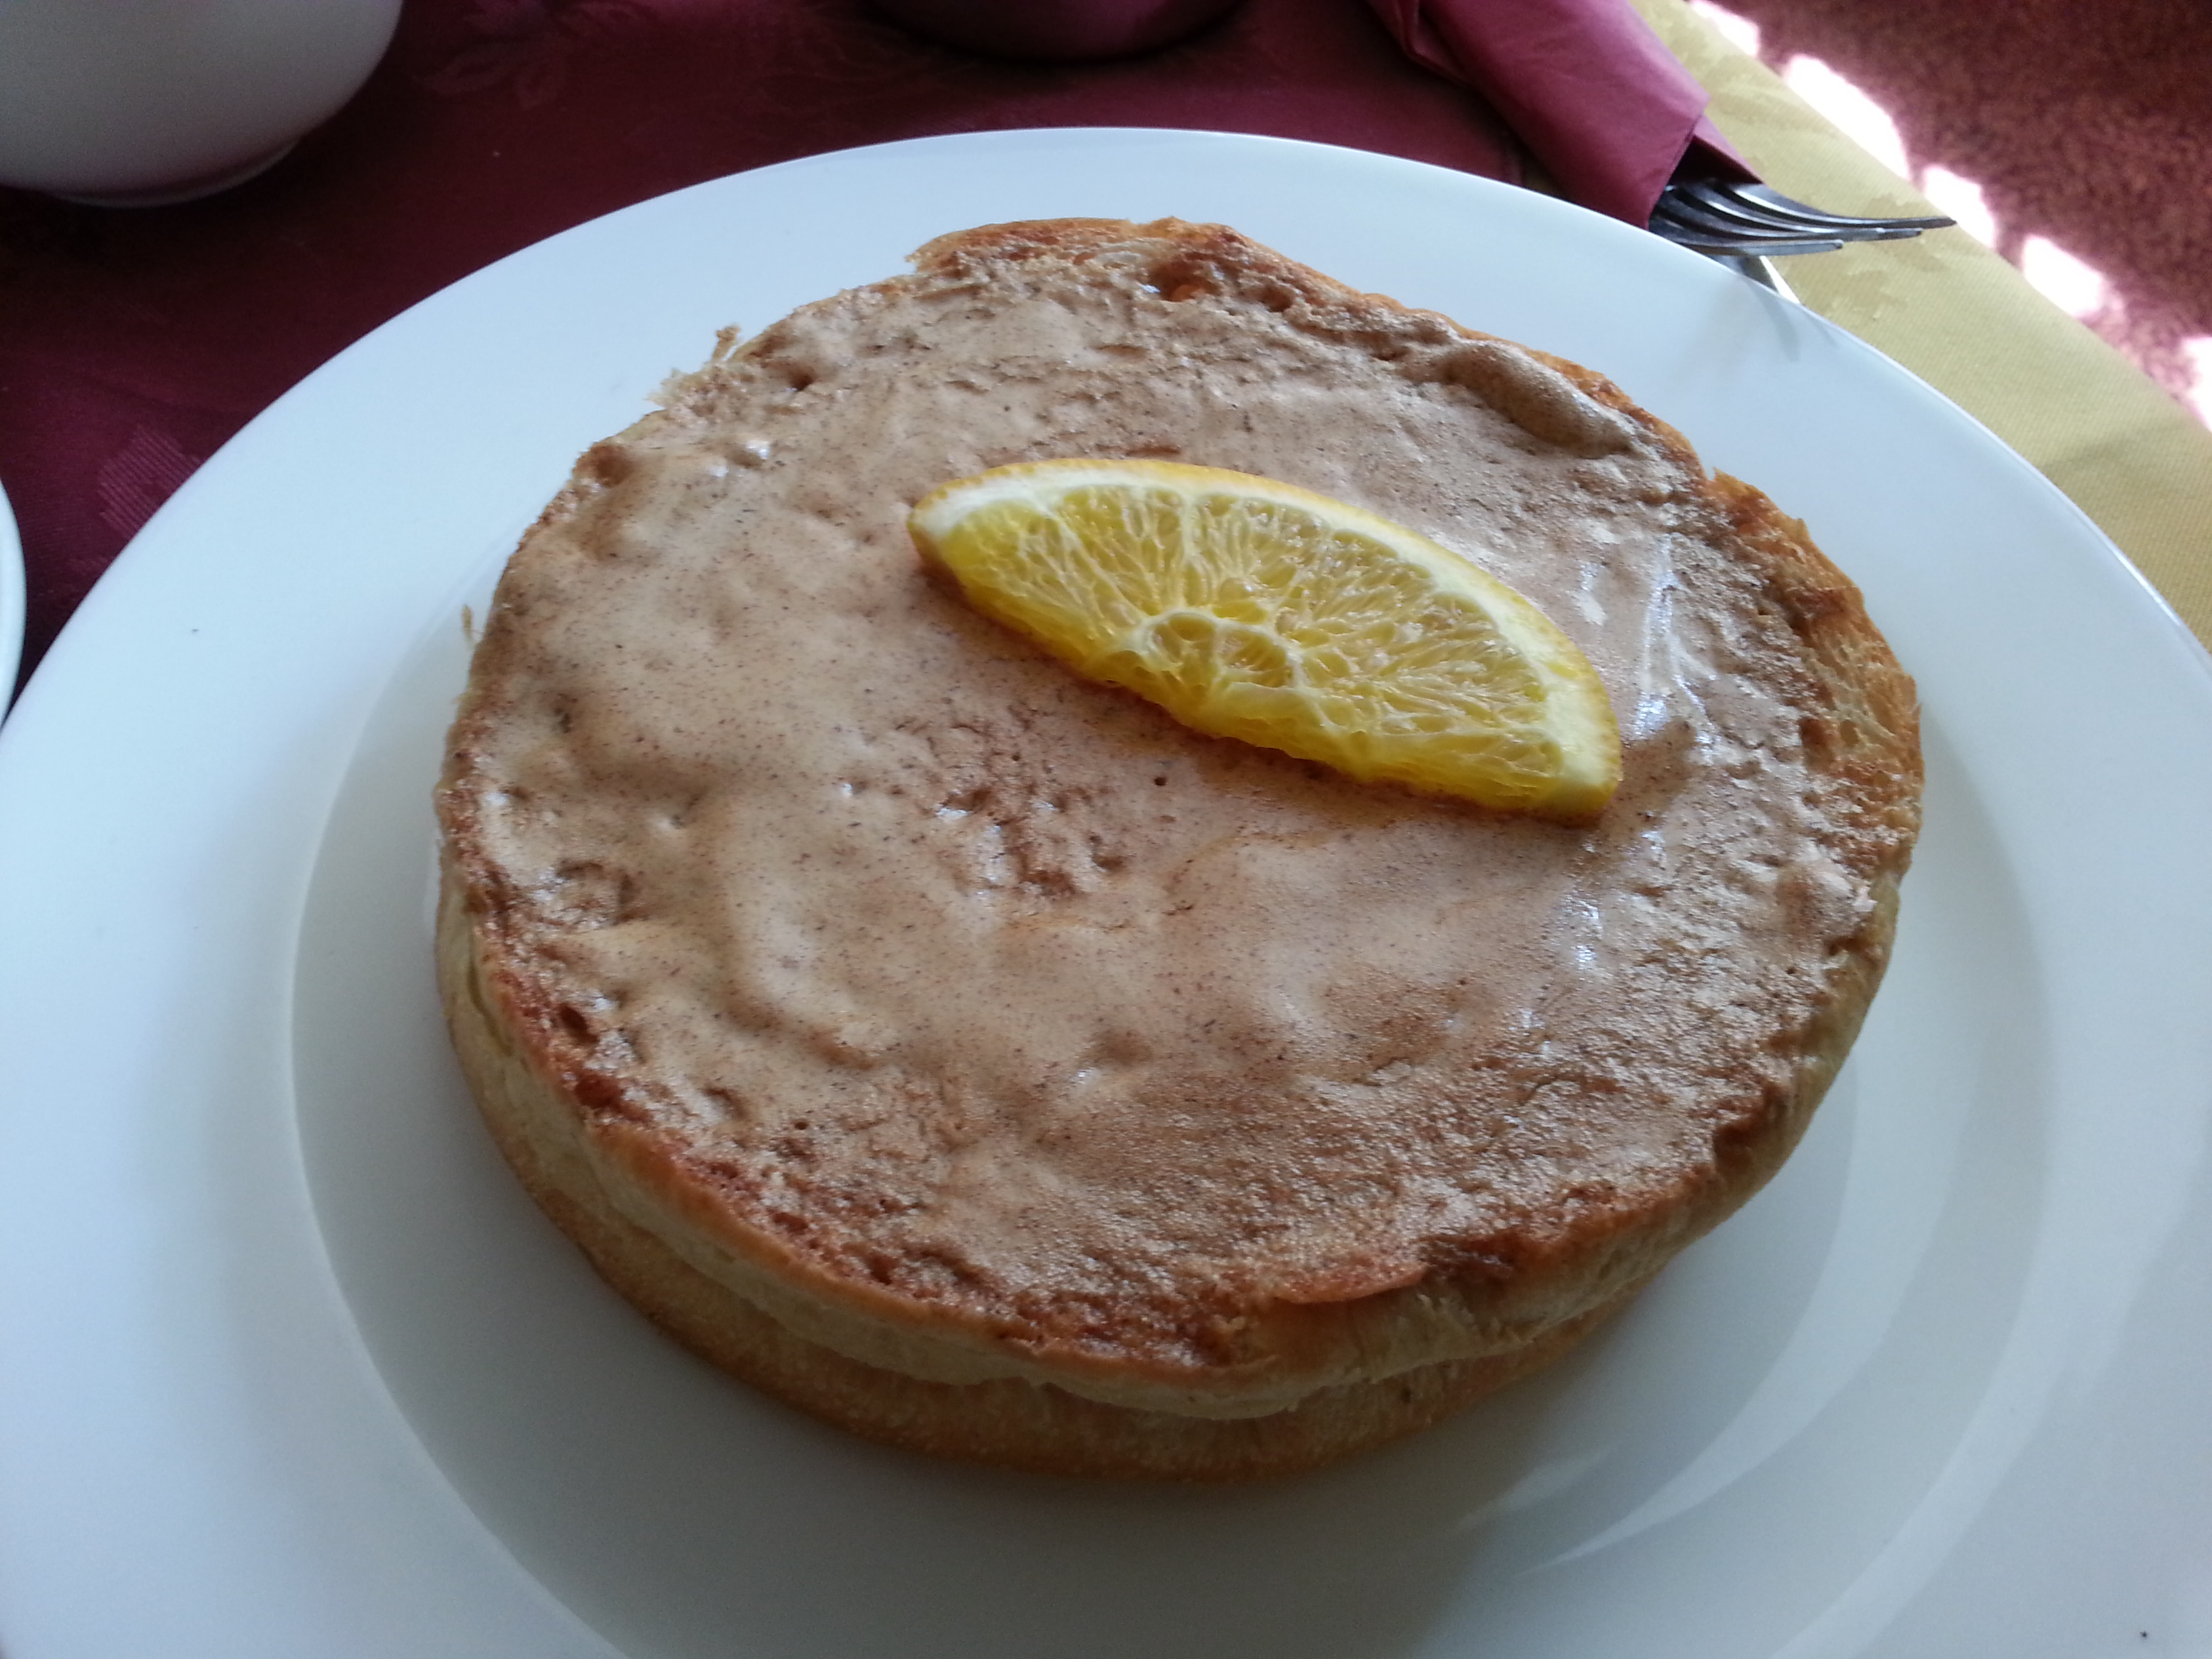
The Sally Lunn
Oh no she didn’t!
A Sally Lunn is a large, round enriched bread, much plainer than a Bath bun, rather like French brioche. The story of its invention goes something like this:
A young French immigrant lands in Bath during the 17th century and gets herself a job in a bakery where she shows off some of her recipes and one in particular becomes very popular indeed. Her name? Solange Luyan.
The recipe went missing in the 1800s, but was apparently found during the 1930s when it was discovered in a ‘secret cupboard’ in her original home. The owner of the house then decided to open up the original Sally Lunn Tea Room.
This is, of course, all complete nonsense. The most likely explanation is that Sally Lunn is a corruption of the French solielune, or sun and moon cake.
I visited the tea rooms and ate a delicious lightly-toasted Sally Lunn spread with sweet cinnamon butter and it was delicious. Like the Bath bun, its popularity had faded in the rest of the country.
A botanical plate showing the life cycle of the asparagus plant
Asparagus season in the UK very short, going from only May until June. Of course, these days we are no longer a slave to the seasons and can have fresh asparagus that has been grown in Peru or Kenya whenever we like. I love the stuff, but I do feel that our food loses some if its magic when seasons no longer matter. It is for this reason I only buy British asparagus.
Asparagus has been eaten in Ancient Egypt, Greece and Rome and has been loved in France for many centuries, and it is the carefully cultivated and selected French type of asparagus that made its way to Britain in the seventeenth century, a time of great ‘vegetable improvement’, and it is still grown here today. This does not mean that prior to this date we did not eat it or try to cultivate it.
The etymology of asparagus is interesting – many people think that it was called sparrow grass, but the upper class thought it a vulgar term and subtly changed its name to asparagus to make it sound more posh. This is not quite true: it actually began life as asparagus coming from Mediæval Latin, then it was shortened to sparage in Late Old English and then further modified to asperages in Middle English. It was anglicised to sperach or sperage in the 16th century, but strangely it was officially spelled as asparagus to be in line with Latin. The word asparagus became associated with “stiffness and pedantry”, and the “folk-etymologi[s]ed” sparrow grass arose in reaction to these Latin throwbacks. All this information came from the wonderful Online Etymological Dictionary. I love the Old English word – eorðnafela – sounds like some kind of elf queen from a Tolkien book.
There are three main types of asparagus which all come from the same plant: there are the common all-green tender spears that have very good flavour, and then there is white asparagus, made by ‘forcing’ the spears to grow in the absence of light by earthing up around and over tips. These are not typically grown in Britain, though you do spot them from time to time, though they have usually come from Holland or Belgium, where white asparagus is popular. Lastly, there is lavender-tipped asparagus which is simply white asparagus that has been allowed the see the sun again and just colour slightly. White and lavender-tipped are much more fibrous than the green but have a much more delicate flavour.
Asparagus is also infamous for a certain side-effect after it has been eaten and digested: the distinctive smell it leaves in our urine, which is liked by some, but hated by others:
[Asparagus] cause a filthy and disagreeable smell in the urine, as everybody knows.
Louis Lemery, Treatise of All Sorts of Food, 1702
…all night long after a dinner at which I had partaken of [asparagus], they played (lyrical and coarse in their jesting as the fairies in Shakespeare’s Dream) at transforming my chamber pot into a vase of aromatic perfume.
Marcel Proust, In Search of Lost Times, 1913
[Proust always overdid things – have you ever read his description of madeleines?]
The chemical in question is called asparagusic acid, though not everyone has the ability to produce it (though most do) and not everyone has the ability to smell it (though most can).
Big ponce: Proust
If you like the blogs and podcast I produce, please consider treating me to a virtual coffee or pint, or even a £3 monthly subscription: follow this link for more information.
Preparing Asparagus.
It is very straight-forward to prepare asparagus. You first need to remove the woody part at the base of the stem. You can do this with a knife, but this involves guess-work, so it is easier to break the spears one at a time because they have a natural snap point where the woodiness lessens. You can trim the ends of course if you want to be fancy. If you have very thin young spears, you may not have to snap them at all. Along the stem of the plant there are strange little leaves that lie flat against the stem; you can remove these if you like, but I tend not to unless the spears are particularly thick.
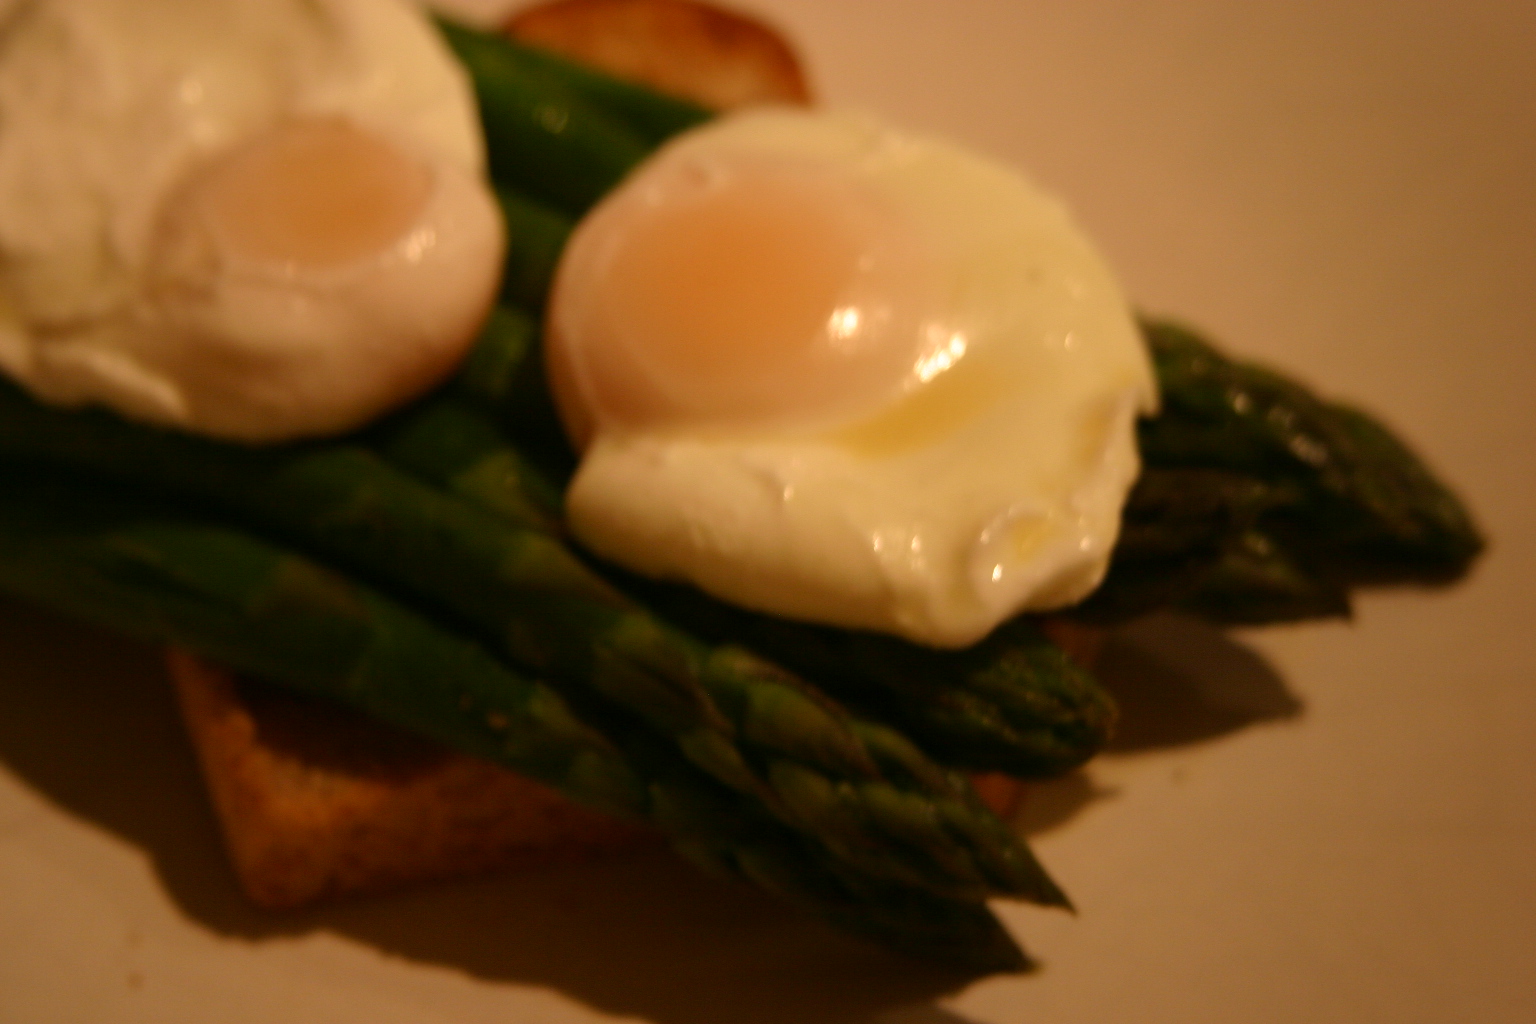
Asparagus and Eggs
Asparagus needs little cooking: just a few minutes steaming is required. Traditionally it is cooked in a tall asparagus pan so that the spears can be boiled upright. Here’s how I like to cook mine – it shows off the flavour of asparagus cooked simply.
Prepare your spears and place them in a pan in just a few tablespoons of water and a knob of butter. Cover so that the asparagus part-boils and part-steams. Check if they are cooked by probing the thickest part of a spear – it should be nice and tender. Asparagus spears of a middling thickness will take no longer than four minutes, and will most likely be done in three. Once cooked, season with salt (if needed) and black pepper.
Serve on toast with some of the asparagus-flavoured butter and poached eggs.