Tag Archives: food

Preparing, Sourcing & Cooking Eel


If you like the content I make for the blogs and podcast, please consider supporting me by buying me a virtual coffee, pint or even a subscription : just click on this link.


The last of a trilogy of posts on the subject of eels. This time a recipe for an eel stew and some help with preparing them.

Sourcing Eel

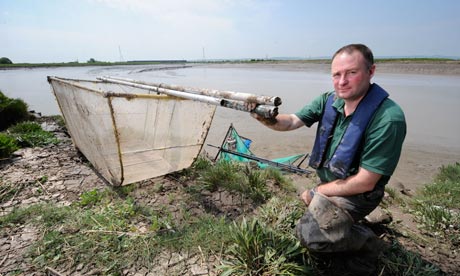
The first time I cooked with eel I used wild ones – something I won’t be doing from now on; the sustainable cook as we have learnt buys only farmed eels. Ask your fishmonger if he can get them for you. If he can’t then you have four options: (1) go to a fishery that supplies eels where you are most likely to have to buy in bulk; (2) if you live in or near London, go to an eel, pie & mash house and pick some up there; (3) order some frozen ones already cleaned from the very good people at The Fish Society; (4) catch some yourself in an eel trap. If you live outside of the UK, eels are much easier to find.
I remember getting my eel order from Dave Yarwood from Out of the Blue in Chorlton. He had driven all the way to Sandbach at some god-awful time in the morning only to get there to find no one around, though he found a note on the door of the suppliers saying the eels were in a bag in a stream round the back! I arrived at his shop and there they were – three freshwater eels swimming around in a polystyrene box. I got a taxi back home with three eels sloshing about in their tank – quite a surreal experience, I can tell you.

eels

Preparing Eel

There’s a good chance that if you are going to have to do away with them yourself, this is because eels begin to break down very quickly after death. There is a lot of advice out there on what is the best way to do this. If you look in English Food by Jane Grigson says to ask your fishmonger to do the dirty work. It used to be thought that eels had to be skinned whilst still alive, but this is not the case. Larousse Gastronomique gives you these instructions on how to prepare an eel:

To kill an eel, seize it with a cloth and bang its head violently against a hard surface. To skin it, put a noose around the base and hang it up. Slit the skin in a circle just beneath the noose. Pull away a small portion of the skin, turn it back, take hold of it with a cloth and pull it down hard.

Well it’s not quite as simple as Larousse makes it sound; killing an eel is not like killing a regular fish, i.e. one thump to the back of the head and it’s gone, no, they keep on wriggling and writhing for a long time after you’ve ‘killed’ it. The best thing to do is to put the eels in iced water or in the freezer until they become very slow and docile, then hit them hard against a wall, stone or some other sturdy surface. You’ll find that after several hits that it is still moving about; it’s quite distressing, but the eel is dead, though its autonomic nervous system takes a while to shut down, though I’ve no idea how this happens and why it’s so different to other fishes. You can now either try the skinning method described above or behead them and then skin them. Have a look here at my original eel post from Neil Cooks Grigson, scroll down to see a rather gruesome video of some headless eels swimming about in my sink.

To skin them use a pair of pliers and a little salt to help get a purchase on the skin. Once you have got going the skin comes of satisfyingly easy like a long thin sock. Don’t be alarmed if the eels start moving again – this is from the salt triggering their nerves to start firing.

Now gut and clean the fish; make a cut from its anus – you’ll see it, about halfway down – to the neck end and pull away any innards from the rib cage. Give it a rinse and you are done.
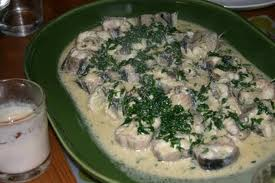
Sedgemoor Eel Stew

One thing I have not mentioned is how well eel eats. It really is a delicious fish – its flesh is mild and delicate, don’t be put off by its snake-like form and sliminess. It is similar to salmon, but a little richer and much moister due to its high fat content and they are not in the least bit muddy-tasting. This is the first eel recipe I ever cooked and it is by far the best. It appears in English Food by Jane Grigson. The eel is cooked in a sauce made of cider, stock and cream. Sedgemoor is in Somerset in the south-east of England where most English recipes for eel come from.

eel stew

Ingredients

1 ½ to 2 kg (3 to 4 lb) freshwater eel

dry cider

150ml (¼ pint) double cream

4 tbs chopped parsley

salt and pepper

triangles of fried or toasted bread

Begin by cutting the eel(s) into even-sized portions of around two inches in length. Season them lightly. Make a stock from the eel heads and skin as well as the flat part of the tails: Place the trimmings in a pan and cover them with half-water, half-cider. Bring to a boil and then cover and simmer for 20 minutes.

Arrange the eel pieces in a shallow pan and pour over enough hot stock to just barely cover them. Gently poach the eels for 10-15 minutes depending on the girth of your eels until the eel meat starts to come away from the bones. Don’t let the stock come to a proper boil though – steady poaching is the key. When cooked, remove the eel pieces and arrange them on a serving dish, cover them and keep them warm.

Now make the sauce by boiling down the cooking liquor to a good strong flavour and then add the cream and parsley. Season again if required. Pour the sauce over the eel and serve with the fried bread or toast.

P.S. Delicious as eel maybe, beware if someone offers you raw eel, say as sashimi. Eel blood is toxic before it is cooked, so if you get served a bloody bit, it could be a bad man trying to do away with you.

10 Comments

Filed under Britain, cooking, food, General, Recipes

Elvers in the Gloucester Style


Want to know more? This podcast episode complements this blog post:


As promised on the last post on eel conservation, a recipe for a dish that on no accounts must you make unless the elver (glass eel) population has reached at least somewhere close to their population size in days of yore.

elver fisherman

An elverer on the River Severn

This is a recipe that I think I remember Keith Floyd cooking elvers still wriggling as he scooped them straight out of the River Severn in a pillowcase and  tipping them straight into a hot frying pan. I’ve tried to find the clip on the web, but alas it is nowhere to be found. I did find, however a clip of Gordon Ramsay cooking freshly-caught elvers on the banks of the river. I should warn you that elvers are cooked live, so if you are at all squeamish you might not want to see the video:

www.youtube.com/watch?v=07_IkrNy4cU

Elvers in the Gloucester style is essentially scrambled eggs with elvers and it comes from Jane Grigson’s English Food and it is one recipe that I will probably never cook for my other blog Neil Cooks Grigson where I’m trying to cook every single recipe from the book. She points that back in the years of elver plenty, ‘several tons of elvers are caught between Sharpness and Tewkesbury on the Severn’. Also, interestingly, ‘elvers are the only fish fry which may be legally caught as food.’

Well that probably won’t be true for very long.

Jane Grigson

Jane Grigson

Jane’s recipe asks for 500g of elvers so if you are a little evil and know where to get them prepare to pay – they’ll cost you at least £100!

It must have been very exciting going down the banks of the river at night to see a huge dark swathe of elvers migrating upstream safe in the knowledge that there’ll be a delicious dinner in store.

‘For 4

500g (1 lb) elvers

8 rashers fat streaky bacon

A little bacon fat or lard

2 eggs, beaten

Salt, pepper

Wine vinegar

‘When you go to buy elvers, take along an old pillowcase so that the fishmonger can tip them straight into it.

‘At home, add a handful of kitchen salt to the elvers and swish them about, still in the pillowcase, in plenty of water. Squeeze them firmly to extract as much water as possible, then repeat the washing process again with some more salt. This gets rid of the sliminess. You may need to rinse them again and pick out any tiny twigs, leaves and pieces of grass.

‘To cook the dish, fry the bacon until crisp in a little bacon fat or lard. Remove it to a serving dish, and turn the levers into the bacon fat which remains in the pan. Stir them about for a few seconds until they become opaque, then mix in the beaten egg and cook for a few seconds longer. The important thing is not to cook for too long. Taste and add seasoning. Put the elvers on top of the bacon, and sprinkle with a little vinegar. Serve very hot.’

We we’ll just have to take her word for it, I suppose.


If you like the blogs and podcast I produce, please consider treating me to a virtual coffee or pint, or even a £3 monthly subscription: follow this link for more information.


17 Comments

Filed under Britain, food, history, Recipes, Uncategorized

The Eel Paradox


Want to know more? This podcast episode complements this blog post:


Around a year ago I wrote a post about jellied eels and eel, pie and mash houses in London and I have been meaning to write a sequel on the subject of eel fishing and conservation for a while, as well as looking at some traditional recipes for the slippery fish.

The European eel Anguilla anguilla is a threatened species; the IUCN has put it on its Red List as a Critically Endangered animal, yet it is perfectly legal to eat them – and fish for them if you have a licence – the funny thing is adult stocks of eel has remained stable for the last few decades. So why has the eel been given this Critically Endangered status? Well it is because the young eels – known as elvers in Britain, but more commonly known as glass eels – have had the drastic drop in population. Some of these populations have crashed by 95% in some areas. The paradox is: how can the adult population be stable whilst the young have diminished in number so much?

german eel

Well the short answer is that we don’t know! Elvers resupply our rivers of stock eels after a long migration from the Sargasso Sea where they were born. Understandably, this part of the life cycle is poorly understood, and all scientists and conservationists can do is count the number reaching our estuaries and rivers and monitor them carefully.

In Britain, the main inlet for elvers is the River Severn; indeed there are still a decent number of elvers swimming into its mouth every year. However, the population has dropped overall in Europe by 75% and so the spectacle of the great migration is no longer what it was:

In the month of April; the shores of the Severn are annually darkened with innumerable quantities of elvers, which are seen fringing the sides of the river a black ascending line, which appears in constant motion…When the elvers appear in the river they are taken in great quantities with sieves of hair cloth, or even with a common basket, and after being scoured and are offered for sale. They are either fried in cakes, or stewed, and are accounted very delicious.

Illustrations of the Natural History of Worcestershire, Dr Hastings c.1830

Elvers were an essential food source in more ways than one according to Andrew Kerr of the Sustainable Eel Group: ‘entire communities would live on them; indeed … they were even used to fertilise the fields.’

elvers in the Severn

A smaller-scale version of what Dr Hastings saw on the River Severn

See the story and video here: http://news.bbc.co.uk/local/gloucestershire/hi/people_and_places/nature/newsid_8864000/8864173.stm

The UK ‘elvering’ season is from February to May with its peak in April and it is legal to fish for them if you have the appropriate license; and it can be big business when they sell for £200 a kilo. They go for these huge prices because they are snapped up by the Chinese in order to restock their fisheries.

Elver fishermen have an obligation to fulfill if they want to go fishing for glass eels – 35% of their catch must be relocated upstream. Tiny elvers entering estuaries are often impeded from reaching rivers because of flood barriers. By physically moving them upstream they can do as nature intended and live their lives in British freshwater before slipping back to the Sargasso to breed. This seems to be working – numbers of elvers in the River Severn are on the up, though this could just be population fluctuation.

elver net

The Environment find a poacher’s oversized elver fishing net (from The Guardian 2010)

The ethical elverer after relocating a third of his catch, then sells the remainder to eel farms. The nearest ones to Britain are in Ireland and Holland. This is what the people at the Sustainable Eel Group say is the sustainable thing to do. Unethical elverers sell their catch on to people that have a penchant for elvers. He also uses huge oversized nets and trawlers – some nets can be up to 18m; compare this to the legal 2.5m net. (Amazingly trawling for elvers is still legal in Britain, though the number of eel fishing licenses are restricted.)

Have a look at this BBC report about elver poaching:

http://news.bbc.co.uk/local/gloucestershire/hi/people_and_places/nature/newsid_8708000/8708514.stm

So what do we conclude here? Well jellied eels are not to be consigned to the history books – with careful monitoring there should be well-stocked eel fisheries. It’s simple: only buy farmed eels, not wild, and on no account never buy elvers.

The following two posts will be some eel recipes (some you should try and some you should not!)


If you like the blogs and podcast I produce, please consider treating me to a virtual coffee or pint, or even a £3 monthly subscription: follow this link for more information.


elvers


15 Comments

Filed under Britain, food, General, history, natural history, nature, Uncategorized

Seville Oranges and Seville Orange Marmalade

The weather outside may be miserable and the evenings still long, but luckily there is a little fleeting  sunny surprise popping up in grocers around the country that can perk us up no end; at least if you know where to find them. It is Seville orange season and a small window of just a few weeks is all we have to cook with this delicious fruit.

FxCam_1357492834789

The Seville orange is very bitter and is only really grown in Spain for us British to make our Oxford marmalade. What a treat home-made marmalade is; oranges, water and sugar that is all that are needed to produce such a delightful, very British preserve. If you have never made your own, have a go before they are all disappear again.

Like all citrus fruits, the Seville orange comes originally from China. It was imported on trade routes via Italy, to the Mediterranean countries of Europe. All of these original orange trees were bitter in flavour like the Seville. In the first half of the 17th century, sweet orange trees were delivered to the Portuguese coast by ship. These sweet oranges quickly superseded the bitter ones, that is for that small area of Spain that still grows them.

The flowers of Seville oranges are also used to make orange flower water, another of my favourite ingredients.

Seville and game painting

Rabbit with Red Legged Partridge and Seville Orange by Jean-Baptiste Chardin 1728-29

Below is a recipe for  Seville orange marmalade, but it is useful to know that the zest and juice of these oranges go very well with game and some shellfish such as scallops as the above painting shows.


If you like the blogs and podcast I produce, please consider treating me to a virtual coffee or pint, or even a £3 monthly subscription: follow this link for more information.


Seville Orange Marmalade

Oddly enough, marmalade was not made from Seville or any other orange at first, but quince (a knobbly cousin of apples and pears). It did come from Spain though, in fact the Spanish word for quince is marmalada. Every day’s a school day.

This recipe is Jane Grigson’s and it is a good strong bittersweet ‘Oxford’ style marmalade.

Ingredients

3 ¼ litres water

1 ½ (3 lb) Seville Oranges

3 kg (6 lb) granulated sugar

Give your oranges a good scrub and place them in a preserving pan or large stockpot with the water. Bring to a boil and simmer for about 1 ½ hours until the oranges are tender.

FxCam_1357499871481

Take them out with a slotted spoon. They will probably collapse in on themselves, but don’t worry about that. Let them cool a little, then halve them and scoop out their innards. Tie up the scooped-out pulp in a piece of muslin. If you want a soft set, just put the bag of pulp straight into the pan, if you want it well set, give it a good squeeze to get as much pectin out of the pith and into the liquor as possible (I’m a soft set man).

FxCam_1357502382790

Next, shred the peel, you can be as careful as you want, and you can cut them as thick as you want. You can do this by hand or in the food processor by blitzing them using the pulse setting – be careful though, you don’t want a load of slurry. I’m usually dead against using food processors for this sort of thing, but I quite like the irregular pieces you get with this method. Tip them into the pan along with the sugar. Over a medium heat, stir until the sugar dissolves.

FxCam_1357505465756

Now you need to be brave and bring it to a full rolling boil for at least 15 minutes , you need it very hot so that the marmalade can set. You have several options to test for a set, but I use a combination of a sugar thermometer and the wrinkle test. Pectin – a chemical that essentially glues plant cell walls together – will set to a gel at 105⁰C (221⁰F), so a thermometer is crucial if you want to know if you are getting close. It can take a while because water needs to evaporate to get five degrees above boiling point. Keep a close eye on it and when it gets close do the wrinkle test. For this test put a side plate in your freezer a little while before you want to make your marmalade, and when you’ve achieved 105⁰C (221⁰F), turn off the heat and spoon out a little of it onto your cold plate. Return it to the freezer for a couple of minutes. Push the jelly; if it wrinkles up, your pectin is set. If not, boil up again and retest after 10 minutes.

FxCam_1357586951956

When ready, turn off the heat and allow it to cool for 15 minutes – this important step will stop your peel from floating to the top in a single layer – then pot into sterilized jars (bake them and their lids for 25 minutes at 125⁰C or 250⁰F).

IMG_2702

33 Comments

Filed under cooking, food, Fruit, General, history, Preserving, Recipes, Uncategorized

Jane Grigson’s Orange Mincemeat

It’s just occurred to me that I haven’t put on a Christmas recipe and it is only just over two weeks until the special day. This month has flown by at a scarily quick pace.

Luckily two weeks is just enough time to make this delicious orange flavoured mincemeat. Last year I gave you Mrs Beeton’s recipe, but this one comes from the wonderful Jane Grigson. It is very moist and because of the brandy, orange juice and orange liqueur. It is also vegetarian if you want it to be; the suet can be the vegetable-based sort, or you can leave it out altogether. Give it a go.

Jane Grigson

Jane Grigson

It is extremely easy to make: there is no cooking required so all you need to be able to do is chop, grate, mix and weigh. When you pot the mincemeat, it is very important you sterilise your jars. To do this first wash them in soapy water, then rinse and allow them to dry. Place the jars on a tray, with their lids sat beside them, facing upwards and pop them in the oven for 30 minutes at around 130⁰C. Let them cool a little before potting. If this seems a lot to make in one go, you can easily reduce the amounts as you see fit.


If you like the blogs and podcast I produce, please consider treating me to a virtual coffee or pint, or even a £3 monthly subscription: follow this link for more information.


Click here for the recipe I use for making mince pies.

Ingredients

250 g (8 oz) chopped candied peel

1 kg (2 lb) peeled, cored and grated apples

500 g (1 lb) suet (fresh or packed is fine, but fresh is best)

500 g (1 lb) currants

500 g (1 lb) raisins

500 g (1 lb) sultanas

500 g (1 lb) soft dark brown sugar

1 freshly grated nutmeg

125 g (4 oz) slivered almonds

Juice and zest of 2 oranges

4 tbs brandy

6-8 tbs orange liqueur

Mix all the ingredients together in a huge mixing bowl, then pot into sterilised jars. Store somewhere dark and cool, but not the fridge! Leave the mincemeat to mature for at least together before using it.

IMG_2519

9 Comments

Filed under baking, Britain, Christmas, cooking, Desserts, Festivals, food, Fruit, General, Preserving, Recipes, Teatime

The Edible Hedgerow

I went a little foraging escapade last week to see what wild food I could find in Chorlton Meadows, one of my favourite places in Manchester. The hunter-gatherer is not quite dead. Today’s aim was to find some fruit for some nice hedgerow jelly; something you don’t find in the shops, no siree. I wonder how many people do this anymore? It’s shocking that there are tiny punnets of blackberries in the supermarket selling for 3 or 4 pounds when you can get them free from the brambles!

The first thing you need to find if you want to make a good hedgerow jelly is some crab apples. There’s an area of the meadows called Hardy’s Farm and I knew that there was plenty of apple trees around there so I headed straight for it. The poor summer we’ve had – very wet and warm – has been the perfect environment for moulds and other fungi, they had managed to infect every tree I came across except for one! Some trees didn’t even have fruit or flowers on them. A sad, sad state of affairs. It is a little early for apples though, so perhaps they’ll get their act together.

Some of the few crab apples that weren’t diseased

Crab apples, or any windfall apples really, make up 50 percent of the jelly because apples provide the pectin that sets jelly once it is cooked.

The great thing about these jellies is that you can use berries that are normally far too sour and astringent in their unsweetened form. I found several species though many of them were not quite ripe.

The rowans were laden with berries

Two of the best examples of this were the two most bountiful species: hawthorn and rowan. These are very common trees found in hedgerows, forests, scrubland and gardens.

The brilliant red berries seemed to glow against the rather miserable grey backdrop of the rain and clouds – especially the rowanberries. If you look closely at them, you can see that they are just tiny apples themselves.

Rowanberries are simply tiny apples!

(to be botanically correct: apples are just large berries)

There was also a few ripe rosehips, so I grabbed some of those too. The other species I found were no way near ripe enough or in high enough numbers: sloes (the wild ancestor to damsons), blackberries, elderberries and some wild plums.

Some rather unripe blackberries and hips


If you like the blogs and podcast I produce, please consider treating me to a virtual coffee or pint, or even a £3 monthly subscription: follow this link for more information.


Hedgerow Jelly

Once you have collected your fruit you can now get making your jelly – and don’t worry if crab apples are the only thing you found because they make a delicious pink-tinged tart jelly themselves. (Notice that I have suddenly gone metric, there’s a reason for this, but that’ll have to wait for another post. I shall endeavour to add Imperial measures though.)

1 kg (2 lbs) crab apples

1 kg (2 lbs) wild berries

1.2 litres (2 pints) water

granulated sugar

Wash your fruit – you don’t want hedgerow and earwig jelly. Roughly chop your apples; don’t core or peel them, it is the core and peel that contain the most of the precious pectin.

As for the berries, I give them a quick blitz in the food processor. Place the fruit in a large heavy-based stock pot. Bring to a boil, cover and simmer until the fruit is mushy.

In order to achieve a nice clear jelly, you need to strain the juice through cloth – I use muslin and a proper jelly stand for this, but it’s perfectly fine to use a large sheet of muslin, cheesecloth or even an old pillowcase. Scald your material in boiling water to sterilise it. Put the jelly bag on its frame with a bowl beneath it to catch the drips. Pour in the mushy fruit and juice and allow it to drip through in its own time overnight. If you don’t have a jelly bag, you can tie a bundle of cloth to the handle of a cupboard above a bowl.

The next day, measure how much juice you have – it should be between 1 and 1.2 litres – and pour it into your stockpot or preserving pan (I am saving up for one of those). For every 600 ml (1 UK pint) of juice you have, you’ll need 450 g (1 pound) of sugar. Add this to the pan and turn on the heat to medium, stir with a wooden spoon until the sugar is completely dissolved, then turn the heat to maximum. Boil the fruity syrup until setting point is reached: this is easy to judge if you have a thermometer, because pectin sets at 104.5⁰C.This should take about 10 or 15 minutes. If you don’t have one then, turn the heat off and place a drop of the jelly on a freezing-cold plate. Let it set, then push it with your nail. If it wrinkles, then it is ready. If it doesn’t, put the heat on again for 10 minutes and try again.

Once setting point is reached, skim away the skum and pour into sterilised jars. The way I do this is I put the jars and lids on a clean baking tray in the oven for 30 minutes at 120⁰C.

Variation: Mulled cider jelly. Use 2 kg of crab apples, and add a 500 ml bottle of dry or sweet cider along with 700 ml of water, along with a cinnamon stick, some cloves, a star anise and a piece of nutmeg. When it comes to the point where you add the sugar, use 100 g less as the cider lends a lot of sweetness itself.

Mulled cider jelly

9 Comments

Filed under Britain, cooking, food, Recipes

Forgotten Foods #2: Verjuice

Having a crabbed face of her own, she’ll eat less Verjuyce with her mutton

T Middleton, Women beware Women, 1657

Verjuice was a very popular cooking ingredient from the Middle Ages onwards. Many old recipes ask for it and they seem to hit a peak during Tudor times. It is essentially the juice of either sour grapes or crab apples; Britain might not be the best place to grow delicious sweet grapes, but we can certainly excel in growing sour fruit! It took the place of fresh lemon juice in recipes for salad dressings, desserts like syllabubs; it was added to stews, soups and sauces as a seasoning, as well as an ingredient in marinades. It was also believed to have medicinal properties; for example, it was mixed with olive oil and blown up horses’ noses to treat colds! It was basically a necessary piece of kit in any kitchen, seeming to drop out of favour by the end of eighteenth century when lemons became more accessible.


Crushing the grapes for verjuice

The word verjuice comes from the Old French verjus, with ver-  meaning green or unripe and –jus being juice. The earliest written mention of it in British literature comes from around 1302, so we are talking old. It must have been such a useful ingredient in a place where fresh lemons will have either have been impossible to get hold of or terribly expensive.

I expected never to taste verjuice, but then as I was wandering around the excellent Global Foods Market in St Louis minding my own business, I happened upon a jar of it in the Middle East aisle of the shop. Naturally I bought some and thought I’d try some original recipes where verjuice was a main ingredient rather than just a seasoning.

17th century verjuice vinaigrette

In the 1897 volume of Good Housekeeping the subject of using verjuice in salad dressings inexplicably crops up. It takes quotes from the 17th century cook book The English Huswife by Gervase Markham. Anyway, it says that if you want to make a simple sallet then make a dressing of verjuice, sallet [olive] oil and sugar. Use it with sparagus, camphire, cucumbers, leeks, blanched carrots, purslane, with a world of others too tedious to nominate. He must have been in a bit of a mood the day he wrote that part.

It was a pretty brief recipe. Although verjuice is very tart, its underlying flavours are rather subtle so it needed quite a high ratio of verjuice to oil (much more than vinegar or lemon juice dressings).

I mixed together 4 tablespoons each of verjuice and extra virgin olive oil. To offset the sourness, I added a teaspoon of soft dark brown sugar, stirring until it dissolved. Lastly I seasoned it with a little salt and pepper. Easy and surprisingly subtle. Any leftover dressing can be stored and blown up your horse’s nose should it ever get a sniffle.


If you like the blogs and podcast I produce, please consider treating me to a virtual coffee or pint, or even a £3 monthly subscription: follow this link for more information.


Sweet verjuice ‘scrambled eggs’ with brioche toast

I recently wrote a post about fruit curds, and I seem to have found a possible source of the preserve when looking for verjuice recipes. There is a recipe in Le Patissier François (published around 1690) that has helpfully been translated into English by Harold McGee where verjuice and salt are added to eggs in order to make them coagulate at a lower temperature, tenderising them:

Break four eggs, beat them, adjust with salt and four spoonsful of verjus, put the mix on the fire, and stir gently with a silver spoon just until the eggs thicken enough, and then take them off the fire and stir them a bit more as they thicken. One can make scrambles eggs in the same way with lemon or orange juice.

It is of Mr McGee’s opinion that a sweetened version of this recipe could be the origin of the fruit curd. Notice that fresh lemons or oranges can be used, suggesting that they are less common than verjuice.

Below is my interpretation of that recipe. I add plenty of acidic verjuice and a large pinch of salt, meaning that the ‘scrambled eggs’ actually end up thickening more like a custard. I have to say it was delicious, so if you ever do come across some verjuice have a go at this recipe:

Ingredients (for 2 people)
A good knob of butter
2 eggs
6 tbs verjuice
good pinch of salt
2 level tbs sugar
2 slices of brioche

Melt the butter in a saucepan on a medium heat. Whisk together the eggs, verjuice, salt and sugar until there is no trace of white left. Pour the egg mixture in the saucepan and carry on whisking over a medium heat. Meanwhile toast the slices of brioche. When the eggs have thickened and are just about to boil, pour them into two small pots and serve with the brioche.

13 Comments

Filed under Britain, Desserts, food, French Cookery, history, Seventeenth Century

Curried Beetroot Chutney

A while ago, I discovered a recipe for a 19th century British curry (see here for the original post). The recipe required me to prepare both a curry powder and a curry paste. It made a very good, strongly spiced curry, but ever since the jars have been sat in my fridge. I thought there must be something else I can do with these concoctions. After a little thought I came up with this chutney idea and it works very well: the earthy beetroot is very sweet which offsets the spices very well. I thought of beetroot because I often panfry beetroot in olive oil with cumin seeds and always thought the combination delicious. Because beetroot is so sweet and quite a lot of sugar is required for the syrup, I include a quantity of carrot, otherwise I think the sweetness and beetroot flavour may make it a little too rich.

It is delicious with cold meats or cheese and is also a great alternative to mango chutney as a condiment for a curry.

The recipes for the curry powder and curry paste needed for the pickle can be found here.

Ingredients

3 tbs flavourless cooking oil such as sunflower, canola, groundnut &c.

2 tsp cumin seeds

1 tbs 19th century curry powder

1 tbs 19th century curry paste

2 lbs beetroot, peeled and diced

1 lb carrots peeled and diced

1 med onion, chopped

2 tart apples, peeled, cored and grated

1 ¼ UK pints red wine vinegar

1 ½ lbs sugar

1 ½ tsp salt

Heat the oil in a stockpot or large saucepan – you need it quite hot, don’t be scared, the hotter the better. Toss in the cumin seeds and fry in the hot oil for around 30 seconds, then add the curry powder and paste. Stir and fry for around 2 minutes then add the remaining ingredients. Bring to a steady boil, then make sure the sugar has dissolved before letting it simmer away for around 90 minutes until the beetroot is tender and the vinegar and sugar have formed a thick syrup.

Pot into sterilised jars. The chutney can be eaten as soon as it is cool, but it is best to leave it for a couple of weeks to develop its flavour.


If you like the blogs and podcast I produce, please consider treating me to a virtual coffee or pint, or even a £3 monthly subscription: follow this link for more information.


3 Comments

Filed under Britain, food, General, Indian food, Nineteenth Century, Preserving, Recipes, Vegetables

Favourite Cook Books No. 1: The Be-Ro Book

I thought I would start a series of posts on the cook books – and books of cookery writing – that I think are the best out there. I end the post with my favourite recipe from the book – Butter Tarts.

So many of you might be thinking, why the heck is the first one up Home Recipes with Be-Ro (or as it is known to me, The Be-Ro Book)? Well it is this book that got me into cookery in the first place because it was the one my Mum used when I was growing up. Before I was even thought of my Mum owned a bakery and so we had the luxury of having most things baked or cooked from scratch. This was the go-to book for all the family staples, and when I was off school on holiday and it was raining outside she would entertain me and my brother by giving us pastry trimmings to cut out. As we got older we chose recipes from The Be-Ro Book and cooked them with help from Mum. So I was essentially brought up on this book and its recipes, and it is certainly where I got my enthusiasm for cooking; I have been conditioned to feel at home in the kitchen.

The copy I have is the Centenary Edition, though it doesn’t say anywhere in the book when in was printed. I know that the Be-Ro Flour Company was formed in the 1880s, so it dates the book to the 1980s. My Mum has an even older copy this one, though the recipes are identical. Be-Ro still makes flour and Be-Ro recipe books are still printed today, these days of course you can go onto the Be-Ro website you will find the same recipes, which haven’t changed.

Well almost; the main difference between my copy of The Be-Ro Book and the modern version is that it suffers rather from a post-war rationing complex – most recipes ask for margarine rather than butter. Luckily shortbread escapes this, but buttercream does not. In fact there’s a lot of nasty margarine-based buttercream.

You are forgiven for not holding this book in as high esteem as I do, yet the classics are here, and they bring back great childhood memories. I also have to say it has really good basic skills teaching too, so don’t underrate it.

Many of the recipes are coming back into fashion, especially now that budgets are a little less flexible and the weather is cold and wet. Personal favourites of mine include a really excellent moist and light milk chocolate cake; its secret is the inclusion of evaporated milk and my Mum still bakes it. The steamed sponge puddings are excellent too as are the many tea loaves. It does fail on a terrible recipe for flapjacks that uses cornflakes instead of oats. You can’t win them all though, can you?


If you like the blogs and podcast I produce, please consider treating me to a virtual coffee or pint, or even a £3 monthly subscription: follow this post for more information.


Butter Tarts

In my opinion these butter tarts are the best things in this book, though I have made a few changes to the original recipe. The filling is a mixture of raisins in a sweet caramel sauce that forms a delicious chewy crust as it bakes.

This recipe makes 12 butter tarts.

Ingredients

shortcrust pastry made with 8 oz flour and 4 oz of butter (or butter and lard)

1 oz butter

2 oz caster sugar

2 oz soft dark brown sugar

4 oz raisins

a few drops of vanilla extract

Roll out the pastry thinly and cut out circles using a pastry cutter measuring 3 ½ inches in diameter and line a steep-sided patty pan tray. You can use a tart tin, but I find you can’t get enough of the filling in.

Melt the butter in a saucepan, take off the heat and stir in the remaining ingredients. Add 2 teaspoons of mixture per tray – this should be just enough for 12 tarts.

Bake for 15-20 minutes at 200⁰C (400⁰F) and cool on a wire rack.

91 Comments

Filed under baking, Books, Britain, food, General, Recipes, Teatime

Potted Chicken Livers

Now I know you’re thinking that I am dressing up something French as British by saying ‘potted chicken livers’ instead of pâté but the British have been potting meats like beef, game and salmon, and also liver, for a long time now. Potting helps preserve meat if covered with an airtight layer of clarified butter and kept in a cool place. I am going to write a post very soon on potting meats as well as some other methods of meat preservation soon; the point of this post was for me to write a little diatribe about how the word pâté has the same roots as pot so I could feel a little smug and say that I was right. You know like those people who say raspberry coulis, when they just mean sauce. It turns out that I was a little wrong: my French is worse than pidgin and I just assumed the two words had the same root. I am blaming Elizabeth David for this gaff: she talks of potted chicken livers as though that’s what everyone calls them down her way.

Pot or pâté? Ms David knew which side of her toast was buttered

So as it turns out that the word pâté has the same roots as the words pastry and pasta, coming from Greek words meaning ‘small particles and fine textures’ according Harold McGee in his tome On Food and Cooking. So potted livers have a fine texture as they are a mixture of butter and liver, and pastry is made up of particles of flour and butter. Actually, pâté started life more as a chopped assemblage of meats, rather than the refined smoothness we think of today. Oddly enough pâté and pie eventually became interchangeable words in medieval times because chopped meat was often cooked in pastry on both sides of the English Channel. As I have said before, the food histories of Britain and France blend so much there is sometimes no point in trying to discern between the two.

Anyway, I have chuntered on enough now so I shall give you two recipes for potted chicken livers. First, a couple of mentions on preparation and storage: in this recipe the livers are fried in butter until pink, about 4 or 5 minutes on a high heat. It is very important that they should be cooked through and only slightly pink, not just seared and bloody and rare. I don’t want you coming down with Campylobacter or some other nasty food poisoning microbe. The other thing is to cover your potted livers with a good layer of clarified butter along with a lid or a covering of cling film, especially if being kept in a cold larder. The butter isn’t necessary if you are keeping them in the fridge, but they should be covered with something; butter is best though as it stops the livers from oxidising and turning from rich brown to muddy gray (oxidising is harmless, they’re still good to eat).

To make clarified butter, slowly melt some butter in a saucepan over a low heat. Skim off any froth or foam with a spoon and then decant the butter into a jug making sure none of the butter solids get poured out with it.


If you like the blogs and podcast I produce, please consider treating me to a virtual coffee or pint, or even a £3 monthly subscription: follow this link for more information.


Potted chicken livers with brandy and peppercorns

This is the classic recipe for potted chicken livers, though I find that there is never enough brandy. I use quite a lot compared to many recipes because I like to be able to taste it; brandy is very rich and it can be a bit too much, especially with all that liver and butter too. To counteract this is I add a good dose of piquant pickled green peppercorns which are available at delicatessen’s shops or online. You can of course omit the peppercorns and reduce the amount of brandy if you’d rather.

Ingredients

8 oz chicken livers

6 oz butter

2 to 4 tbs brandy

3 tsp rinsed and drained pickled green peppercorns

salt and black pepper

clarified butter (optional)

Pick over the chicken livers, removing any large pieces of gristle, carefully removing any little green bile ducts that may be left on them. Get a frying pan nice and hot and add 2 ounces of the butter. When the butter stops foaming, add the livers and fry for a total of 4 or 5 minutes, turning them half-way through.

The idea is for the livers to be cooked, but still a little pink, so cut inside one to check after 4 minutes of frying. Tip the livers and butter into a blender or food processor and return the pan to the heat whilst you deglaze it with the brandy. Tip the brandy and burnt bits into the blender along with the rest of the butter and blitz until the required smoothness (I like mine very smooth). Mix in the peppercorns and the seasoning before potting in one large earthenware pot of several smaller ones. Pour over the clarified butter to form an airtight seal.

Potted chicken livers with gin, rosemary and thyme

My attempt at a recipe rather more Scottish in its flavours, which I think works very well. These livers are much more savoury and less rich than in the recipe above: a good shot of gin provides a subtle aromatic bitter hit of juniper, and the fresh herbs mellow it nicely.

The method is exactly the same as the above except 2 teaspoons each of finely chopped rosemary and thyme are fried along with the livers. Of course exchange the brandy for the gin and omit the pickled peppercorns.

10 Comments

Filed under Britain, food, French Cookery, history, Meat, Preserving, Recipes